After a long drive from my home in Virginia to Gainesville, FL, I was anxious to get moving and do some visiting. It was a beautiful day, mid 70’s and blue skies, as I headed to Melrose, FL to visit instrument maker David Beede. I’ve known David and his wife Julie for many years, but have never had a chance to visit them in their native habitat! Unfortunately Julie wasn’t home. She is the Volunteer Chair of Education for Sustainable Cambodia and was on a trip to Cambodia.
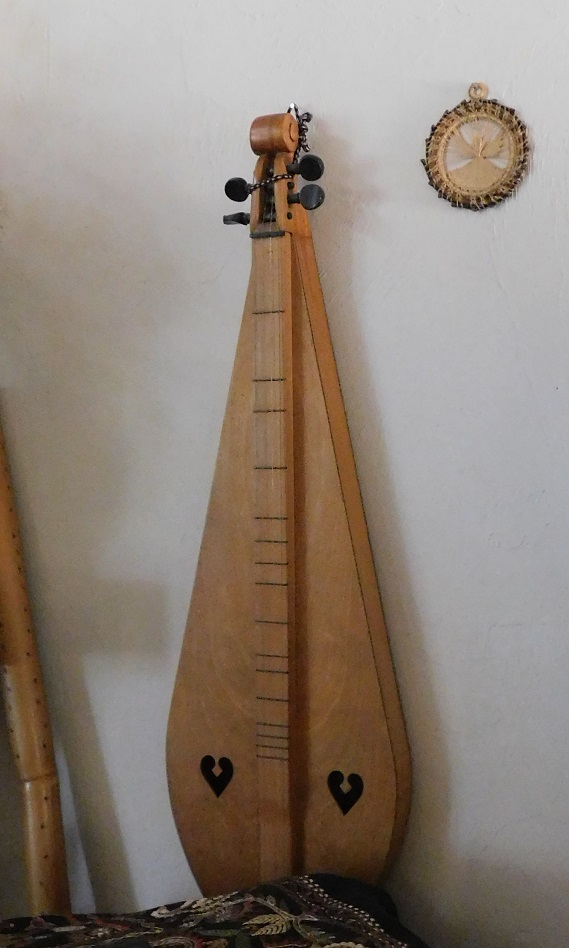
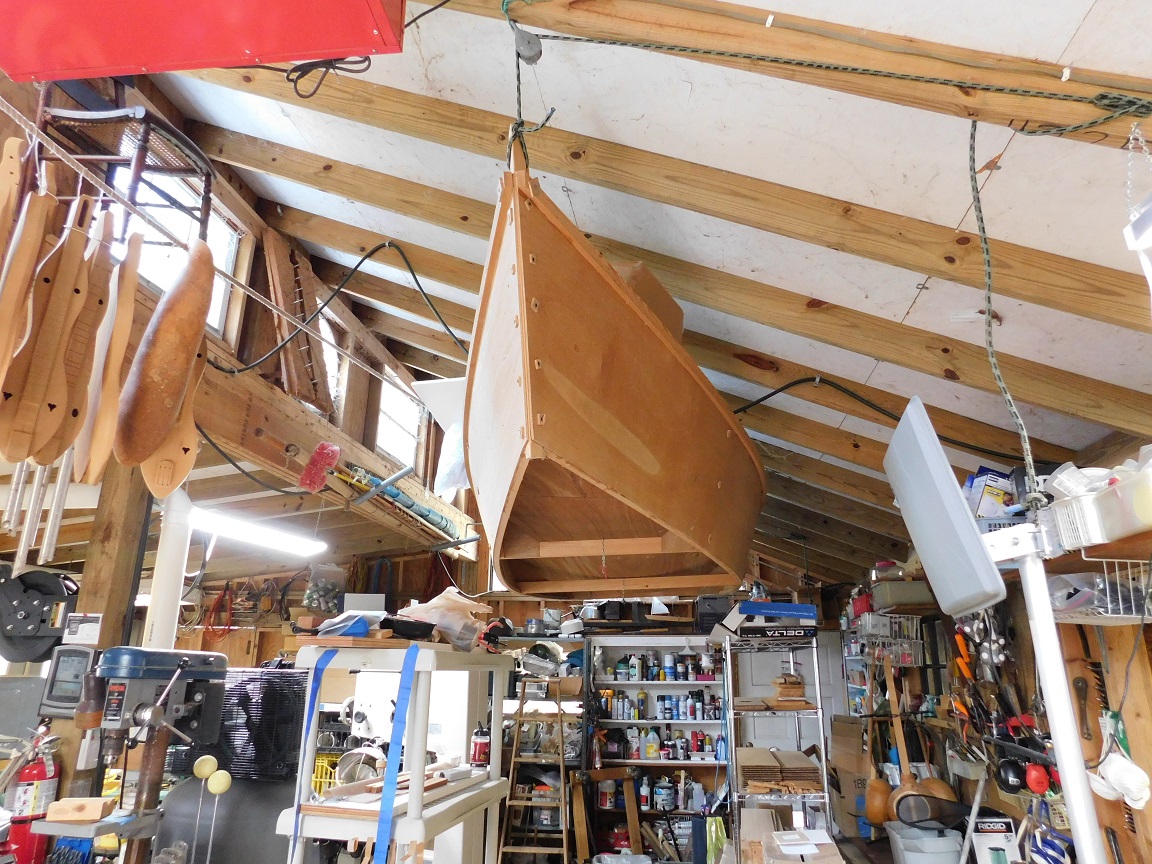
David’s home and shop are in a beautiful location on a small lake. We started the tour in his house where he showed me a couple of beautiful dulcimers he had made, including the first one he had ever built, which had just returned to him from its original owner and is now hanging on the wall. It still looks great.
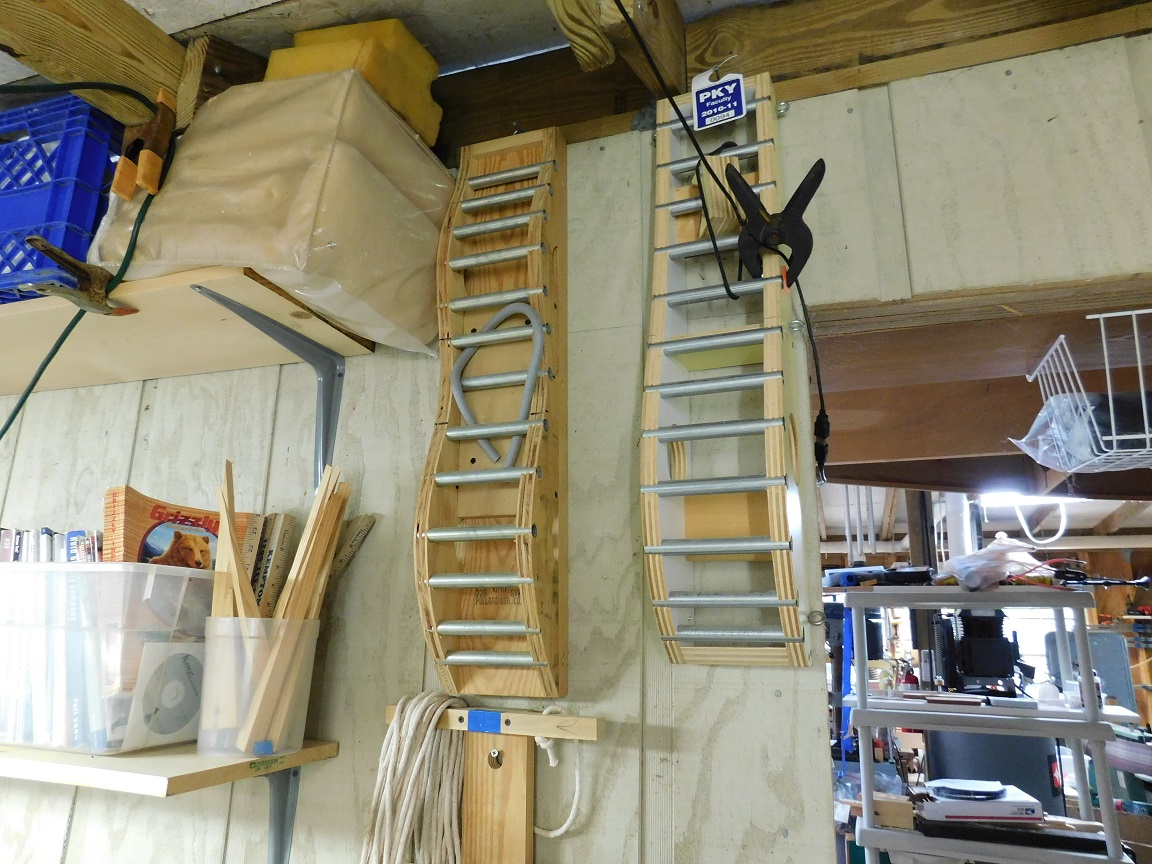
Right up the hill from David’s house is his shop, which is pretty typical of any woodworker’s shop. Tools hanging on the walls, racks of lumber, and custom jigs everywhere that he machines on a ShopBot PRS.
One thing that might not be quite as common in most shops, but seemed natural to me, is a boat hanging from the ceiling. Along with being a world-class dulcimer builder, David is a boat builder and designer.
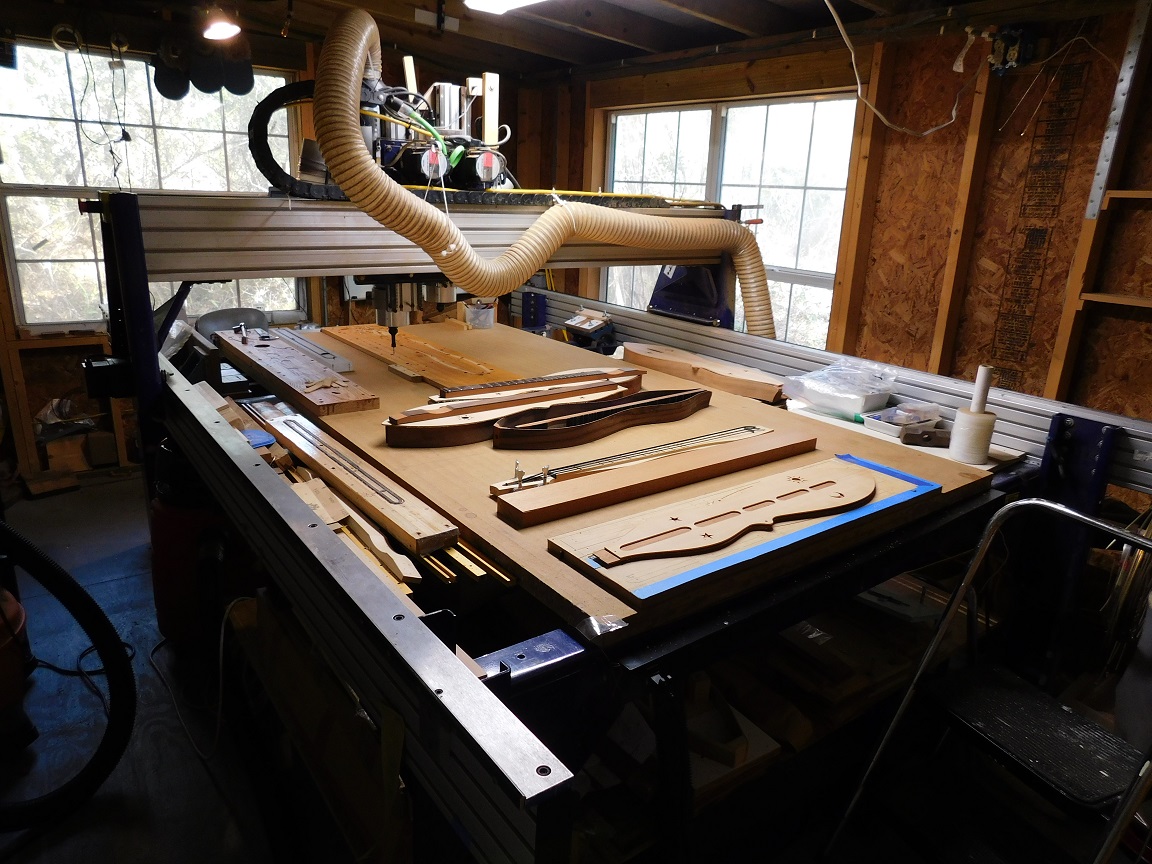
The main shop has the traditional stationary power tools and hand tools you would find in most musical instrument builder’s shops, but in the back is the ShopBot that David uses in all the parts of his building process. This is the second ShopBot David has owned, upgrading from his original PR.
David is an expert at creating jigs and setups to help accurately cut his parts. One of my favorite is an “analog” system for changing the dust collection hose connection for his dual Z-axis tool (as seen in the short video below). Moving an axis up to the top of its motion moves a wooden lever which slides a gate to switch the hose connection from one axis to the other. Very clever!
David has automated a lot of his processes using series of custom cuts and macros. Many of them do accurate repositioning of the cutter to match the location of the jig on his table, allowing him to keep the jigs in place and not to have to keep mounting and re-mounting them. The list of these custom cuts on the whiteboard is impressive!
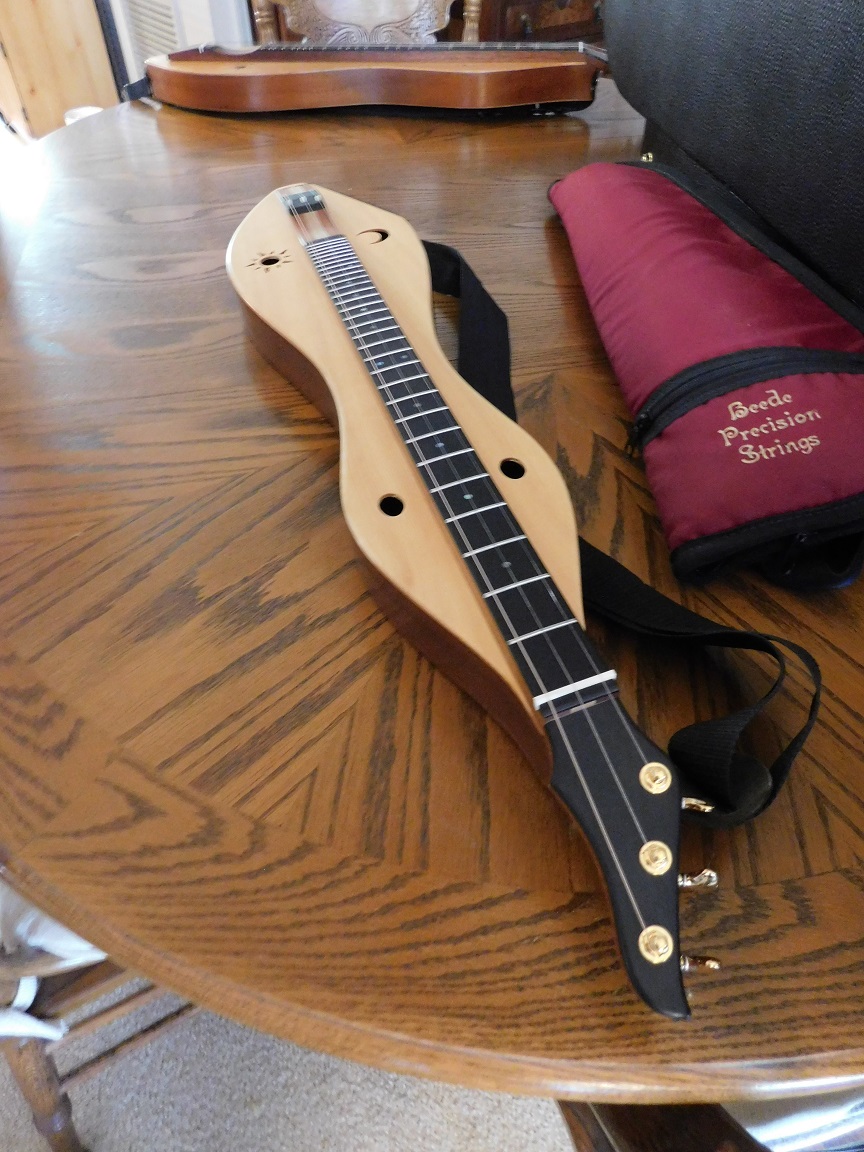
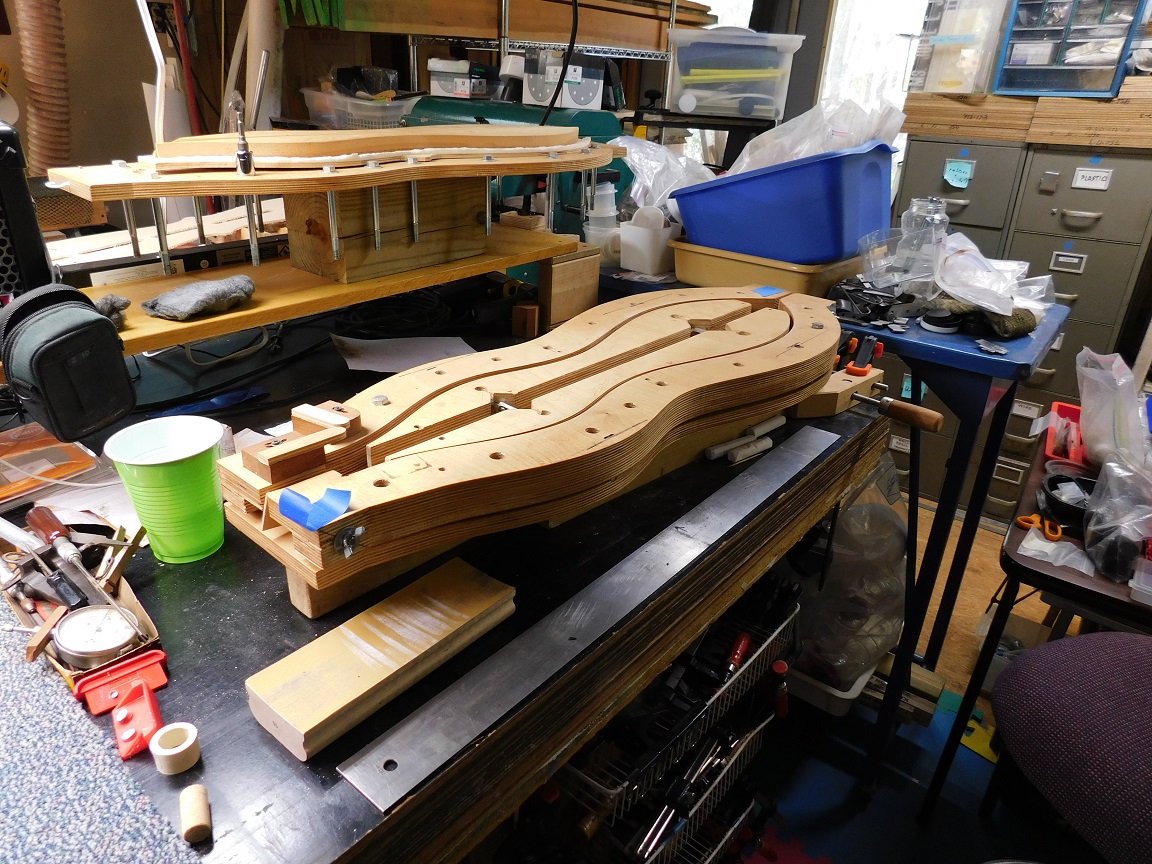
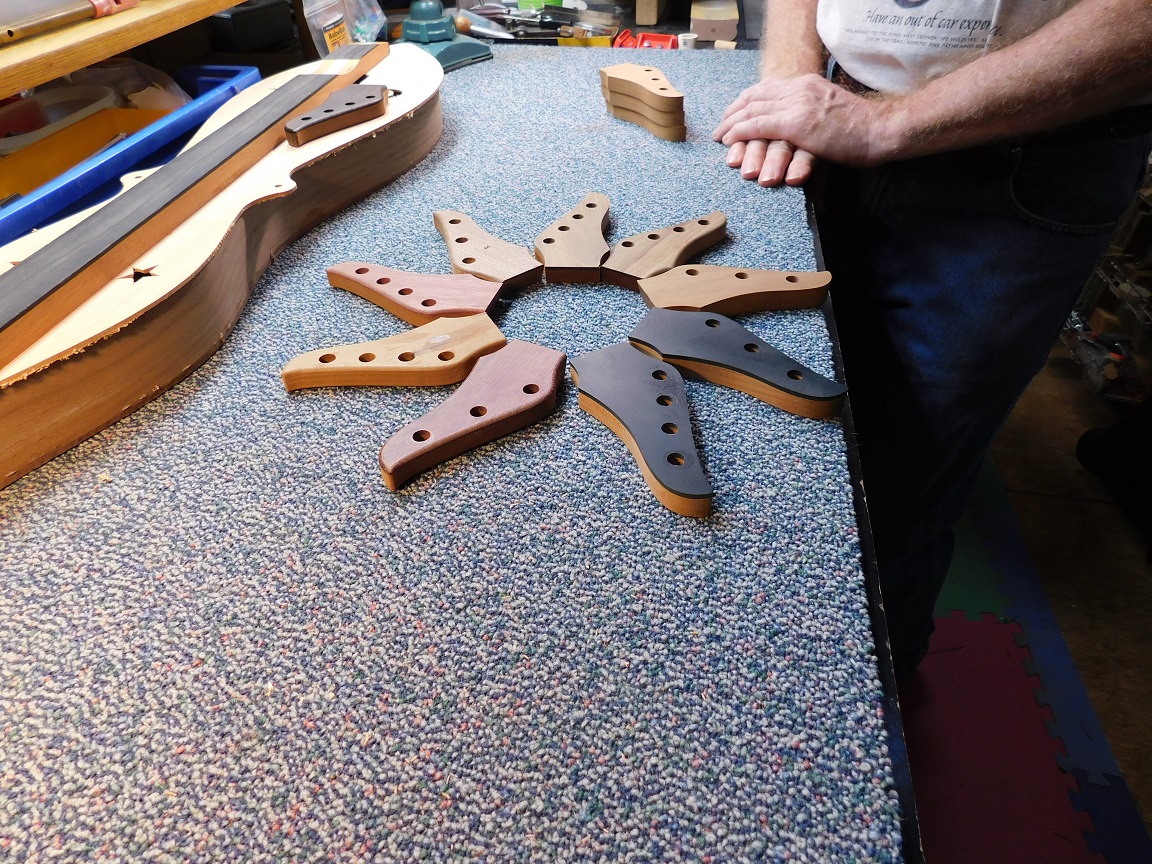
Most of the instruments that David builds are constructed the way a guitar might be, with separate sides, top, and back made from cedar and exotic woods. He also, however, makes what is called a “clamshell” dulcimer, which is carved from solid blocks of wood rather than from thin planks and glued together.
It was hard to leave David’s shop, it was a beautiful location and a very enjoyable visit, but I had another shop to visit about an hour away—Tim Lucas in Bell, Florida.
Do you have digital fabrication equipment such as a ShopBot CNC machine, laser cutter, and/or a 3D printer, and an interest in education? Do you want to know more about the software and machines available to you? Are you a facilitator of a digital FabLab or Makerspace who would like to join a support network of other educators to discuss project-based learning, lesson plans, and how to address standards? Then this hands-on workshop is for you! ShopBot’s Sallye Coyle will be facilitating a multi-day “Digital Fabrication in Education” workshop at ShopBot headquarters in Durham, NC.
This 2½ day workshop will begin with ShopBot CNC machines. Using VCarve Pro CAD/CAM software, we will design and prepare files for machining on a ShopBot. The sessions will then move to cross-platform training—demonstrating how designs originally intended for one digital fabrication tool can be prepared for use on another platform (example: CNC to laser or vinyl cutter, 3D printer to CNC machine). Topics will include design flow, 2D vs. 3D Computer Aided Design (CAD) and Machining (CAM) software, and how to evaluate which digital fabrication process is best for a desired outcome. The final half day will return to ShopBot tools, providing more advanced information for those charged with installing, maintaining, or getting the most out of their CNC machine.
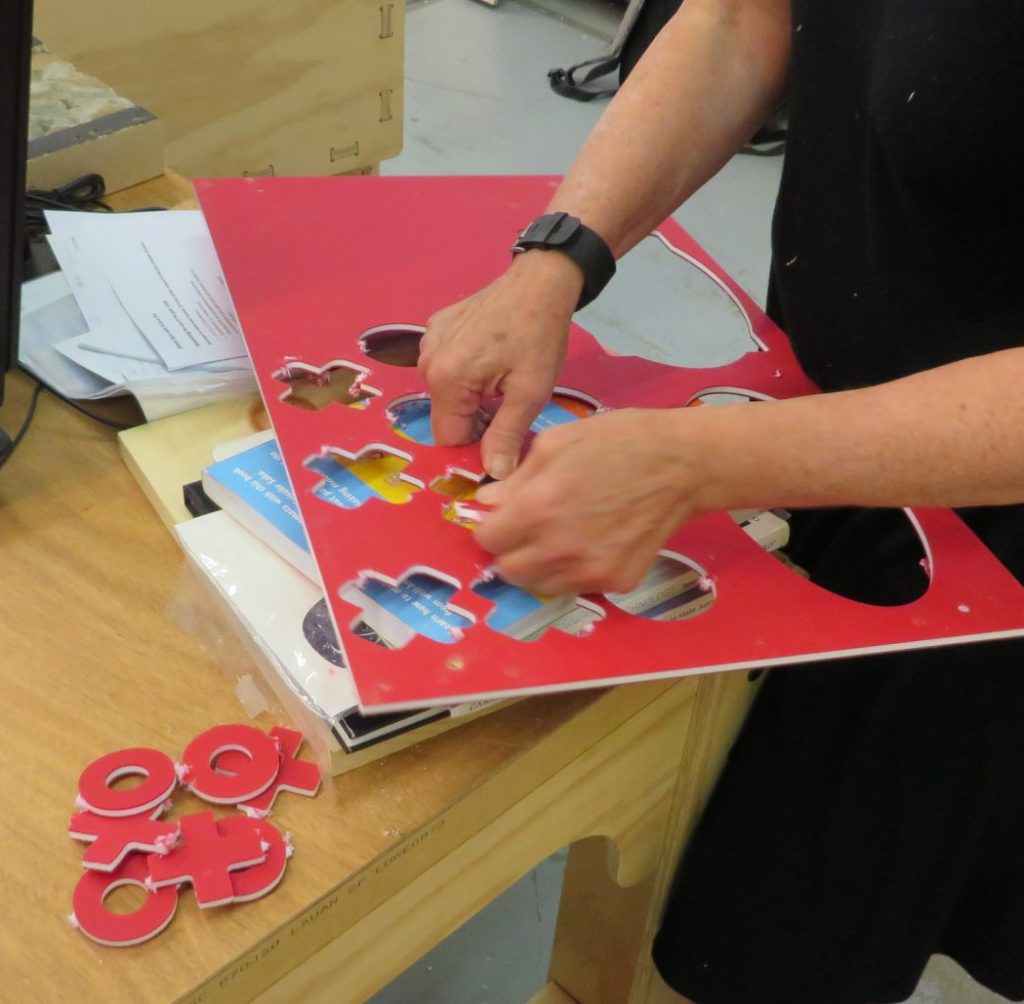
Workshop student punches out custom tic-tac-toe pieces cut on a ShopBot.
While you do not have to have CNC or CAD/CAM experience, familiarity with some aspect of digital fabrication would be helpful. There will be opportunities for show and tell, and at least one round table discussion, so you should come prepared with questions and/or examples of how to use digital fabrication in education. Working in collaboration with your fellow attendees, you should leave the workshop with hands-on projects and ideas to address topics related to STEM, CTE, the Arts, Common Core, and/or Next Generation Science Standards.
Three sessions offered
May 18 – 20, June 8 – 10 and July 20 – 22.
On-site at the ShopBot facility in Durham, NC
Thursday 9-5
Thursday evening open hours to work on your own project (optional)
Friday 9 – 5
Saturday 9-1
2.5 days (2 CEU credits)
$400 per computer seat (we can have up to 2 people per computer)
How to Sign Up
If you’re interested in attending the workshop, send us an email at info@shopbottools.com with your name, contact details, and a couple of sentences about your experience level. And of course, questions are welcome!
Sallye Coyle is experiencing how rapid advances in computers, software, and technology have changed the way education is served by digital fabrication spaces. She has traveled extensively in the US and the world, working with schools, FabLabs, TechShops, and makerspaces to “train the trainers” in how to use the digital fabrication technology, as well as how to build, maintain, and use ShopBot tools.
Special guests
We are working on making a suite of other digital fabrication tools (and their handlers) available on-site for the workshop. These tools include: a vinyl cutter, laser cutter, and an Ultimaker 3D printer.
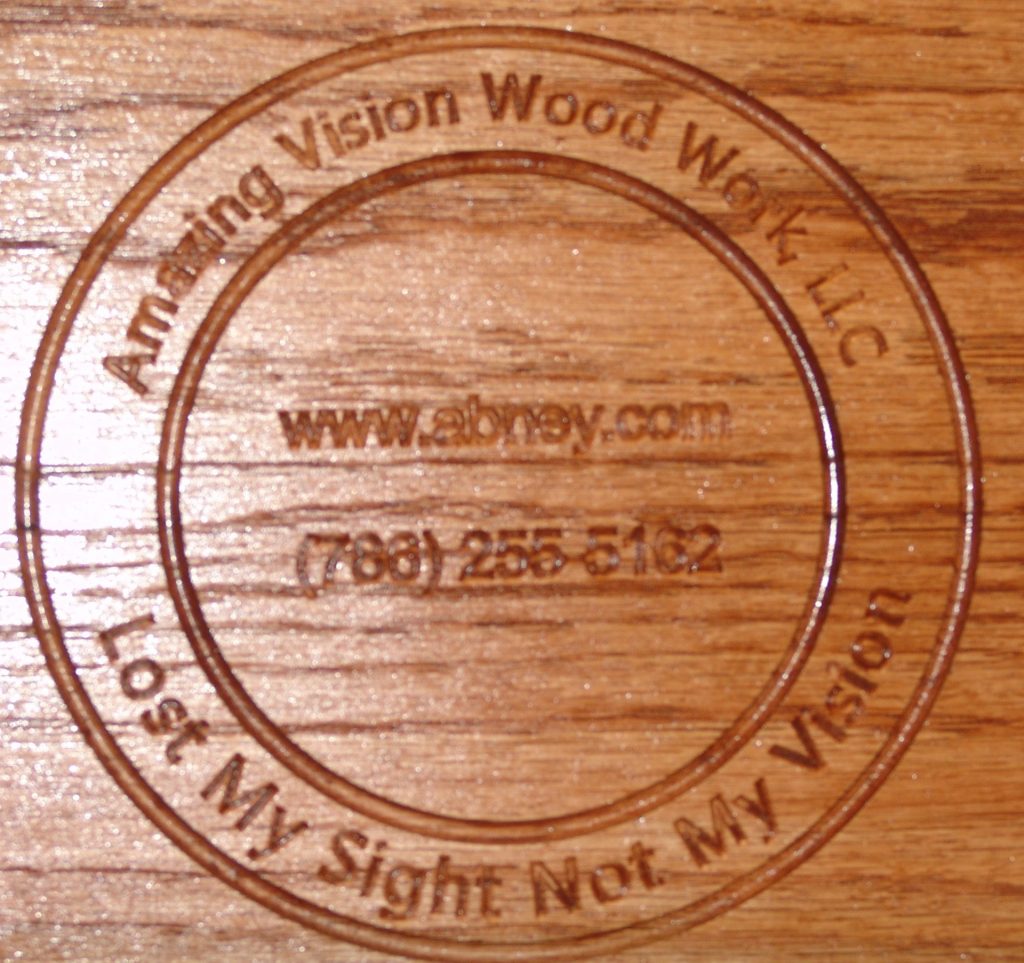
As a US Army veteran with 28 years of service, Jerry Abney has never been one to back down from a challenge. Upon return from a tour in Iraq in 2004, the vision in his right eye deteriorated to the point of blindness. The very next year, he was diagnosed with retinoschisis of the left eye, leaving him with 5% of his original sight. Due to his vision loss, Jerry had to rethink his approach to most aspects of his life, including hobbies, work, and exercise. As part of the adjustment to his change, Jerry found himself at the VA’s Blind Rehabilitation Center in Birmingham, AL for computer training when he noted the sounds of a woodworking course next door. Intrigued, he introduced the idea of working with wood to his counselor, who agreed that the challenge associated with turning an idea into a tangible result was one tailor-made for Jerry. His natural curiosity for how things work coupled with his determination and discipline could let him explore new ways to make things, keeping him physically and intellectually stimulated– an attitude he has applied towards a number of different activities that most would say are impossible: he’s even figured out ways to water ski, scuba dive, and rock climb. Today, Jerry uses his ShopBot to reverse-engineer objects he finds interesting, making them work on his own terms. He runs a woodworking company, Amazing Vision Wood Work, out of his Miami home where he is always working on new projects and improving his technique.
Jerry combines a number of different woodworking methods, including lathing and CNC to make products like this bowl.
Jerry also makes signs and plaques for local businesses, servicepeople, and VA offices.
New Techniques
One of the advantages to Jerry’s experiences is that he’s blazing a trail in CNC and woodworking. Through Amazing Vision, he’s devised methods for working on a computer (he currently uses ZoomText for reading, typing and working in software) that work around the constraints of limited vision and allow him to cut on his ShopBot. He also operates a number of different machines and can impart his knowledge on to anyone with limited vision and an interest in woodworking.
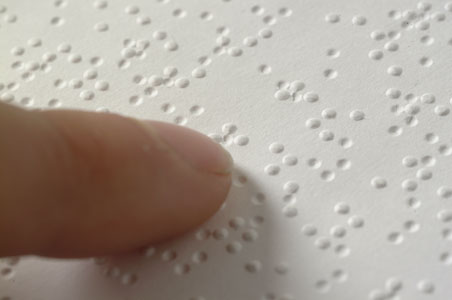
Machining in Braille
Braille is most commonly embossed into paper, since machining it can be difficult.
One of the most interesting developments to come out of Jerry’s experiences, however, is his work in machining Braille, the writing system used by the blind or visually impaired. Rooted in military history, it’s based on a code called “night writing” that was used by 19th century soldiers to communicate silently in the dark. Due to the relative letter size and space needed to form words, machining Braille requires a certain level of precision and patience. While there are resources for machining Braille, they require both expensive licensed software and tool additions that cost thousands of dollars, which are typically out of reach for the average hobbyist or small business owner.
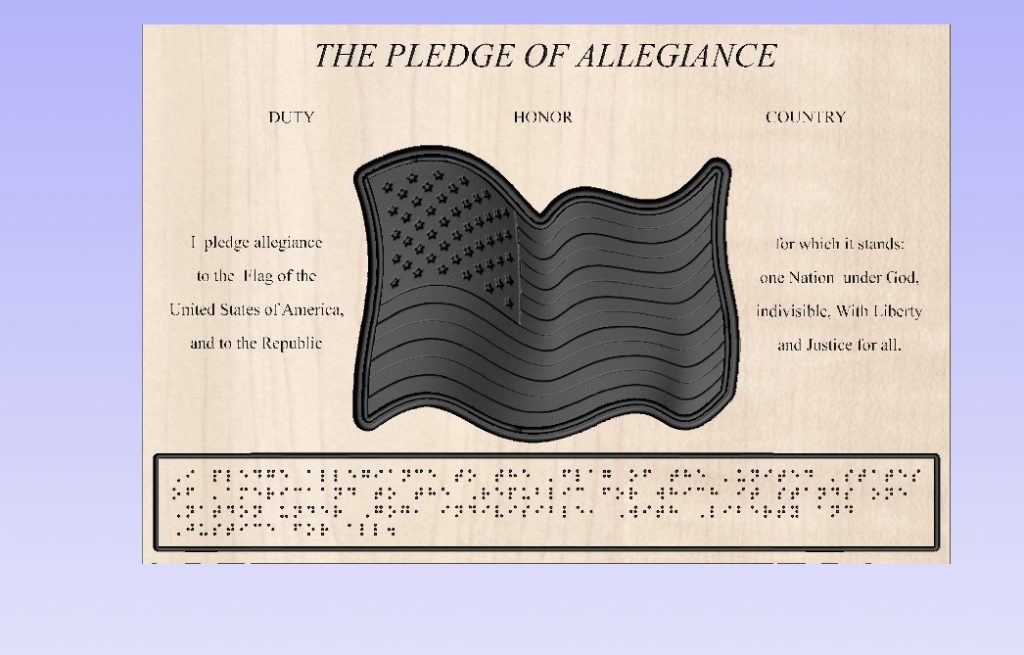
In his usual fashion, Jerry Abney refuses to adhere to that status quo. He is trying to find a way to make the process available for the average user, and has been working with ShopBot on some solutions. He has successfully cut Braille on several projects, but it can be incredibly time-consuming and mentally exhausting to even design a few words. One plaque produced by Amazing Vision includes an American flag and the Pledge of Allegiance in both Latin and Braille alphabets. Because he had to design the cells manually, the Braille portion took him longer than the entire rest of the project multiple times over, but for Jerry, the thought of eventually making the process more accessible & cost effective is worth it.
Though it is only composed of dots, the placement and order of the Braille Pledge of Allegiance took Jerry countless hours of concentration and patience.
“Lost My Sight, Not My Vision”
While people may enjoy the things he makes, the product itself isn’t what drives Jerry. It’s the idea of coming across something interesting and finding a way to do it on his terms. This is perhaps best displayed in his company’s motto, “Lost My Sight, Not My Vision”, which he carves into each of his final products as a stamp of authenticity. For Jerry, these pieces may each start out as raw material, but with patience and dedication they can turn into something wonderful.
The approximate route for the first leg of Bill’s Digital Dirty Jobs Tour.
At the end of this month, I’ll be driving to Austin, Texas and back, making the first couple of Dirty Digital Jobs visits. I’m awfully sick of winter so my plan is to take the southern route along the panhandle of Florida and the Gulf Coast on the way there–the warm weather will be a welcome change!.
I’ve only got a couple of days to get to Austin in time for Wayne Locke’s ShopBot User Group taking place March 3-4 so it will be a pretty hard push, but I already have visits scheduled with longtime ShopBotter and musical instrument maker, David Beede, woodworker Tim Lucas, and sculptor Kevin Gallup. If the timing works out, I’ve got a couple more stops that I want to make on the way there and will keep my fingers crossed that I can make them happen. I’ll post about my visits on the ShopBot blog as I go, so keep your eye out for updates.
Wayne has been hosting ShopBot events longer than anyone, but I’ve never had a chance to go to it before, so I’m really looking forward to seeing old Texas friends and learning some new tricks. For a couple of days afterwards I’ll be visiting shops around Austin, including the amazing Techshop in Round Rock that’s connected to a Lowe’s. If you’re in Austin and looking for cheap labor for a couple of hours, let me know and I’ll try to fit you in.
At the end of the week we’ll be setting up for SXSW Create taking place March 10-12, where my son will meet me for the trip home. I’ve always wanted to visit PieLab in Greensboro, Alabama and re-visit Rural Studio and the $20k House project, so we may try to take a jog up that way on the way home.
Whichever way I go, I’ll be looking for more Dirty Digital Jobs to do, so if you’re generally between Austin, Texas and the Eastern Shore of Virginia, drop me a line at info@shopbottools.com and we’ll see what we can work out. And most importantly, keep the coffee pot on!
ShopBot Tools is excited to be a part of Construct3D 2017 at Duke University in Durham, the first national conference on digital fabrication to focus entirely on 3D printing for educators. This inaugural event will be held May 5-7, and addresses a wide range of topics including fostering student engagement, supporting research, and understanding the role of 21st century technology in manufacturing. Registration is currently open on their website through April 28th.
With this major conference being held in Durham, ShopBot is offering Construct3D attendees an exclusive chance to stop by for a tour of the headquarters and an exclusive 3-hour ShopBot CNC training session, all hosted by our own ShopBot Sallye!
There are more details still to come; if you’re interested in paying ShopBot a visit, email us at marketing@shopbottools.com, check back here, and follow us on social media for all the latest updates!
Andy Brooks may not work in IT anymore, but troubleshooting problems is still a big part of his job. His company, Oak Branch Manufacturing, offers prototyping, 3D cutting, architectural design, engraving, and signage for a growing list of high-profile clients and companies in his home state of Georgia and all across the country.
Like a number of career manufacturers and small business owners, Brooks’ career in manufacturing started off as a side project. He had purchased his first ShopBot, a PRTalpha 96, in 2005 while he was working in information technology for a local Georgia company. At that time, he would cut projects and prototypes for himself and the occasional client, which helped him to hone his skills on the machine.
After several years of cutting pieces for clients, Andy realized that not only were his projects becoming more complex, but he was building a reputation as a quality a CNC shop for hire in the Gainesville area. In fact, by 2012 he had enough clients and business to quit his day job and go into full-time contracting. From those first cuts up until 2013, the PRTalpha was the cornerstone of his company, then known as Brooks CNC.
“Up until the last few years, the ShopBot was essentially the sole workhorse of my shop,” says Brooks. “I used it to cut just about every project that came in.”
As business increased further, the company brought on a second employee, and purchased a second ShopBot, this time a more portable Desktop that could be used to experiment and expand capabilities. Today, Oak Branch operates out of its own building with a number of employees and houses a range of digital fabrication products, including a large format laser cutter for engraving and signage. They manufacture on just about every scale imaginable, from one-offs and walk-ins like local signs to huge contracts for organizations like Ronald McDonald House® and the Atlanta Hawks basketball team.
Behind the Scenes on a Big Project
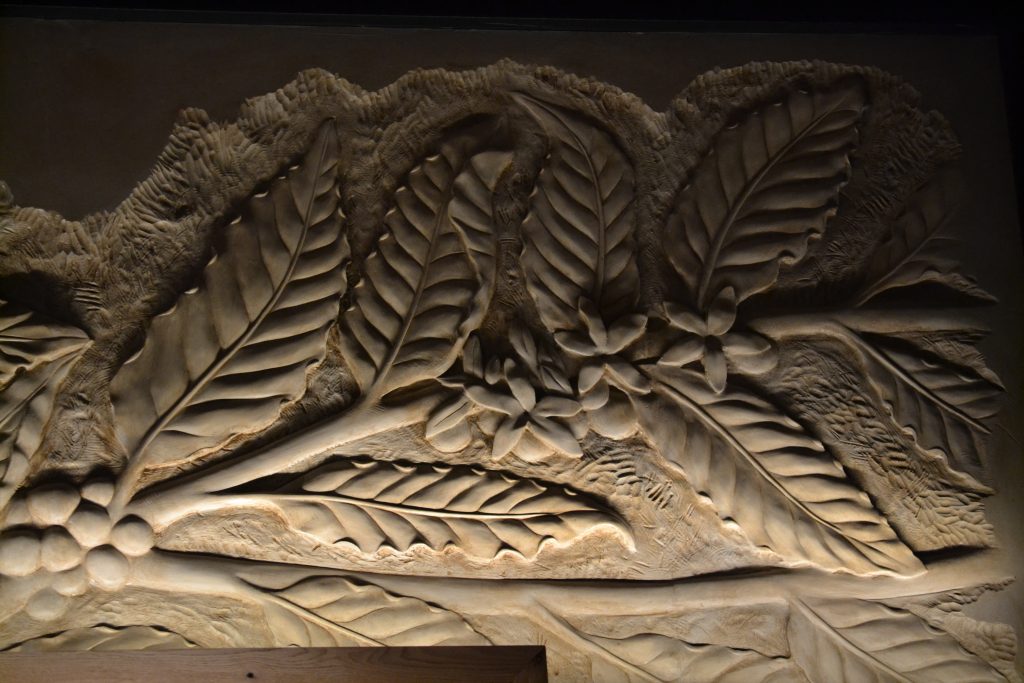
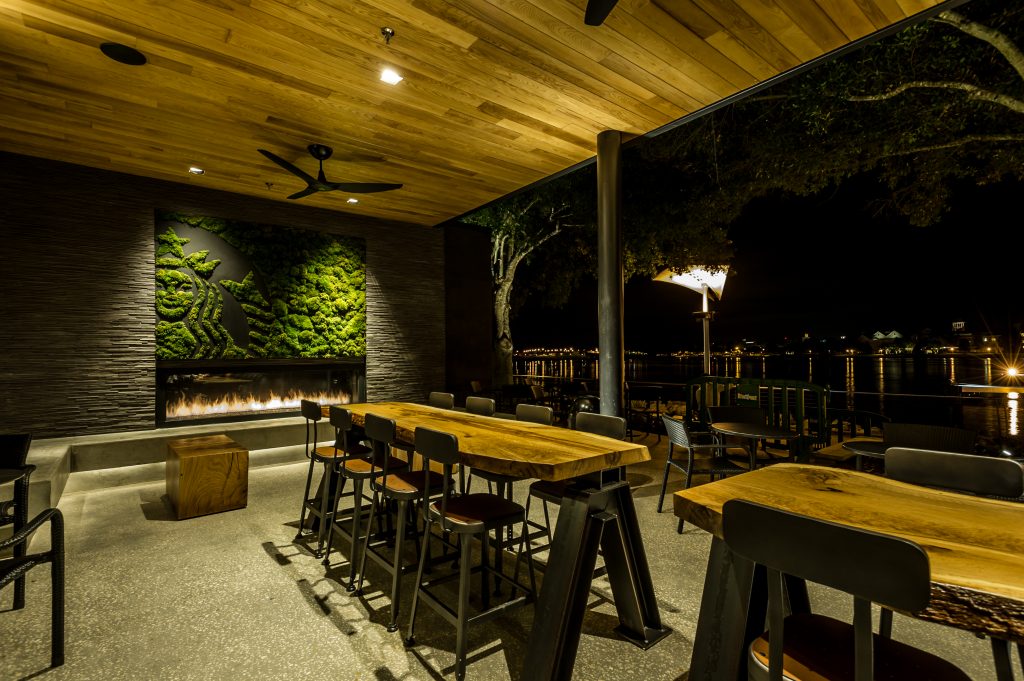
Perhaps the largest and most complex project that Oak Branch has been involved with to date is the installation at Starbucks® Downtown Disney in Orlando, FL. The job required coordination with the Walt Disney World Resort, the architect, and countless other contractors who were hired to work on the project. This particular store wanted to highlight the company’s commitment to green living and environmental concerns, and Oak Branch was challenged with making several big features into a reality.
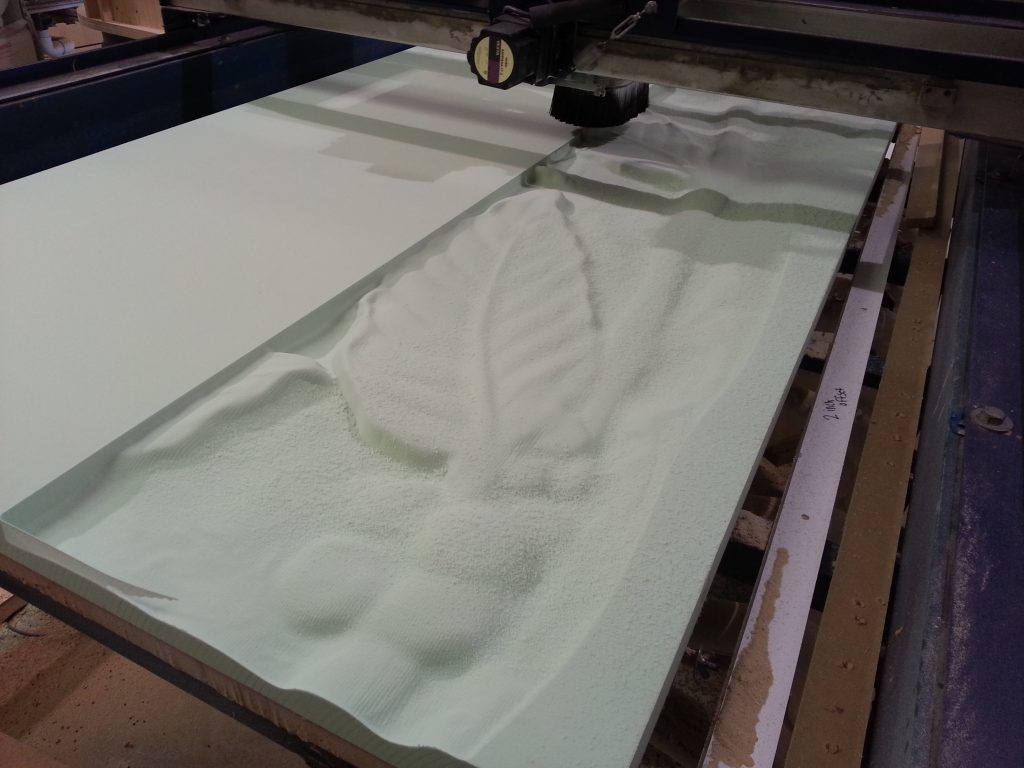
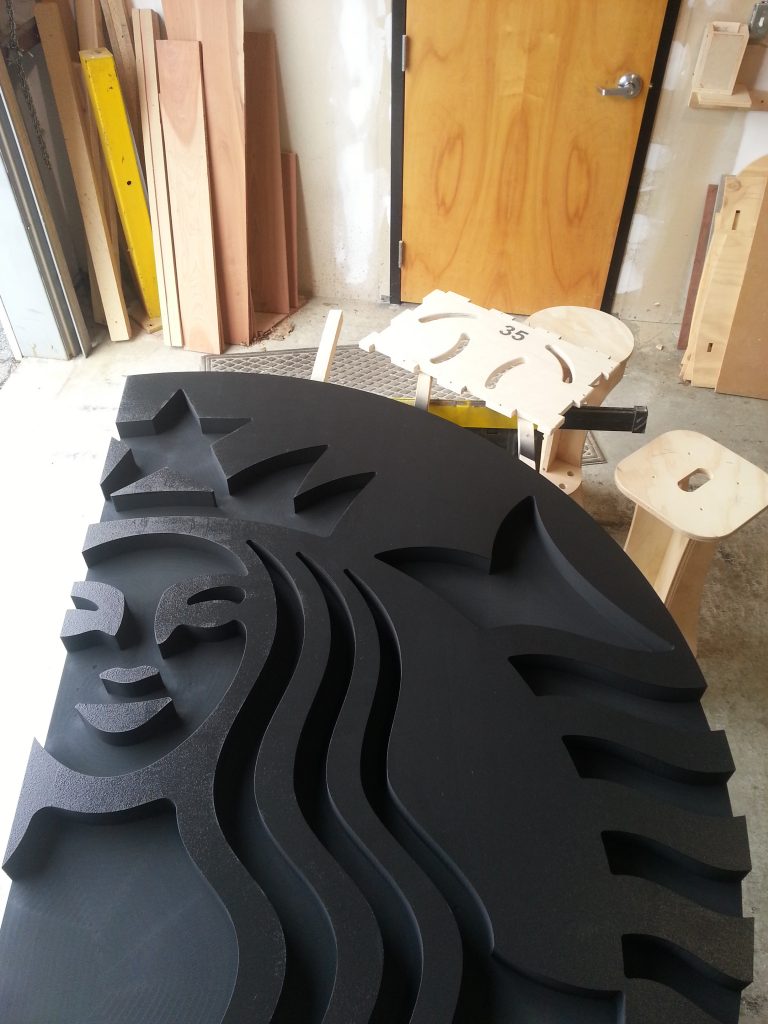
The first part of the project was the wall detail that would serve as the backdrop for the counter in the shop. Supplied with only the what, it was up to Oak Branch to figure out the how. As a first step, the general design was cut into the material on the shop PRTalpha.
As a start, the router made several passes on the material to get the majority of the design cut.
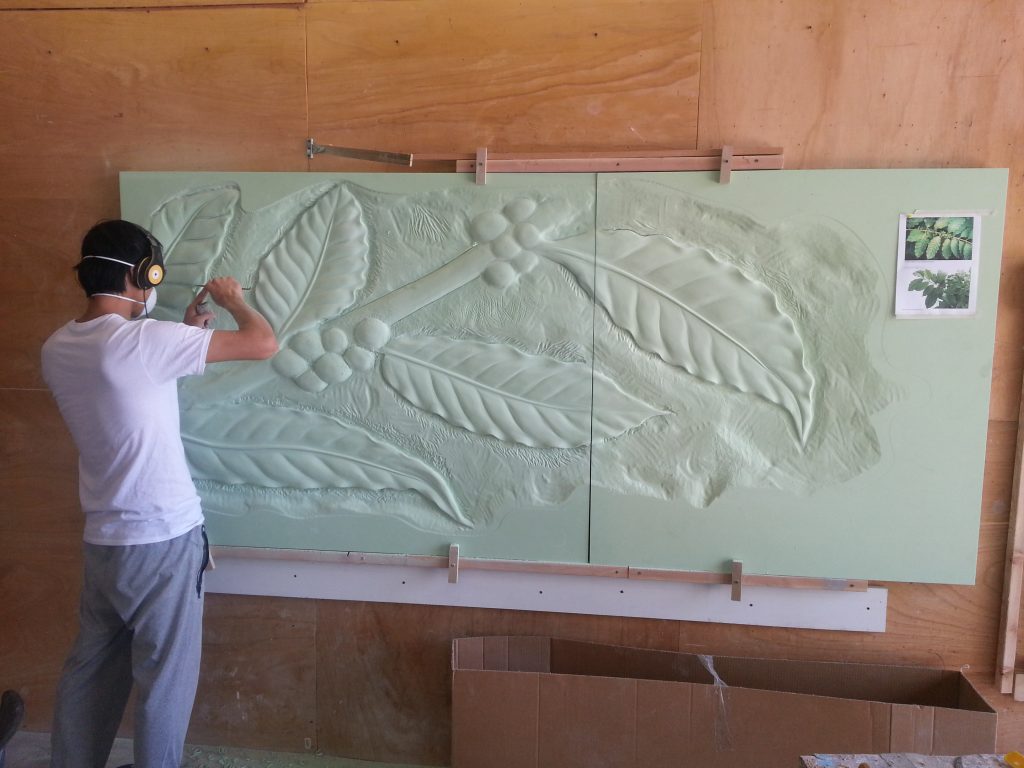
Next, the individual panels were assembled and more detail was added by hand, based on pictures of actual plant life and foliage.
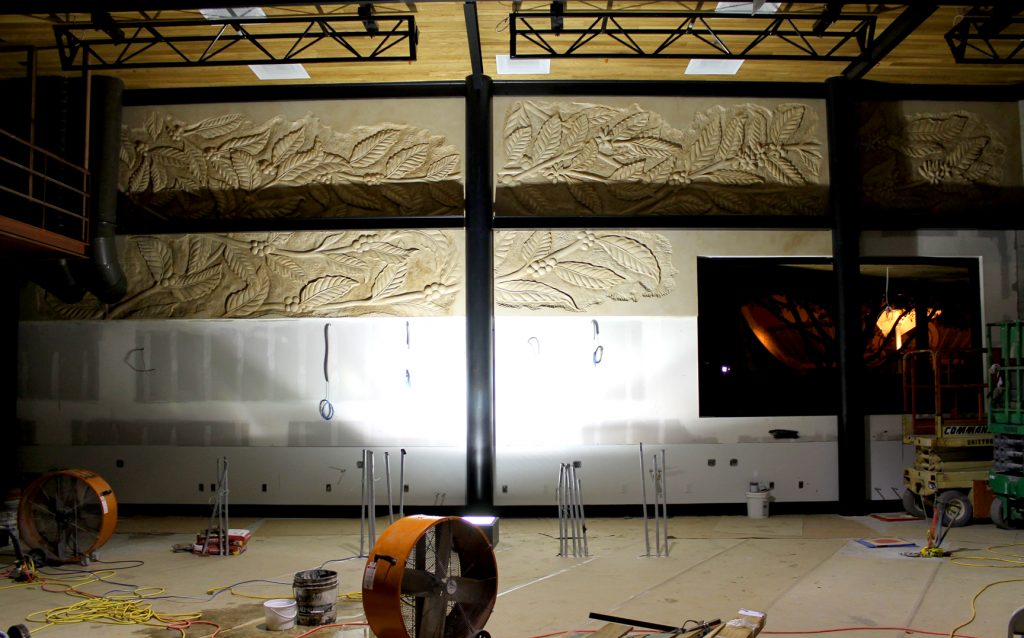
Once the panels were completed and finished, they were shipped to Florida where they were mounted in conjunction with the actual construction efforts that were already underway. The finished product provided a backdrop to the menu, and when lit from an angle, really shows the amount of painstaking detail that went into the design.
Early stages of installation at Starbucks Downtown Disney.
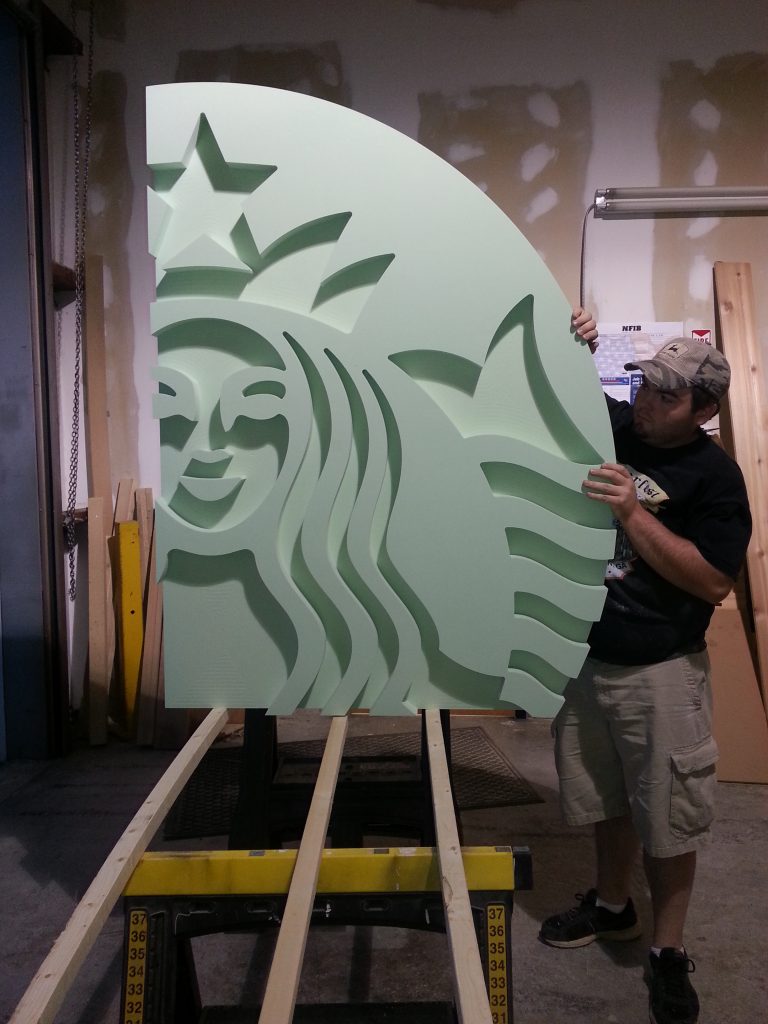
In addition to the menu backdrop, a number of other details were cut throughout the shop, including the store’s “Welcome” sign and logo, both of which were carved directly into the wall.
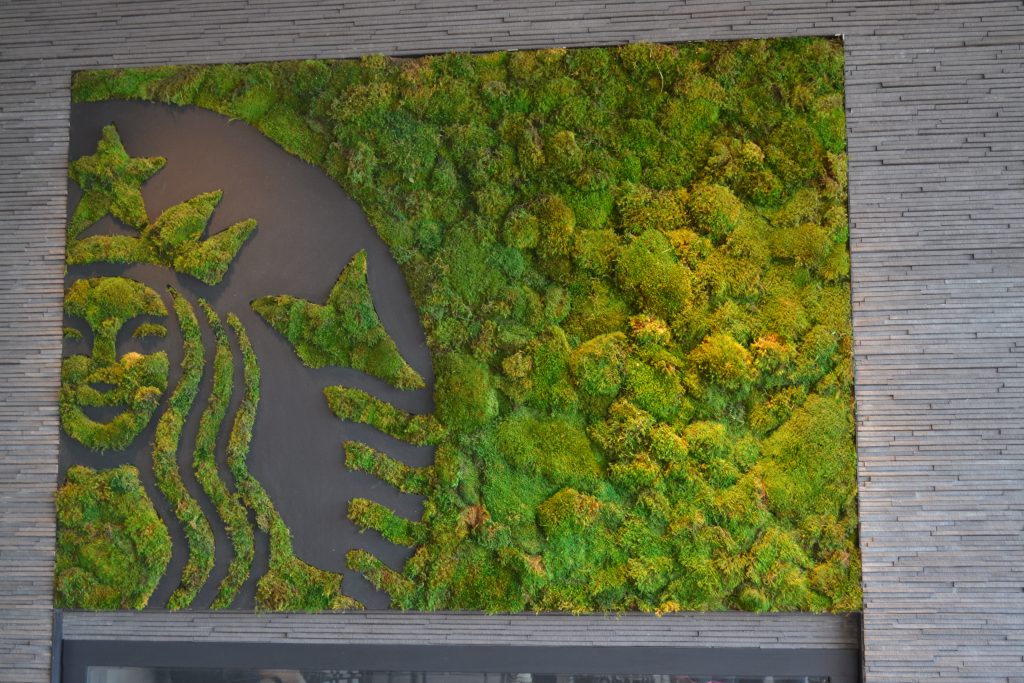
Perhaps the most ambitious request to come from the client was a wall installation that both displayed the Starbucks logo but also incorporated real plant life. The result was a “living wall”, which was painted with sod and gave the company logo a mossy look that fit in with the rest of the store’s green and brown eco motif.
Much like the counter backdrop, the logo was cut in sections and assembled.
It was then painted to match the decor of the rest of the interior design.
The wall was mounted and the inlays were filled with actual moss to create a living, breathing wall.
The final product: the living wall anticipates its first customers upon opening.
Modify Furniture is joining forces with ShopBot Tools to launch the first ever Design Challenge! Whether you’re a seasoned designer or new to 3D, here’s your chance to show off your creative side, get your name out there, and even win a cool prize in the process. Entrants will be designing an invisibin™ drop-in to add form, function, or flair to existing Modify furniture designs. To see how it works, check out the video below. For entry information, check out the instructions at the end of this post.
The Modify Furniture Philosophy
Anyone who’s ever had to furnish a space knows that there’s more to it than just picking out matching colors. There are careers, philosophies and entire disciplines dedicated to the placement and arrangement of furniture. Marci Klein of Modify Furniture is looking to rethink all of that through an engaging, collaborative, and fully customizable approach to furniture.
Solutions-Oriented Design
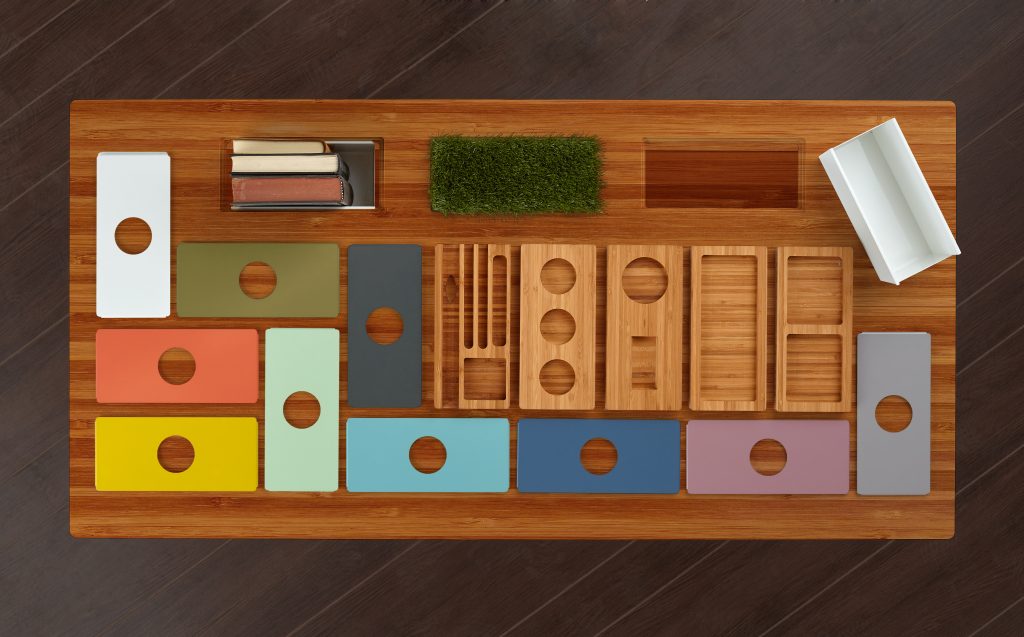
Marci Klein created Modify Furniture in the spirit of customization & simplicity.
The custom design elements made possible by Modify are the result of Klein’s time in medical school. While there, she was looking for a way to furnish her tiny dorm without sacrificing form, function, and space. Rather than purchasing a desk from Ikea and hoping it would fit, she realized that furniture comprised of smaller units could be modified without the purchase of entirely new products. In addition, things like color and texture could be changed easily to allow the furniture to evolve with the room’s layout. With these first designs, Modify Furniture was born.
A few years later, Klein and her husband were able to purchase a used 5′ x 10′ ShopBot from eBay, which has been invaluable in not only cutting furniture elements, but also the prototyping and production of new designs and products. The ShopBot has also allowed Modify to produce home decor and smaller products meant to complement existing offerings. Klein’s experience in the medical world still influences the way Modify operates today: the company’s furniture and designs are meant to benefit both the consumer and designer through simplicity, customization, and a solutions-oriented approach.
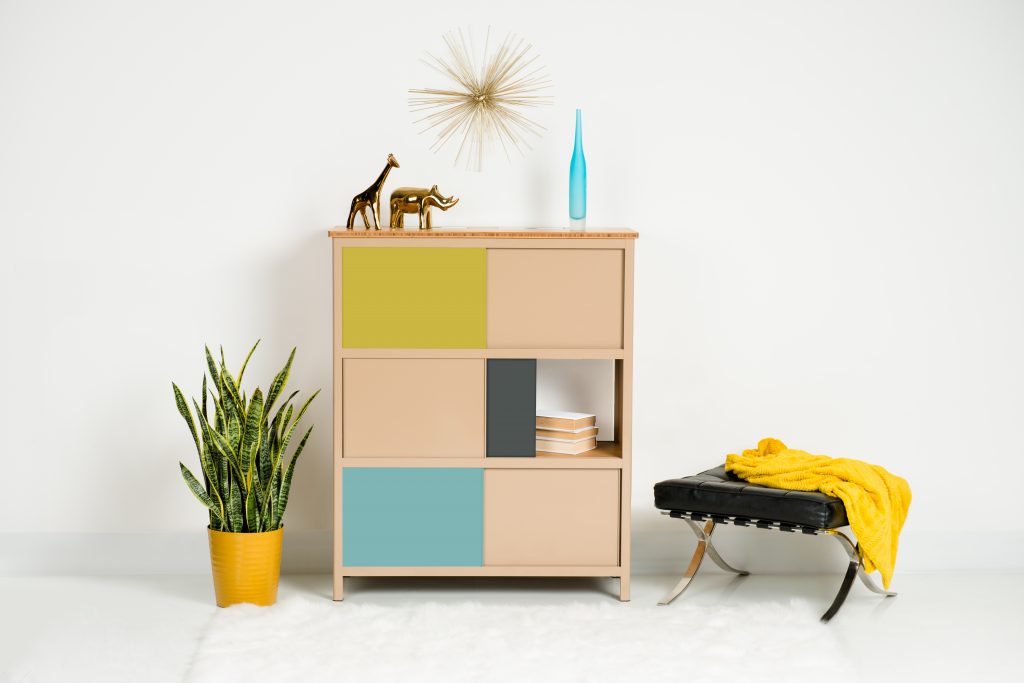
The ShopBot PRSalpha has allowed Modify Furniture to explore accessories, prototypes, and complementary home decor items.
The Challenge
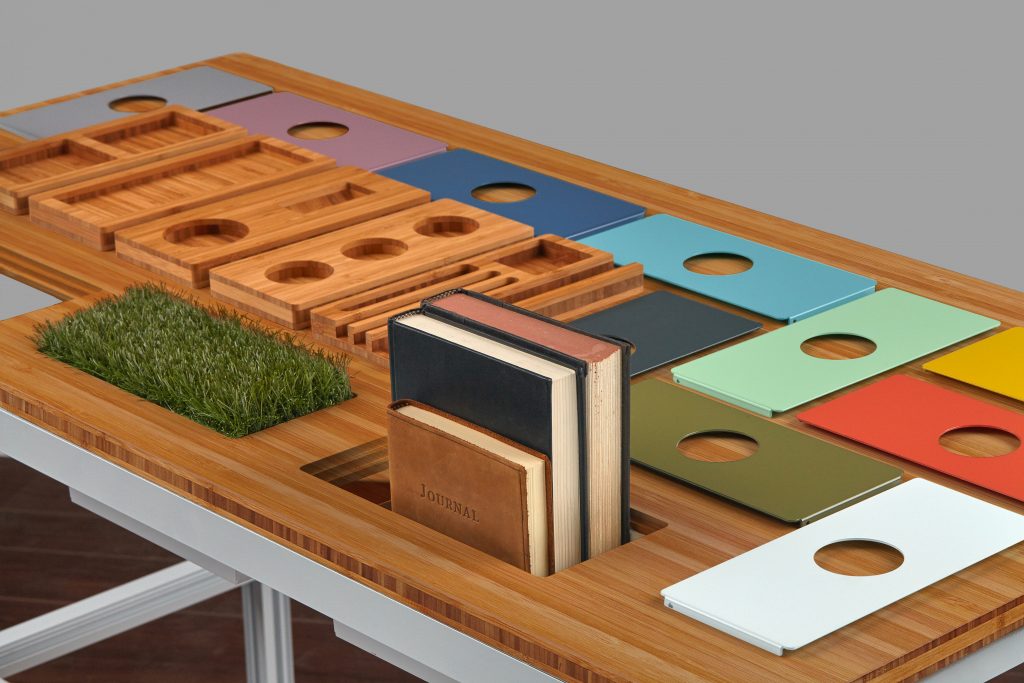
One of the unique features of the Modify model is the use of precisely cut areas that can customize the piece with minimal cost and effort. The standard dimensions of these cuts allow for a wide array of drop-ins that can be used for organization, aesthetic changes, or personalization. The 4″ x 8″ drop-in pieces can be cut on a ShopBot or CNC machine of just about any size. There’s no limit to what one can do with their Modify surface!
The invisibin™ system allows for an endless combination of colors, ideas and uses.
Entering the Competition
Modify Furniture is asking designers of all skill levels to help get everyone excited about modular furniture through the first-ever Invisibin Design Challenge! To enter, simply email your design file (.swf, .swx, sketchup files, and drawings) to marci@modifyfurniture.com along with a short explanation of why your design should be picked. Then, post an image of your design on Instagram with the tag #mymodifydesign.
The chosen design will then be sold on the Modify website along with designer information. The winner will also receive four copies of their design and their choice of a cash prize or credit towards products on the Modify website.
The Design Challenge is a great opportunity for makers, ShopBotters and designers of all experiences and ages. Visit modifyfurniture.com and enter today!
ShopBot Tools founder & CEO Ted Hall has been keeping an eye on the role that digital fabrication is playing in the evolution of manufacturing. Through Ted’s Medium blog series, he touches on a range of topics, including how ShopBot has adapted not only to succeed, but to enable other businesses to grow and keep jobs from being shipped overseas.
In his latest entry, Ted discusses the concept of a company “eating its own dogfood” – for ShopBot, that means using the tools produced to help keep production simple and efficient. This allows a company to not only make great things, but to explore how those things can be better applied.
To read more about the challenges, successes and lessons learned from over two decades of technology-based small manufacturing, follow Ted Hall on Medium. To discover more about ShopBot’s tools, community and support, visit shopbottools.com.
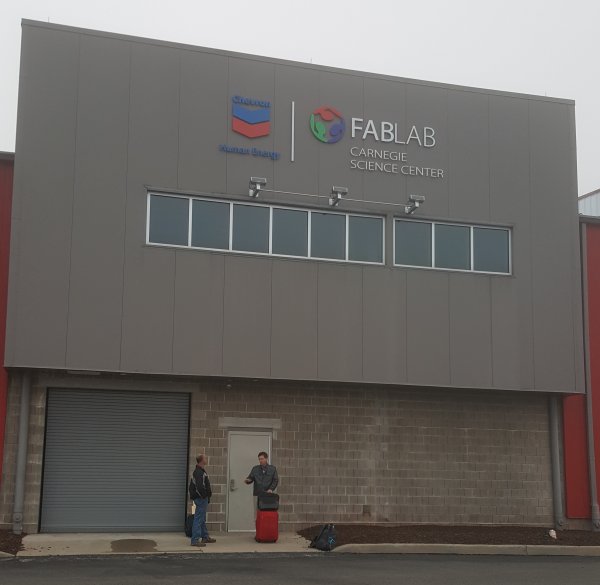
Carnegie Science Center is a popular spot for a play date, where children and adults can experience science first hand. It is also home to a Chevron FabLab, a digital fabrication laboratory for innovation and invention. The Carnegie FabLab holds camps and programs for children 8 – 18. Its mobile lab brings in depth digital fabrication experiences to schools and events.
Early morning outside the FabLab
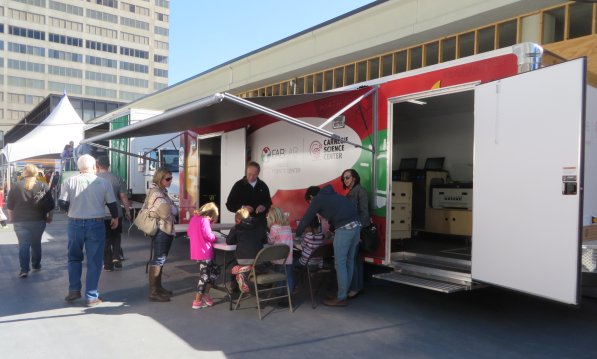
The Carnegie Science Center mobile lab at Maker Faire Pittsburgh 2015.
One of the programs that Carnegie runs is their Teaching Excellence Academy. In November, Sallye Coyle from ShopBot led a session in Digital Fabrication for Educators.
Digital Fabrication for Educators:
ShopBot CNC, Laser cutter, and 3D printer Date: Thursday, Nov. 17 and Friday, Nov. 18;
9 am – 3 pm daily, with an optional open lab on Friday from 3 – 5 pm Cost: $200 for two-day workshop Audience: K—12 teachers and administrators
Fab Lab Carnegie Science Center welcomes Sallye Coyle from ShopBot as a guest educator for this two-day intensive training. For teachers or administrators with digital makerspaces in their schools, or those who are putting together makerspaces, this training is essential. Educators will gain experience with 3D scanning and printing, designing for the laser, vinyl cutter and ShopBot. Participants will be immersed in multi-platform CNC projects, experiencing first-hand the design and engineering cycle used in digital fabrication. With an optional open lab on Friday afternoon, participants will be able to move deeper into creative design for CNC machines and have some fun in the process.
A major focus of the workshop was to show that the work flow is the same for all the digital fabrication tools: use a form of CAD (computer-aided-design) software to get the “what and where” into the computer, set the “how” for the digital fab tool* and look desired, and then let the computer control the machine while it does its work. Since the large format (4’x8’) ShopBot PRSalpha CNC tool is often the most intimidating tool in a lab, we started there. To give everyone a sample of the entire process, we used VCarve Pro, the CAD/CAM software shipped with a ShopBot, to:
design a sign
toolpath it to engrave the lettering with a V-Bit
generate the code for the ShopBot to follow
set up the ShopBot run the file
Creating the Files
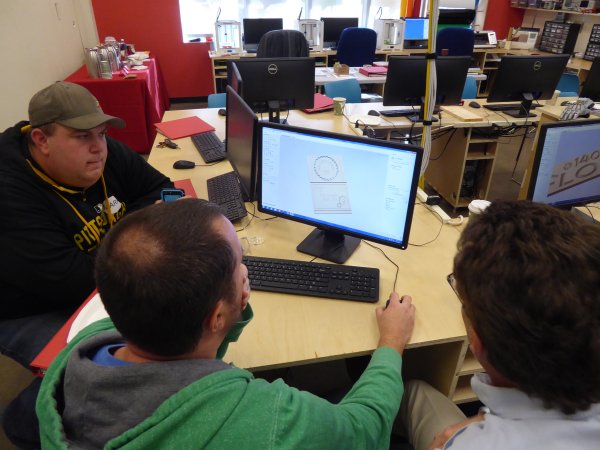
Then it was time for everyone to create their own files. First, the attendees had to measure the size of the various scraps of material they had to work with so they could input the data into the CAD software. Some chose simpler designs with text only, others downloaded bitmaps from the internet and traced them. Toolpathing options included engraving with a V-bit, and using an endmill bit to pocket or to profile along the vectors to cut out the designs. Giving the attendees time to design their own pieces rather than follow a set tutorial is labor intensive for the instructors, but it also allows the attendees to work through their questions while an expert is there to help them. They can also learn from other people’s techniques and mistakes.
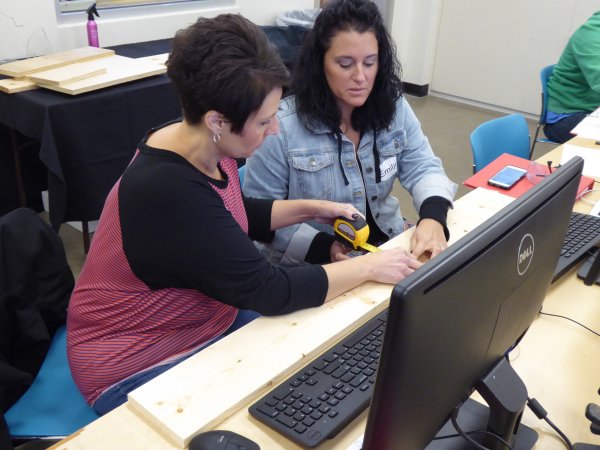
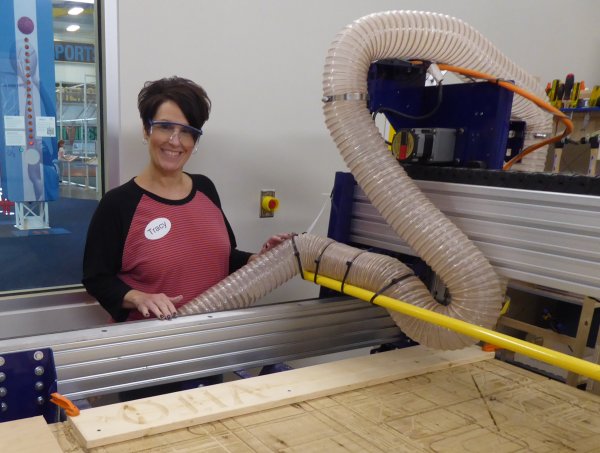
Tracy and Emily from New Castle High School measure their material to prepare for creating their CAD files. They will each claim half of the material for themselves.
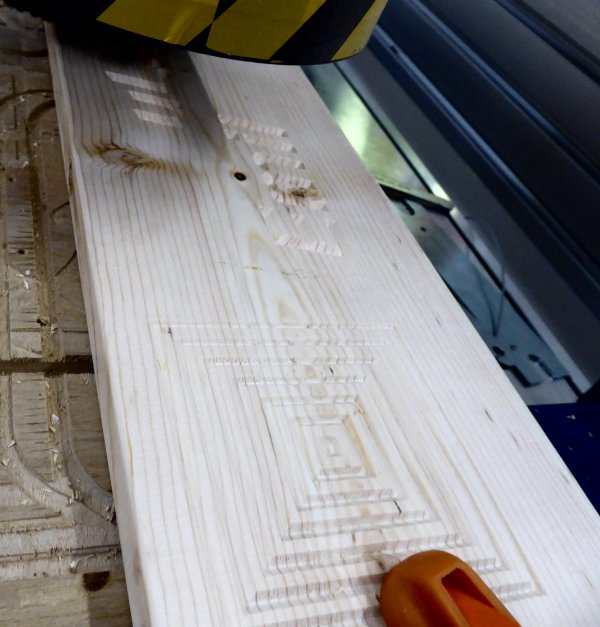
Tracy’s sign is complete. Her hold down technique was to mark in the CAD file where it was safe to put a hold down screw through the board into the ShopBot table.
Emily’s work is on the same board, and required a bit more creative hold down technique since she did not want holes in her creation. She used Tracy’s hold down screws at one end, and a clamp at the other. Since the best place for a clamp was on top of one of her designs, she machined the concentric squares pictured above with a clamp in an out-of-the-way location. With the ShopBot shut down, she then moved the clamp to rest on the machined part and ran the remaining toolpaths.
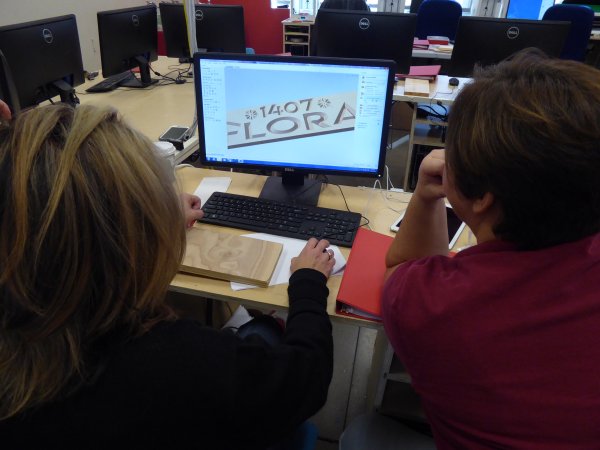
Liz from Carnegie and Raquel, and art teacher who supports STEAM at her high school, simulate Raquel’s design on the screen.
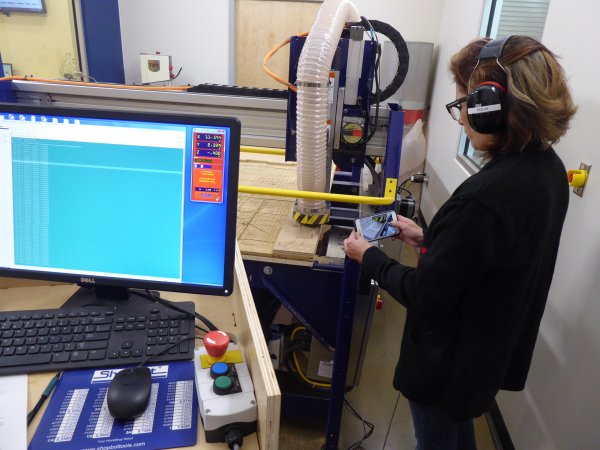
Raquel photographing the ShopBot in action.
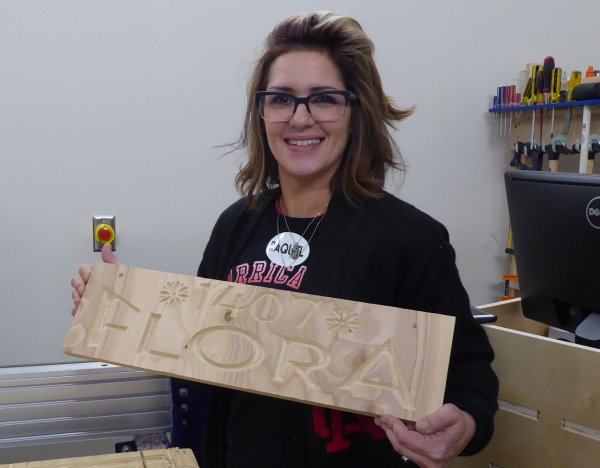
Success!!! Raquel commented that she will now be spending all of her spare time using the CNC in the FabLab at New Castle High School.
Randy from ShopBot (right) helps Mark and Eric with their VCarve files. Although they use Inventor for CAD software as part of the PLTW program at their school, Mark and Eric found VCarve to be easy to design in, and terrific for creating the toolpaths for their 2D and 3D design files.
Mark and Eric have an older CNC (not a ShopBot) with a router in their school. They loved the quiet of the spindle on the ShopBot PRSalpha in the FabLab.
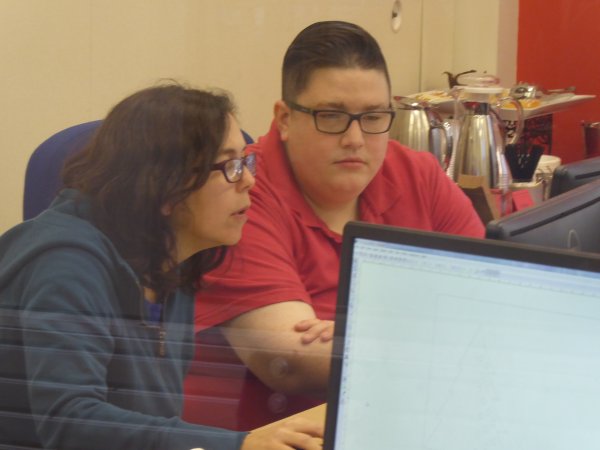
While some were waiting for their turn to run their ShopBot project, Steve from Carnegie introduced the laser cutter and vinyl cutter. Using Inkscape, a free graphic software, the group designed a seasonal project that could be cut out of thin wood. Sallye pointed out that the 2D design files (.dxf, .eps, .ai, .svg, etc.) can be transferred into and out of VCarve to other graphic or engineering based CAD programs.
Steve from Carnegie helping Aimee with her files.
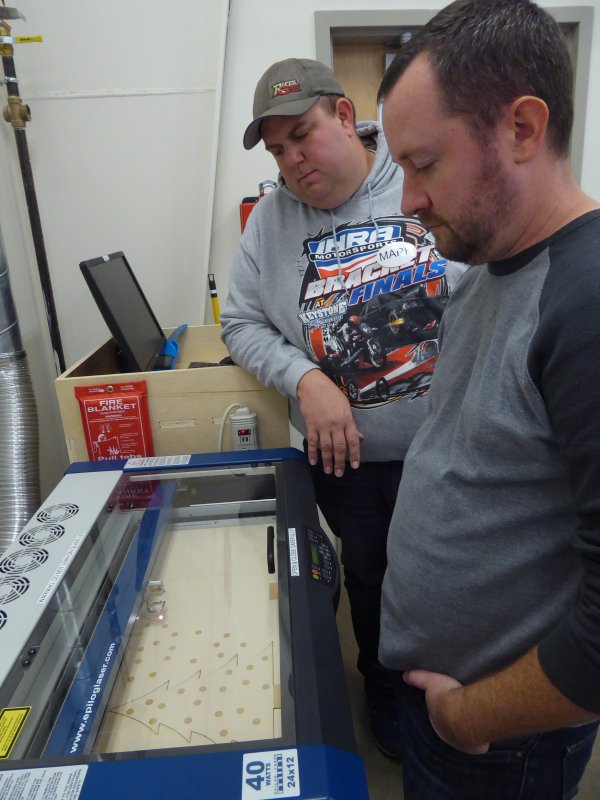
Mark and Eric using the laser with thin wood. The laser etches (rasters) some parts of the design, then cuts through the thin wood by following the vector lines.
The second day, the attendees worked on bringing 3D designs to life and preparing them for machining on the ShopBot. Since we had a Handibot visiting for the PD and the Camp ShopBot to follow, we decided to machine the 3D files on the little CNC machine. Attendees downloaded 3D files (.stl) from the web that would normally be printed on a 3D printer, and brought them through VCarve to create roughing and finish passes. Here is a link to the blog that describes the technique.
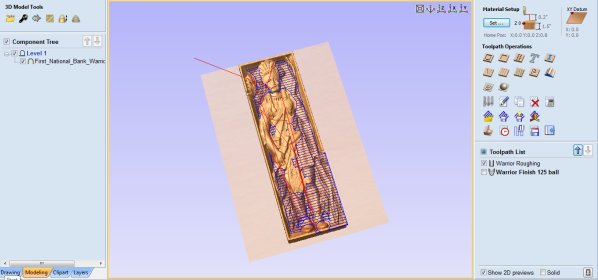
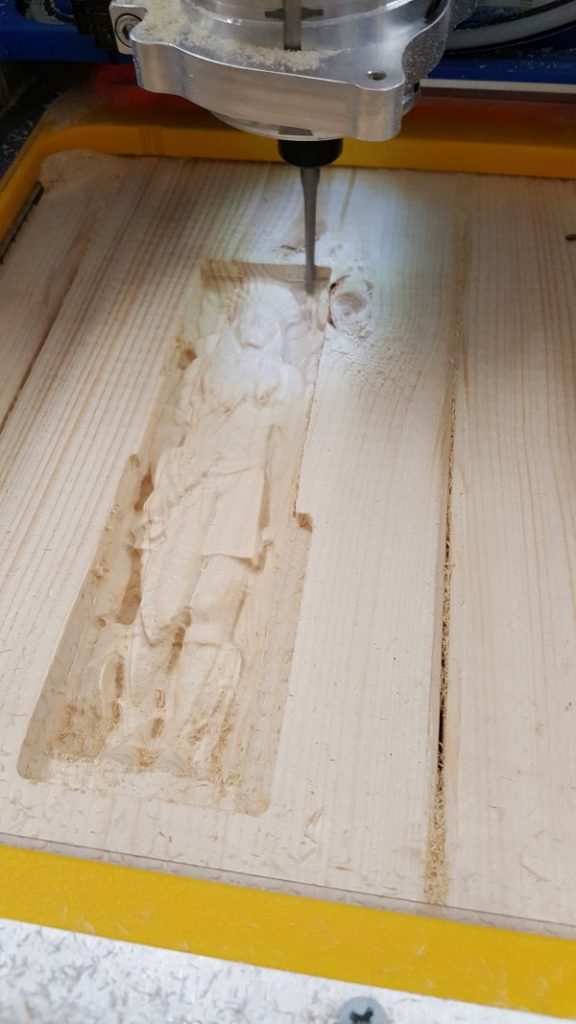
3D file (.std) downloaded from the web and imported into VCarve Pro for toolpathing. The roughing pass removes excess material in multiple passes, then the finish pass moves a ball nose bit simultaneously in 3 axes to create the smooth finish. The size of the ball nose bit affects detail (resolution) and time to machine the file.
Finish pass with a .125” ball nose bit. Handibot can machine wood, plastic and aluminum in addition to the machinable wax that some of the smaller CNC mills are limited to.
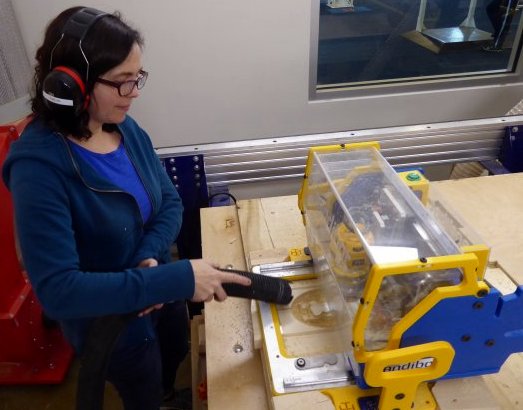
Roughing out the Aimee’s Reindeer Dog. We removed the dust skirt from the router head to watch the progress of the file, so Aimee is vacuuming as she goes. The 2″ x 6″ board is held in place side-to-side (X axis) by a jig that Randy and George whipped up in the AM. A screw through a hole in the frame of the Handibot and into the 2 x 6 holds the board in place on the Y axis.
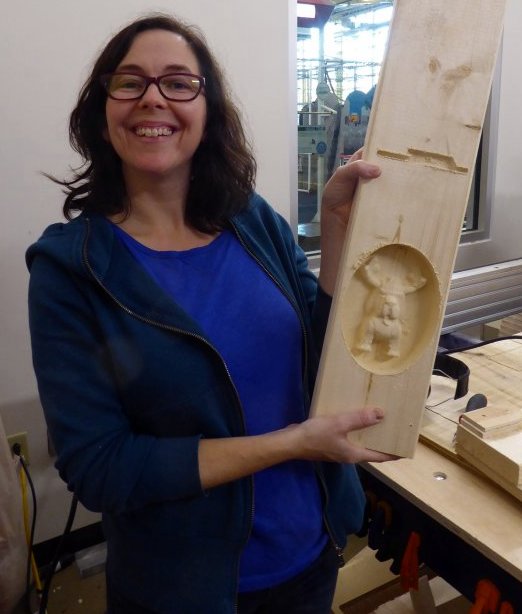
Aimee with her finished Reindeer Dog. Both roughing and finish pass were done with a .25″ ball nose bit. Early on in the workshop, Aimee confided to Liz that they didn’t have a CNC machine at her K-8 school, and would never be getting one. The smile on her face after using the Handibot suggests she might rethink that.
Jon, who runs the Carnegie Mobile Lab, and Liz, FabLab Manager, were intrigued by many of the features of the Handibot. Its resolution is so good that it is the perfect CNC machine for making PCB’s. Since the Handibot uses the same CAD/CAM software as the bigger ShopBots, making a circuit board and making a podium is just a matter of changing the size of the bit and the material. One of the apps for FabMo, Handibot’s Control software, allows children to draw on a touch screen and have it immediately translate to drawing with a pen or carving.
In this Handibot How-To video from August, Brian Owen shows how to cut a custom circuit board:
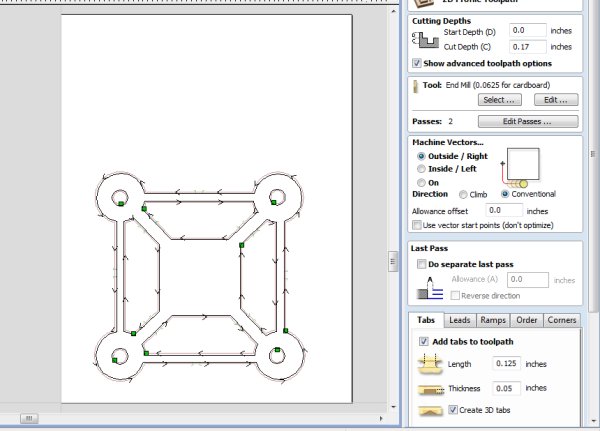
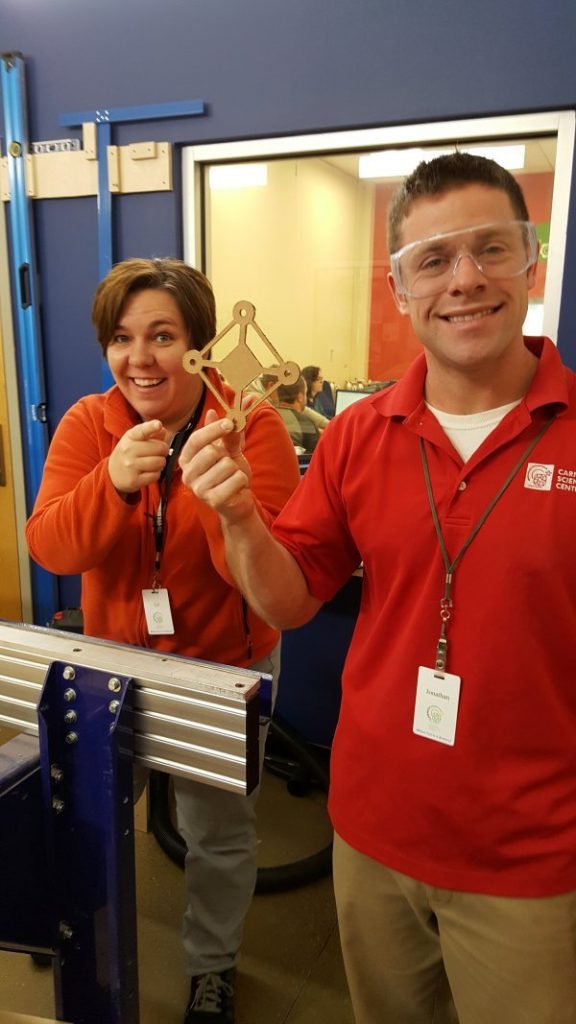
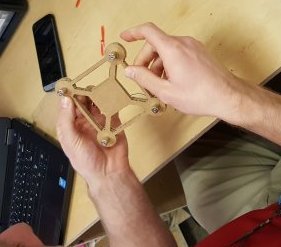
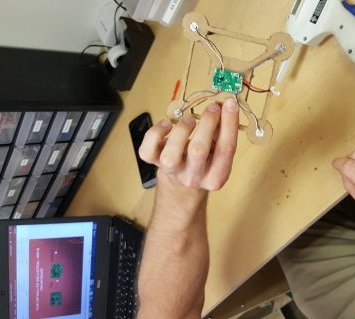
When Jon asked if the Handibot could be used to cut the cardboard for their Quadcopter project, we grabbed a .0625” bit from the mini mill inventory, imported an Inkscape file into VCarve, and set it to profile to cut through the cardboard. Jon added the motors, soldered in the circuitry, and flew the quadcoptor. He saw potential for using a Handibot rather than a laser to cut the parts on site at a school: easier to transport, no fumes to vent, and more fun for the kids to watch. Cost is a factor, too: 4 Handibots would be cheaper than a single laser cutter.
VCarve file for the base of the Quadcopter. Tabs were added to the profile pass to keep the parts from shifting while machining.
Handibot cutting a second quadcopter body. The weight of the Handibot holds the material in place while machining. A second layer of cardboard serves as the “sacrificial layer” to protect the surface under the Handibot.
Wow, look at that! Less than two minutes to cut, and you dont have to cut down the cardboard first!
*The digital fab tools the Carnegie Science Center FabLab has available include two CNC machines (ShopBot and Roland), a laser cutter (Epilog), 3D printers (Ultimaker), vinyl cutter (Roland) and a full electronics station. The Mobile Lab has a ShopBot Buddy with an 110v Desktop spindle, laser cutter (s), 3D printers, vinyl cutter, a mini mill and an electronics station. For those who are unfamiliar with how the various digital fabrication tools work, here is a chart that compares the various tools.
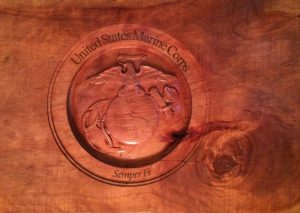
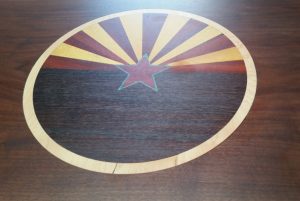
Arizona Cardinals sign made with ShopBot PRSalpha CNC
Wally Quanstrom retired as a senior executive at BP awhile back, and has thoroughly enjoyed his recent years designing and making any number of creative projects with the help of his ShopBot PRSalpha CNC tool. “My friend Harry Warren worked with an early CNC tool years ago. He worked 30 years as a machinist and CNC operator for John Deere. His experience inspired me with the confidence to go ahead and purchase my own CNC 6 years ago.”
Wally says he chose ShopBot for a number of reasons. “I like the fact that ShopBot is a USA company. Not just that it is based here, but that they make the tools here as well. I’ve been to Durham twice and enjoyed meeting Ted Hall and Sallye Coyle. I appreciate Ted’s concept of making the CNC accessible to anyone who’s motivated to put the technology to work.”
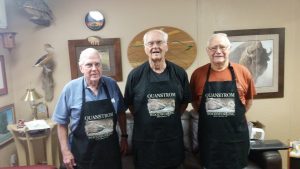
Harry Warren, Wally Quanstrom, and Jeff Brown; aka The 3 Amigos!
“I have a number of traditional tools made by Laguna. A bandsaw for example. I looked at Laguna’s CNC tools, and I’ll say that they may be ‘prettier’ from a looks standpoint, but the ShopBot is a more solid tool in my opinion. It’s rigid. It performs great. Six years in, I’m thrilled with my 4 x 8 ShopBot tool.”
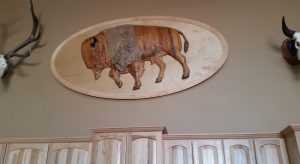
Here are samples of his and his friends’ projects:
Eight-foot buffalo
Some nice detail carving
Impressive inlay work
Wally says that he’s found Vectric and ShopBot’s tutorials to be very useful. “I notice that typically the tutorials have you set your zero/origin at the lower left corner; but I like to place it in the middle of the material. This way I can work on different projects at the same time.”
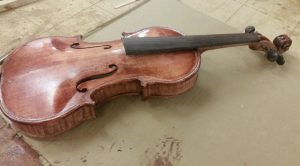
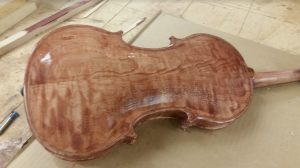
Wally’s friend Jeff Brown has been using the ShopBot to make violins. “I was using a Shark, but the tool gave me a lot of trouble; it was simply not rigid enough.” Jeff came by his interest in musical instruments honestly: his dad was a fiddler and his great grandfather a violin maker. Jeff inherited a dozen violins from his Dad, and set about repairing them. This led to an interest in making instruments.
“I didn’t want to try and duplicate someone else’s design. I wanted to start from scratch.” Jeff has a background in mathematics and computer programming, so he found an interest in “starting with the math, not the picture.” He creates wireframe designs in Microsoft XL, and then brings the wireframes into SolidWorks.
“I enjoy making violins in a number of different woods, from mesquite, to cherry and walnut. I’ve taken some of the instruments to a Violin Makers of AZ convention, and they received a lot of interest.” We’re excited to see what the 3 Amigos will make next!


 As a US Army veteran with 28 years of service, Jerry Abney has never been one to back down from a challenge. Upon return from a tour in Iraq in 2004, the vision in his right eye deteriorated to the point of blindness. The very next year, he was diagnosed with retinoschisis of the left eye, leaving him with 5% of his original sight. Due to his vision loss, Jerry had to rethink his approach to most aspects of his life, including hobbies, work, and exercise. As part of the adjustment to his change, Jerry found himself at the VA’s Blind Rehabilitation Center in Birmingham, AL for computer training when he noted the sounds of a woodworking course next door. Intrigued, he introduced the idea of working with wood to his counselor, who agreed that the challenge associated with turning an idea into a tangible result was one tailor-made for Jerry. His natural curiosity for how things work coupled with his determination and discipline could let him explore new ways to make things, keeping him physically and intellectually stimulated– an attitude he has applied towards a number of different activities that most would say are impossible: he’s even figured out ways to water ski, scuba dive, and rock climb. Today, Jerry uses his ShopBot to reverse-engineer objects he finds interesting, making them work on his own terms. He runs a woodworking company,