By Sallye Coyle, March 12th, 2018 
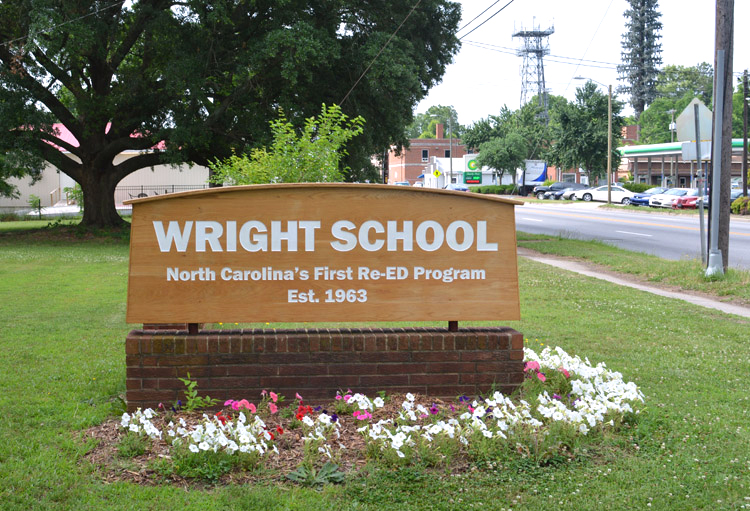
While driving along Roxboro Road on my way to ShopBot Tools World Headquarters (as founder Ted Hall likes to call it) one morning, I spied a sign for the Wright School that I had carved on the ShopBot tool I have in my barn. It made me think about a few of the projects that have been touched by a ShopBot tool in ShopBot’s hometown of Durham, North Carolina.
Signage
I once heard someone at a ShopBot event say that, “when you get a ShopBot CNC machine, you automatically become a sign maker.” My first “paid” gig was just that… a sign. It taught me that a professional sign maker needs many more skills than being able to carve the design, but the ShopBot goes a long way towards making each sign special. Almost 18 years later, I smile every time I drive past the house in town that sports a white sign with black lettering. The sign itself is the same shape as the house, which makes it a more customized piece than just a rectangle with an address.
 Look closely in the lower right corner to see my first “gig” with a ShopBot, a sign in the shape of the house. It’s not a clear picture because I want to protect the privacy of the homeowners. This first sign taught me that the design process and finish work can take far longer than carving the sign!
Some of my projects are pro bono to contribute to the community. The Wright School in Durham provides best practice, cost-effective, residential mental health treatment to North Carolina’s children, ages six to twelve, with serious emotional and behavioral disorders. State-supported, it is frequently one of the programs threatened by budget cuts. A friend of the principal wanted to give him a sign for the school as a “thank you” for all of his hard work. The ShopBot did the carving, the friend did the finishing work.
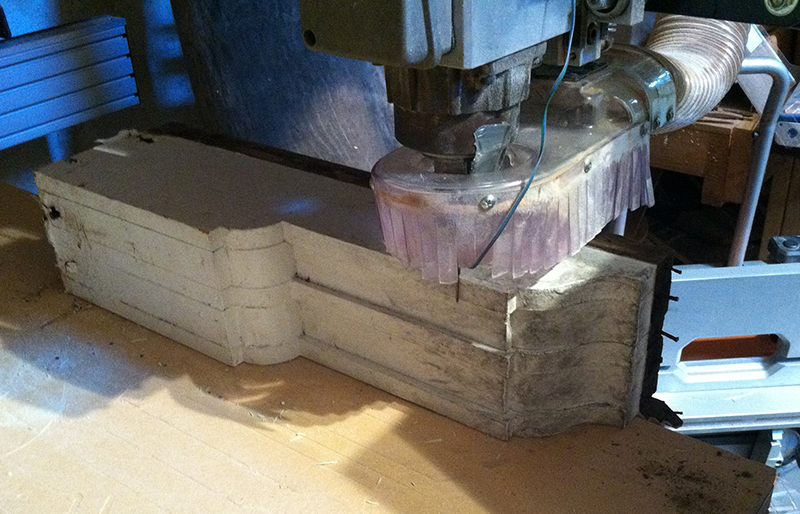
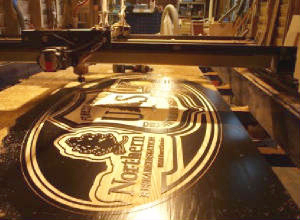
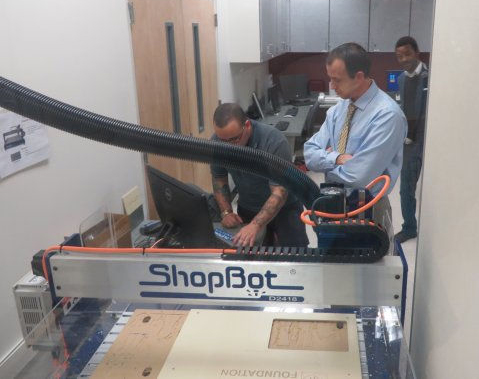
While the sign I did for the US Forest Service didn’t stay in Durham, it was carved on the ShopBot in my barn. The design called for raised lettering, which allowed me to paint the blank with three coats of sign-maker’s black paint, then carve away the low spots. The Hardwood Store of North Carolina in Graham supplied samples to test types of wood to determine what would machine nicely. Ash was the wood of choice, both for color and edge quality. I used a V-bit to bevel the edges of the design, followed by an end mill bit to carve away the rest. Mitch Fisher, of Fisher Signs, sprayed the final sign with three coats of polyurethane before it was sent to the Forest Service in West Virginia.
 Carving a blank that has been painted first. 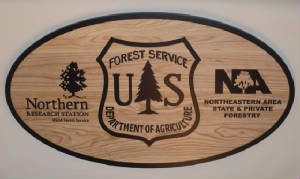 Finished sign (55” x 33”) after coating with three layers of polyurethane by professional sign maker, Mitch Fisher. Collaborations with Artists
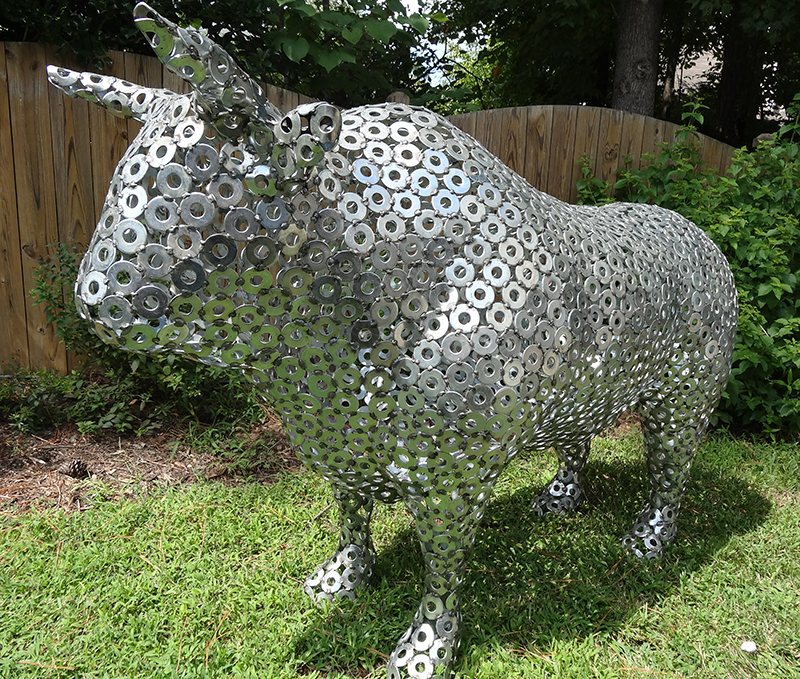
Bull Durham
If you drive through downtown Durham (perhaps in search of ice cream at The Parlour), you’ll see Major the Bull striking an imposing figure in the CCB Plaza at the corner of Corcoran and Parrish Streets.
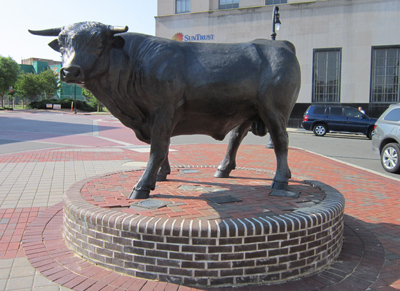
The original Major was not created with the help of a ShopBot. But TJ Christiansen, who is known for his excellent ShopBot trainings in house and online, used his ShopBot to create a foam mold, then welded metal components together over it to create a new version of Major. When last I visited the Durham Performing Arts Center (DPAC), TJ’s version was gracing the lobby.
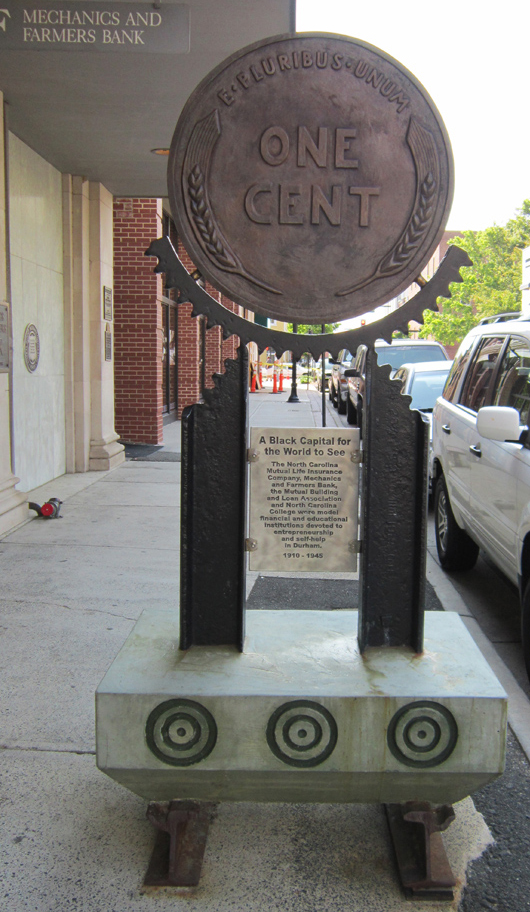
Black Wall Street
Major the Bull marks the entrance to Parrish Street, also known as “Black Wall Street.” Before the current renovation and revitalization project began in downtown Durham, along Parrish Street and its environs were six monuments that celebrate the contributions of four key institutions that spurred black enterprise in downtown Durham. The same artists who designed and fabricated Major, Leah Foushee Waller and Michael Waller, created the six bronze sculptures. The lettering on the aluminum plaques for each of the sculptures was engraved on my ShopBot PRT, using a 90 degree V-Bit, VCarve Pro (then called Part Wizard), and lots of Dawn dish detergent diluted with water (one part Dawn, two parts water) as a coolant.
North Carolina Central University
The four institutions celebrated by the monuments were NC Mutual Life Insurance Company, Mechanics and Farmers Bank, The Mutual Building and Loan Association, and North Carolina College. North Carolina College, which became North Carolina Central University, was the first public liberal arts university to support black students. For its centennial celebration, NCCU again called on Leah Foushee Waller and Michael Waller to create a centennial crest for a new park on Fayetteville Street.
 Google street view of the NCCU Centennial Park on Fayetteville Street. The centennial crest is at the top of the stairs. Information plaques for the centennial chapel were also carved with a ShopBot. When creating a bronze sculpture, often the first step is to create a model that is then used to create a mold into which the hot metal is poured. From the letterhead of NCCU depicting a sculpture of James E. Shepard, founder of NCCU, I created the model of the 36” diameter centennial crest out of MDF. A summary of the steps, from 2D graphic to 3D model, to pouring the molten bronze, and the final product after cleaning up and coloring by Mike Waller, is shown below. The bronze was cast at the foundry of Liberty Arts located in Durham Central Park, where the Farmer’s Market is held each week. It’s worth a visit to see the metal gates of the foundry.

Education
Duke University has its own makerspace and technology hub on campus, with a ShopBot Desktop CNC nestled in among the 3D printers. Duke University was also host (and ShopBot Tools a sponsor) for the first Construct3D Conference. Construct3D 2018, the national academic 3D printing and digital fabrication conference and expo, will take place at Georgia Tech, October 5-8, 2018. The second annual event, co-founded by Ultimaker’s Lizabeth Arum and Matt Griffin, and Duke University’s Chip Bobbert, and sponsored by founding sponsors Ultimaker and Duke University, will focus on academic use, best practices, and professional development opportunities for faculty, staff, and students from informal, K-12, and higher education contexts. Look for ShopBot to again be a sponsor.
 ShopBot Desktop in Duke’s Innovation Studio While the theatre department at Duke does not have a ShopBot, it has contracted to have a ShopBot create sets for plays that are being previewed at Duke before heading to Broadway and elsewhere. The set for the production of “The Great Game” was machined at ShopBot Tools by the prototype PRSalpha tool with a vacuum hold down table. Hey Duke Theatre Department: Playmakers at UNC-Chapel Hill and NC State’s University Theatre have ShopBots in their set design programs!
 Set for “The Great Game.” Ninety panels with 250 – 350 plunges per panel were machined in two weeks (8 hours a day) on the first PRSalpha with a vacuum hold down table. So much material was machined away from the board that supplemental hold down (screws) was used in addition to the vacuum. Half inch material, .25” compression bit, ramp into a single pass. Toolpaths included “profile to the inside” for bigger spaces, and pocketing to turn the waste into dust for smaller spaces.
NCCU Fab Lab
NCCU is also home to the first official Fab Lab at a historically black college/university (HBCU). Funded in part by the AJ Fletcher Foundation, the lab houses a ShopBot Desktop in addition to 3D printers, a digital embroidery sewing machine, and an Epilog laser.
 Grand opening of the NCCU FabLab. Signage created with a ShopBot PRT.
 Funding for the Fab Lab came in part from the AJ Fletcher Foundation. During an official visit by representatives of the Foundation, an NCCU student demonstrates the ShopBot Desktop in the lab.
CTE in Durham Public Schools
ShopBots also abound in the area high schools. For example, Southern School of Energy and Sustainability has a furniture making program, with the goals of having the sale of the furniture made by the students go towards scholarships for college. Riverside High School has an active PLTW (Project Lead the Way). Jordan High School has a ShopBot Desktop in their woodworking area. When you drive onto the campus of Carolina Friends School, you will be greeted by signs that were created on the ShopBot in the woodshop.
Restoration and Renovation
Durham has seen an explosion of restoration and renovation in the last 5–10 years. What was once a sleepy mill town (tobacco and fabric, both now gone) with a university close by has become a destination for the arts, foodies, and young people. Many of the older buildings are being updated, and Chris Burns has been instrumental in helping that happen. Chris was an original member of ShopBot Tools when it was incorporated in 1996, and still travels for ShopBot to do trainings and installations. He and his family have a service, Austin Automation, in which they contract CNC work.
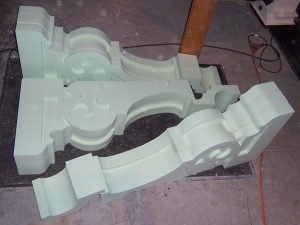
Next to Duke University’s East Campus, Trinity Park is a neighborhood of gracious homes, many dating back to the 1910s and 1920s. One such home was the original Watts Hospital that was moved to its present location on Watts Street when a new hospital was built. After being allowed to fall into disrepair (a bathtub from the second floor fell through to the first floor), the current owners did a major renovation a number of years ago, which helped to spur a revival of the entire neighborhood. The house was in need of a few tweaks, so Chris did a digital probe of a corbel that needed to be reproduced. Once he had the digital file, multiples of the corbels could be manufactured.
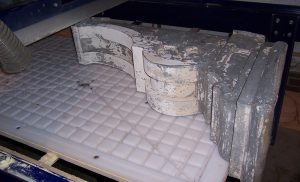
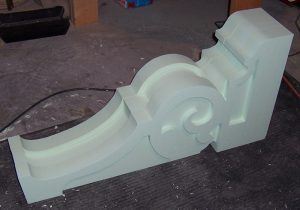
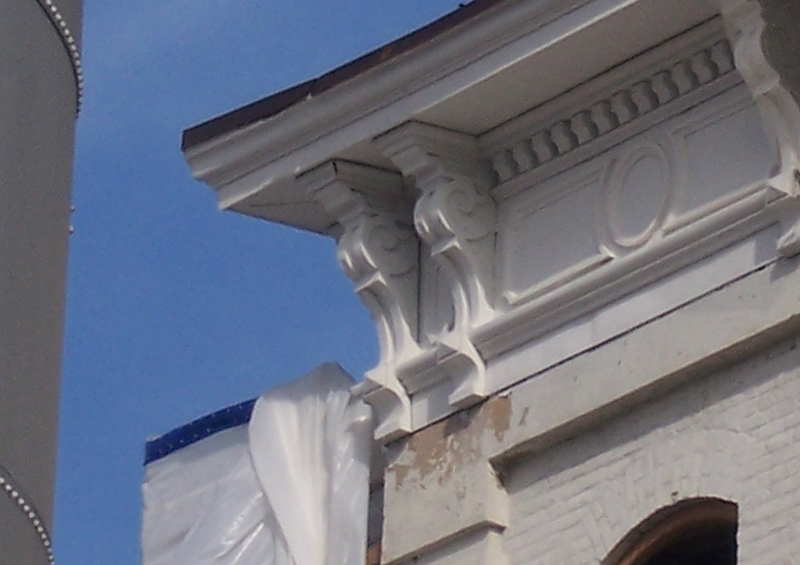
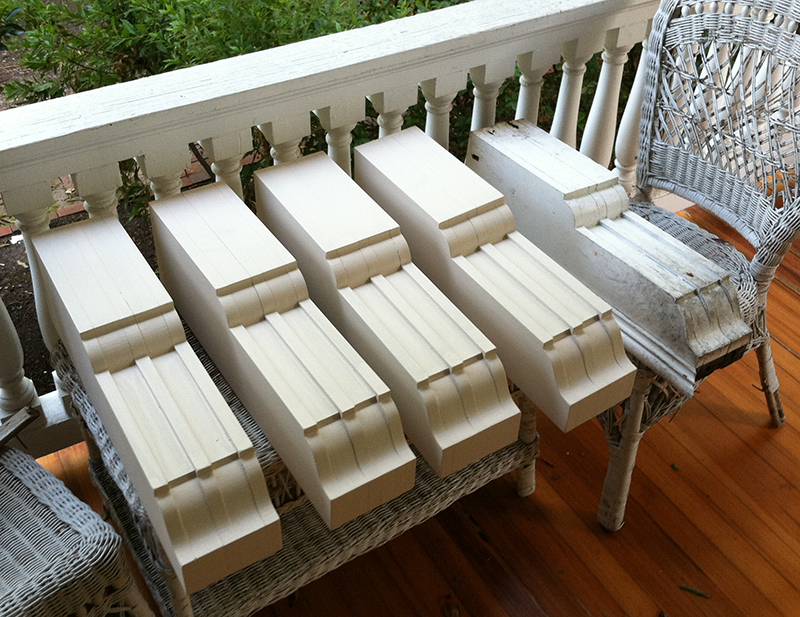 Four new corbels (and the original) on the front porch of the home in Trinity Park, Durham, NC. Chris has also worked on bigger projects in Durham. Sometimes it is difficult to realize the scale of the projects when looking at photos of individual components. For example, here are three photos, the first is the original piece, the next two, the reproductions that Chris created.
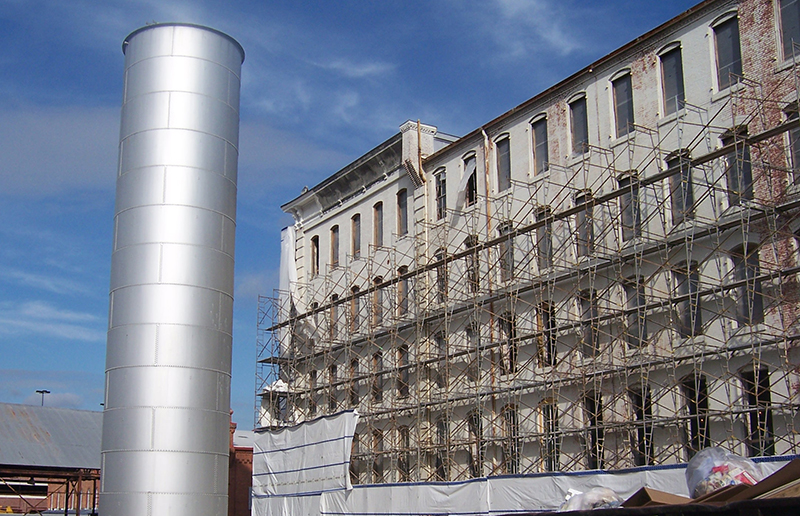
Here’s the project, reproductions in place, to give a better sense of scale:
And now, the whole picture:
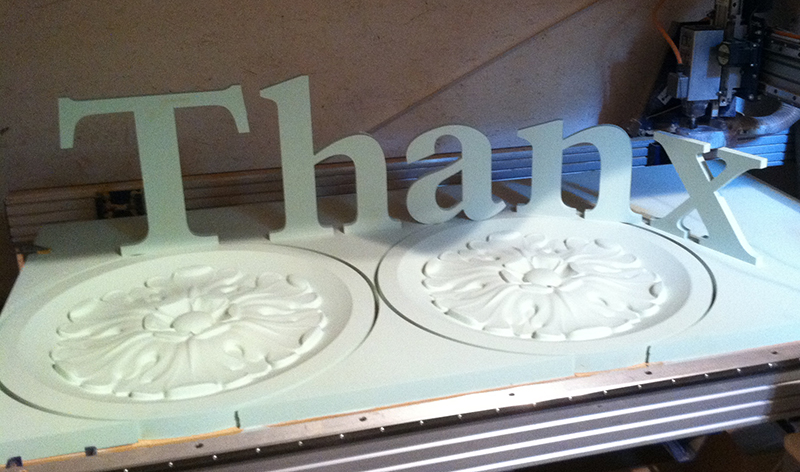
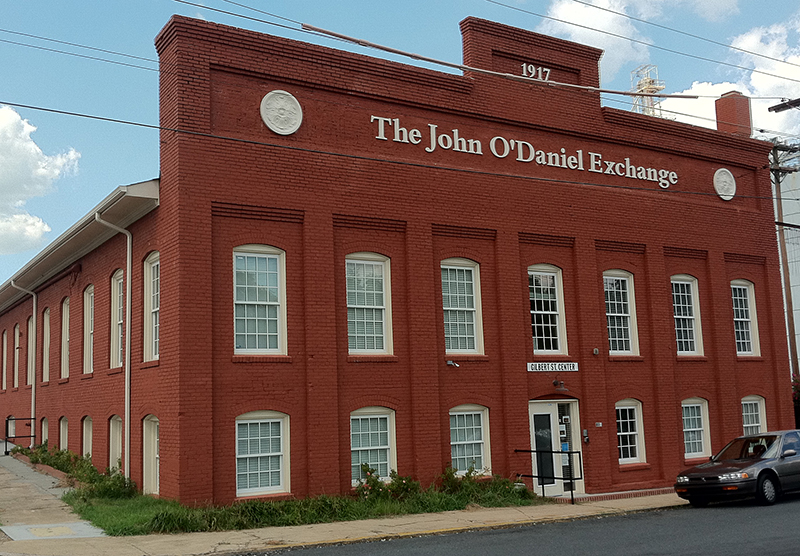
Another Project: Rosettes for The John O’Daniel Exchange are laid out on a 4’x8’ ShopBot.
The application of the finished product:
A Durham Business That Relies on Its ShopBot CNC Tool
In downtown Durham, next to the railroad tracks on Duke Street, and near several of the renovated buildings, is the showroom and factory of the Durham Bookcase Shop. Owner Philip Fletcher and his crew rely on their ShopBot CNC to create everything from the sign outside the building to the ready-to-finish furniture inside. You can purchase something off the floor or specify a custom size bookcase/table/dresser to fit your space. Philip can change the digital file and quickly produce a “one-off” piece.
 Looks like Google Maps caught the Bookcase Shop in the process of mounting a new sign
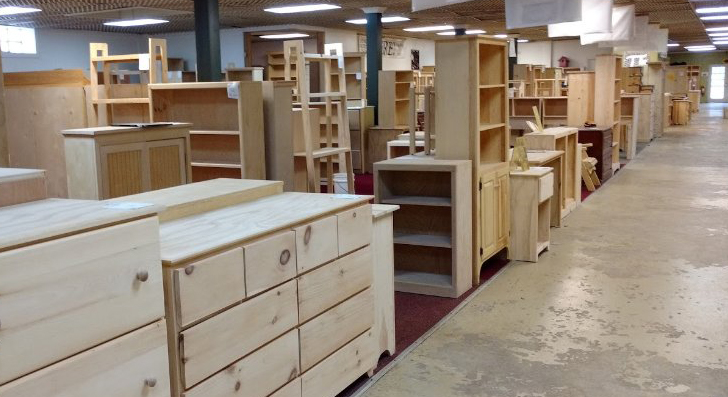 A selection of the possibilities. The ShopBot CNC allows the Bookcase Shop to compete with the big box stores and keeps the production local.
Custom Work for Local Institutions
For over 10 years, Hardwood Designs in Hillsborough, NC used a ShopBot CNC to fabricate high-end interiors at local institutions like Duke’s Fuqua School of Business and the Thomas Center. The CNC machine is an important part of their production facility.
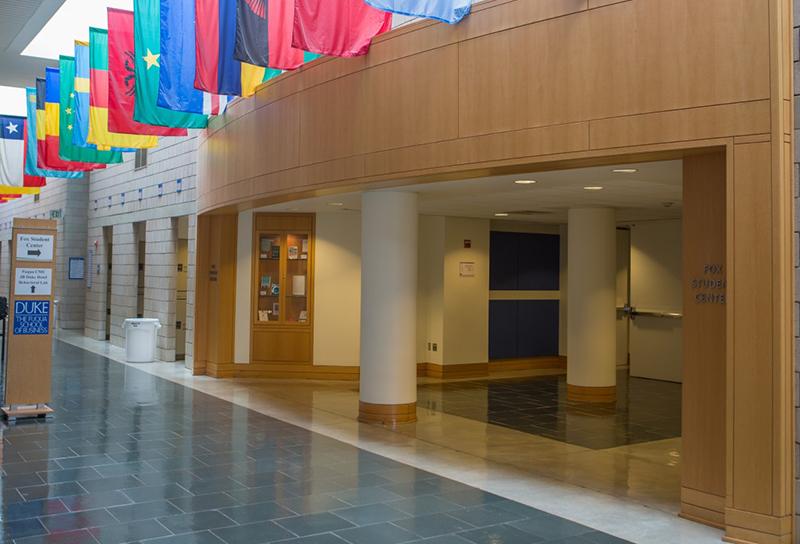 Interior of Fuqua School of Business at Duke University. Behind the Scenes
As mentioned earlier, Durham has become a destination for foodies. There are several key players in the scene: people who have converted what were unhappy places into exciting and inviting places to visit. Nick Hawthorne-Johnson and Rochelle Johnson are two such people. Starting with what was once the Durham Food Co-op building, they created a community kitchen and incubator space that incorporate parts of Durham history. The space has grown into a key event space in town, The Cookery. Visit their website for a 5+ minute video of their early adventures.
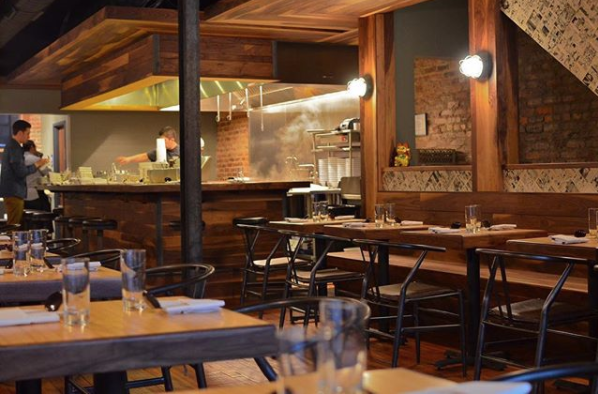
I have a special place in my heart for Nick and Rochelle, since our son did an internship with them after college. His experience there helped to inspire him to go to law school with an interest in business law. So when Nick and Rochelle started on their next adventure in downtown Durham, I was happy to lend a few hours of machine time for a project that plays a supporting role. If you visit the izakaya (Japanese pub) upstairs above Dashi, a Japanese ramen shop, and you sit in a booth, know that the ShopBot in the barn created the frame for the seats.
By Sallye Coyle, February 9th, 2018 
Say “Educational Technology” to a room of teachers, administrators, and vendors, and you will get many different definitions. Having recently attended the Future of Educational Technology Conference (FETC 2018) as a “civilian” rather than an exhibitor, I was able to attend workshops and presentations, visit the entire convention floor of vendors (387), and stop by poster sessions to chat with teachers and administrators. It was an opportunity to see how ShopBot Tools can meet the needs of educators by adding training, tutorials, and projects that link to standards, and providing these in addition to the manufacturing of quality CNC equipment.
The poster sessions were grouped by topics of interest, and submitted by real teachers/administrators. They provided for casual conversations between those with boots-on-the-ground experience and those who might be new to a topic of interest. Notice that in many of the sample posters shown below, “Why” is as important as the “How to”.
The poster sessions I had the opportunity to attend included:
• Electronics
• Coding
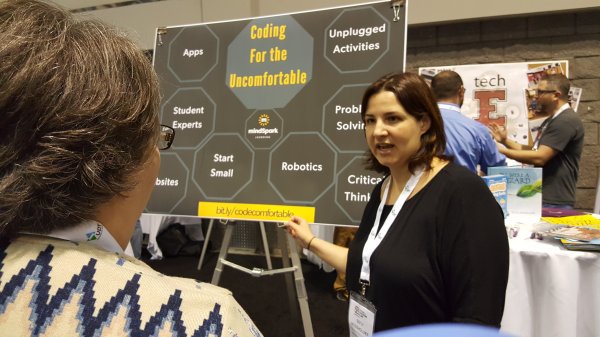 How coding integrates into the school day • Makerspaces
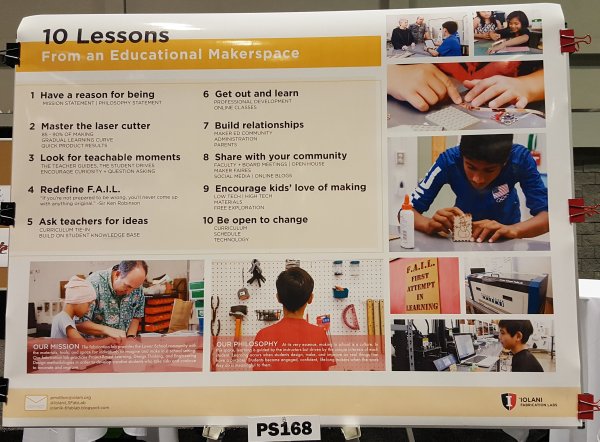 ‘Iolani School in Hawaii has maker spaces in its middle and high schools. The high school has a PRSalpha 96×48 • www.iolani.org
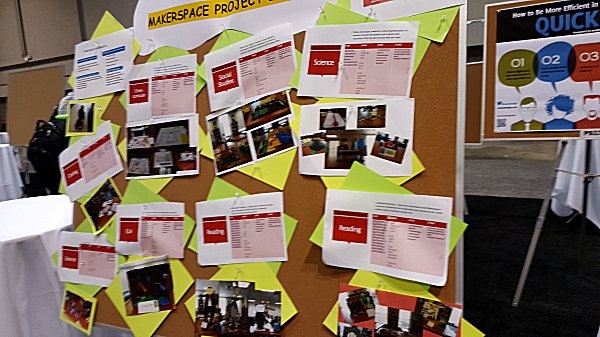 Integrating Makerspaces across disciplines • Integrating Problem/Project Based Learning
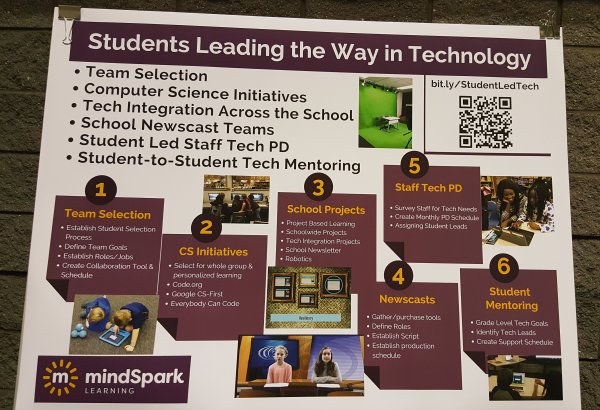

• Professional Development
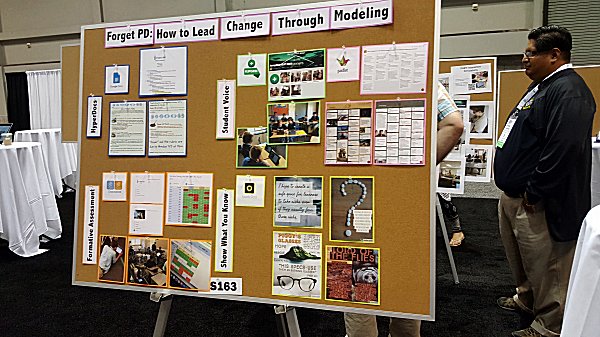 Professional Development strategies: Lecture or Engage? WORKSHOPS: I also attended several workshops about integrating project-based learning and makerspaces into the curriculum standards. One, by Michael Gorman, included an amazing number of resources that are available on his website.
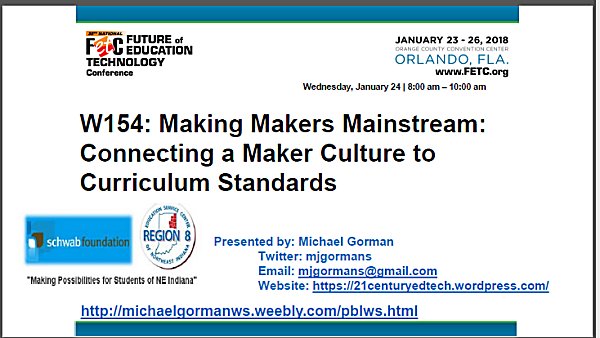 Visit Michael Gorman’s website for a wealth of suggestions. Additionally, I attended two working sessions on free software to help with documentation which are relevant to teachers, students, and perhaps, ShopBot tutorials. Spark software from Adobe helps users create “Professional looking graphics, web pages, and videos in minutes.” A 20 minute introduction to Book Creator was enticing for embedding pictures, videos and text into eBooks that can be anywhere from two pages to 20 pages long. Look for examples soon.
387 vendors of Educational Technologies exhibited. Sorted by broad categories, the vendors included:
• Computers, smart boards, covers for computers, projection systems for the classroom.
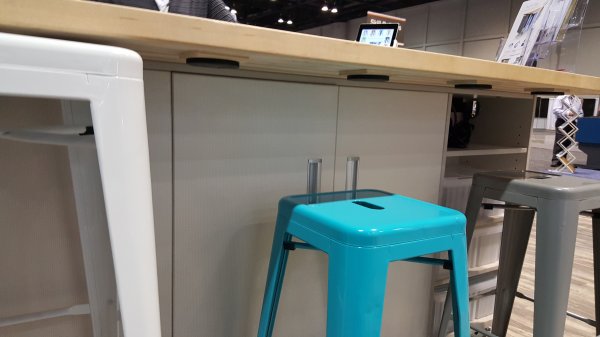
 I didn’t win the document scanner raffled off by Epson. I really wanted the smart board or projector. • Furniture for the classroom or makerspace
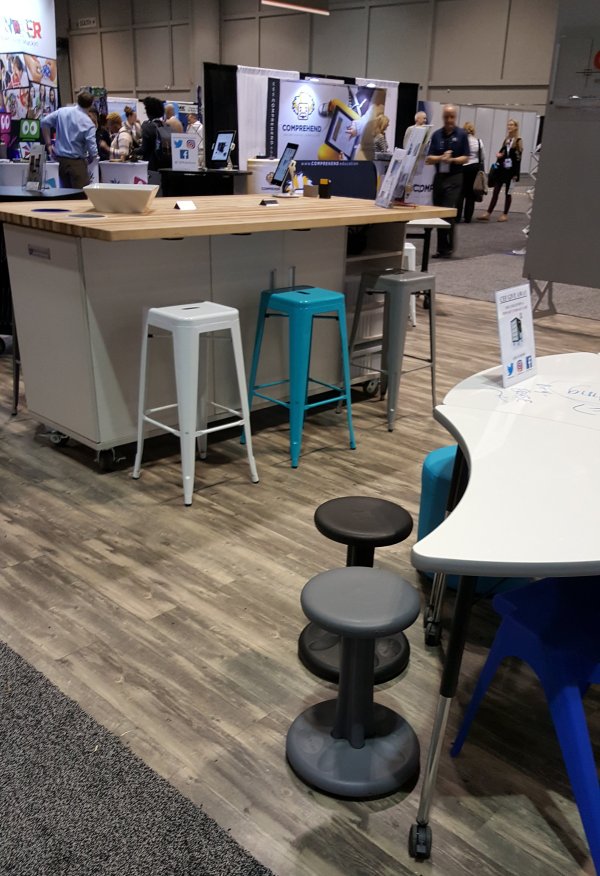 CEF (Custom Educational Furniture) manufactures furniture for the classroom and makerspaces. Many of its designs are suggested by kids. www.cefinc.com
 Store the metal stools under the table. Note the big magnets. • Software for classroom management, documentation, CAD
• Distributors and suppliers of STEM education packages
• Games to teach coding or video games
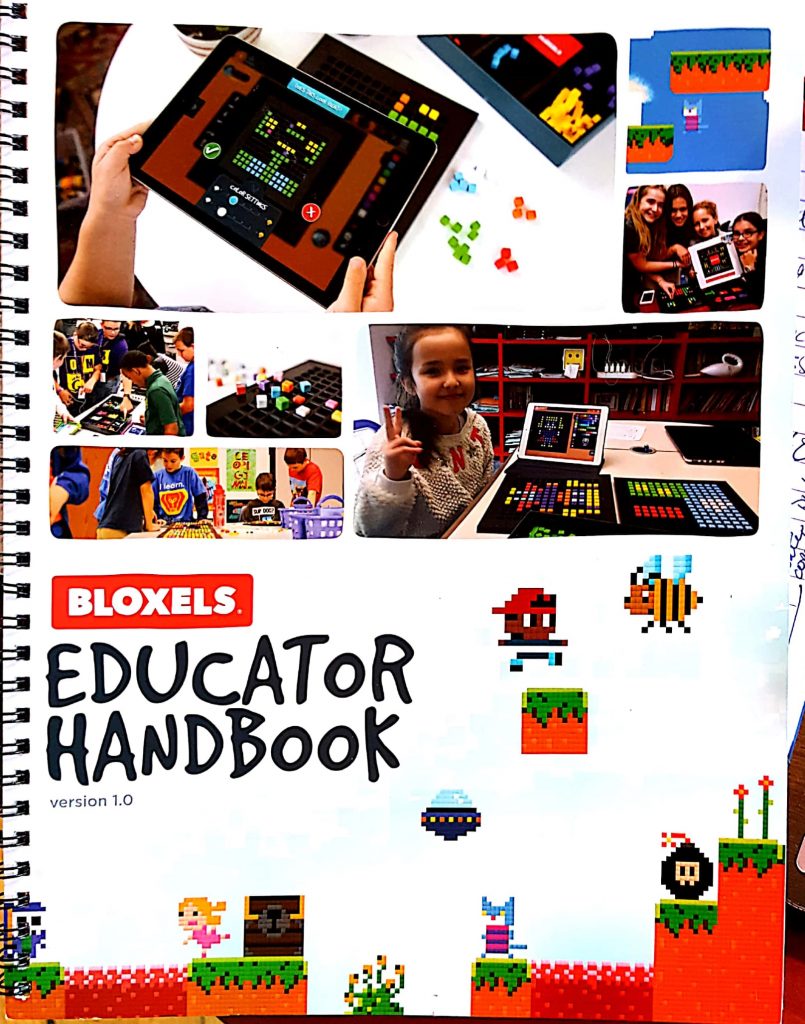 Bloxels is a platform and an app that teaches the basics of creating video games. The Educator Handbook includes links to common core standards and NGSS. 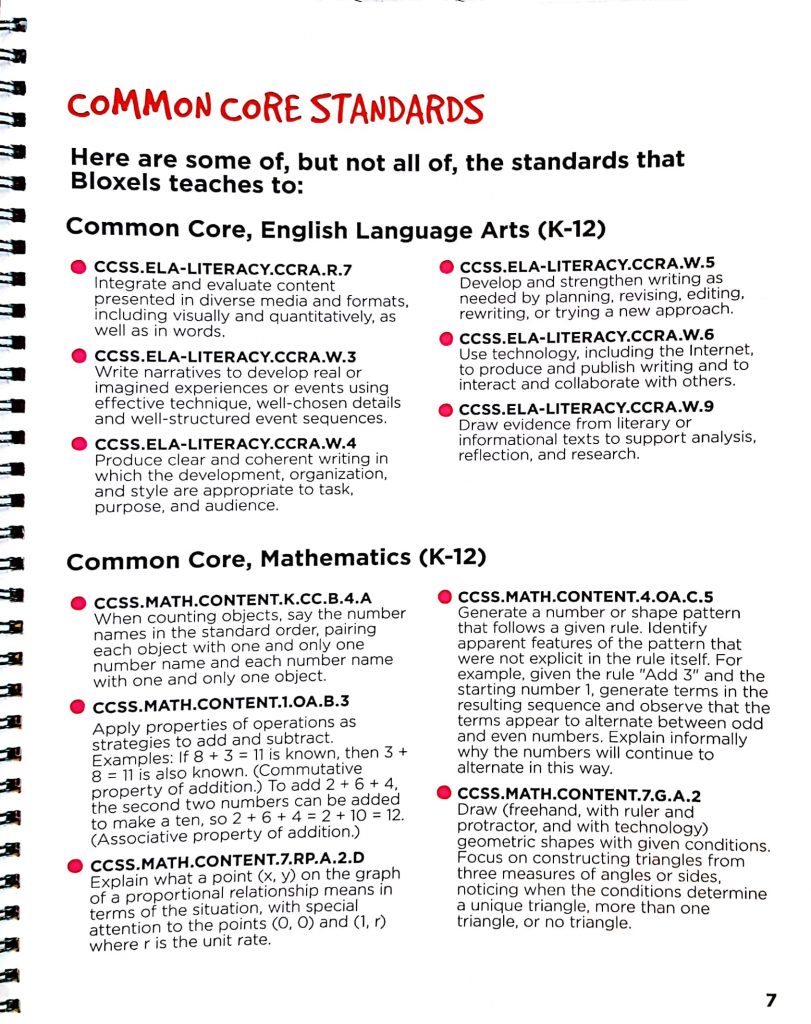
• Digital fabrication equipment
• 3D printers (lots of brands, many distributors for the same brand)
• Laser cutters; Epilog and Full Spectrum included
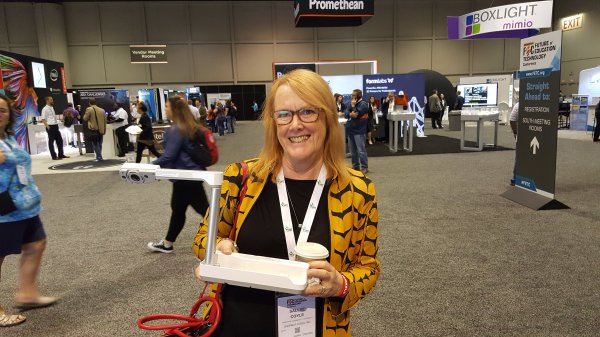
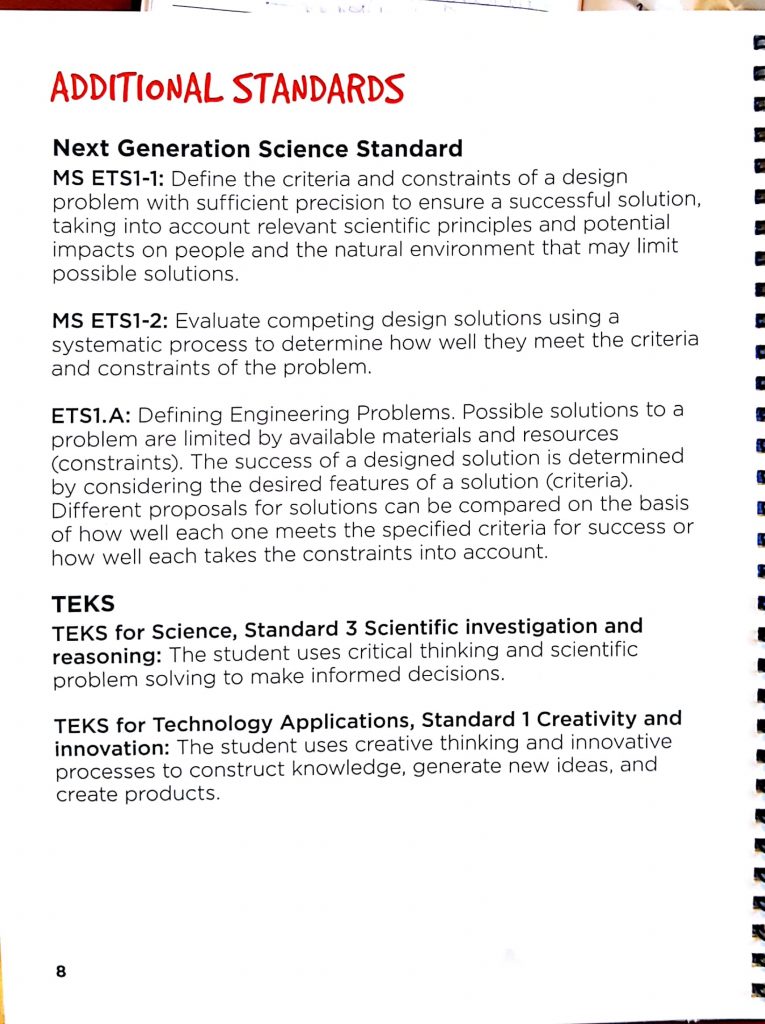
• A first: a water jet cutter by Omax
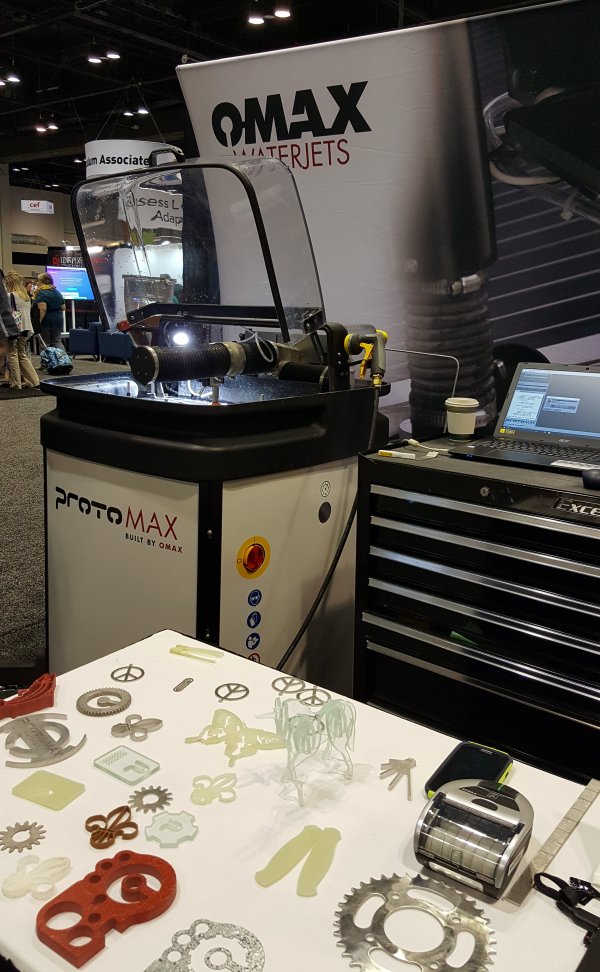 The Omax water jet cutter can use the same design files as ShopBot CNC machines. Look for the glass unicorn I designed on the sample table.
 Detail of unicorn in glass cut with the Omax water jet.
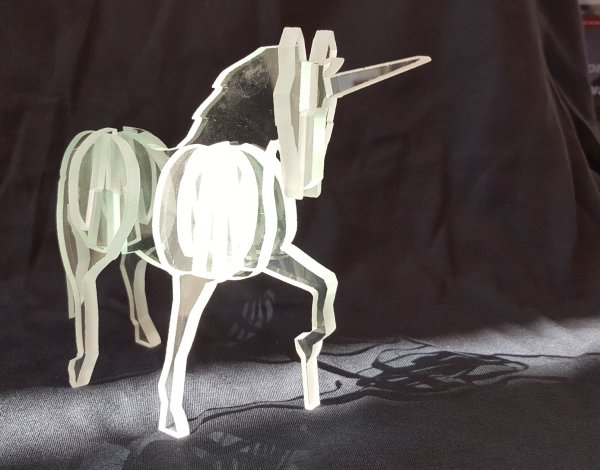
 Same design files machined in HDPE plastic with a ShopBot CNC Plans for FETC 2019: Next year, look for ShopBot to provide information about CNC equipment for cutting sheetgoods and 3D carving in wood, plastic, and non-ferrous metals.
By Jennifer Nix, January 5th, 2018  Andy Glass hamming it up as he begins shooting a video in his shop. To say Andy Glass keeps himself busy is an understatement. In addition to his YouTube channel Glass Impressions, he has a full-time day job, and does woodwork (of various kinds) in his “free” time. This is all while he juggles family life, which includes a wife and toddler at home.
But perhaps we should start at the beginning. Ever since he can remember, Andy has loved woodworking and making things. At age 7, he was already making birdhouses—and it progressed from there. He claims he has the “maker gene” courtesy of his grandfather. Although he only knew him once he had been retired, Andy’s grandfather was a master cabinetmaker and master homebuilder. Retirement didn’t stop him from working, he still had a beautiful shop at his home in St. Cloud, MN. When Andy’s family would go to visit, 5-6 times a year, he would spend 110% of his time in the woodworking shop with his grandfather. He wasn’t always in there building things of his own, though. Often he’d be in there helping his grandfather build things for other people, holding his hammer or helping him in whatever way he needed.
The most memorable thing he learned from his grandpa? Efficient use of materials. Andy was working on a project and needed to cut something from a scrap piece of wood. He plopped the measurements down, right in the middle of the piece of wood. His grandfather stopped him, “Why make two cuts when you can move your measurement down to the edge and make one cut?” he asked. Something so obvious as an adult, but as a 6-7 year old, not anything you even consider to get the job done.
The only formal woodworking education Andy has is from high school classes in construction and woodworking. Instead, he took what his grandfather had taught him and continued with self-education. He used everything from books to online videos, read other online content and magazines and, as he likes to put it he “learned by making.” That includes making mistakes too.
While working on projects in the standalone shop he had at home in Bismarck, ND, he decided to grab a camera and film one throughout his process. That first project? A Shopmade Blast Gate for 4” PVC dust collection piping. He posted it online and things took on a life of their own. The video was getting hit after hit, and because of his business and entrepreneurial skill set he came to the realization that there was value in what he was doing. It was from here that he was able to gather sponsors, which yielded sponsorship money and tools for product endorsements.
 Andy’s First YouTube Video He continued down this path for about 3 years while working his day job and produced videos when he could. Because he couldn’t devote 100% of his time to it, his competition began surpassing him. After spending some time exploring other opportunities in the realm of video channels and other online arenas, Andy recently decided to relaunch his YouTube channel, Glass Impressions. From some of the comments already coming in on his most recent posts, followers of his original YouTube channel are happy to have him back and are looking forward to what he’ll be doing next.
Having always had a love for traditional metalwork machinery and their precision, woodworking routers entered his radar while Andy continued doing woodworking. He saw the technology slowly becoming more and more affordable, which led him to decide to build a CNC himself—something he references as the worst decision of his life. “I wasted a whole lot of time and money, although I learned a whole bunch. I know CNC machining from the ground up now, how the machines work.” The hardest part of building the CNC machine himself was the sheer amount of time it took. “It’s like taking on the plumbing project of putting a garbage disposal in your house (if you’re not a plumber). You find yourself going to Home Depot or another big box store a million times just to put in the disposal.” While he is appreciative to have learned everything he did from putting the tool together, he can’t help but think on it with regret. “It was so much wasted time, when if I had bought a non-kit machine from the get-go, I could have used all of that time to learn about how to use the CNC instead of learning how to build one.”
After that experience, he purchased pre-built CNC machines and then it was 100 mph, full-steam ahead into CNC. “You have to appreciate the precision, repeatability, and the accuracy that CNC gets you.” He currently has two ShopBot tools. The first one he started using is the Desktop MAX. One of the projects he worked on with that particular tool is custom stair treads—a project that he was able to complete by using some custom jigs he made. And while he now uses his second tool, a ShopBot PRSalpha with an automatic tool changer, to do the majority of his larger jobs, the Desktop MAX has continued to be put to good use — he’s used it to create cabinets and signs, among other things.
After learning a bit about Andy and how he got where he is, we asked him some more specific questions:
SB: What were you doing traditionally that you’re now doing via CNC? Are there things that you wanted to do traditionally that you are now using the CNC for because it makes it easier?
AG: I’ve had a handful of business opportunities and products that have been rattling around in my head since the day I learned how to do woodworking. Coming up with an effective and economical way to do it has always been automation and that technology is CNC. As I moved in progression to where I am now, those opportunities are now becoming a reality. Everything I used to make in the woodworking shop was done in a traditional manner: chop saw, table saw, the router jig or the dado blade for dados and grooves and rabbets, etc.
Just this past month, we were doing a huge bar job for a bar/restaurant in Valley City, ND. The booth ends are traditional booth ends, but they wanted the end caps in solid walnut and then connected via poplar/plywood that was stained. I quickly designed a jig for use in the CNC that could register 4 glued-up walnut panels, and the machine would cut out the booth profile and add a 1/8” rabbet where it needed to connect the plywood—and I had them all done in under 3 hours (24 ends). This is just an example of how in the short couple of months having the machine, it has saved an enormous amount of time in the shop. This project is something that is not out of the realm of traditional woodwork capabilities, but it would have taken well over 2-2/12 days to complete this component.
SB: You mentioned using a jig for the booth ends, and you used one for the stair tread project. Do you find yourself building a lot of jigs for your projects or is it something that you’ve come to realize helps you problem solve?
AG: Both. I utilize CNC to make jigs and templates to not necessarily use the CNC on the project itself. Example: Putting in a live bathroom slab in the women’s room of the bar/restaurant project, we needed a 4 3/4” hole cut out for a vessel sink. I didn’t want to use the saw on the live slab, so I used the CNC to cut a jig with a 4 3/4” hole in a piece of wood, with the perfect dimensions for what we were doing for the sink. I knew that by doing this and clamping it on top of the slab in the right orientation, we could then use a router with a flush trim bit to cut the slab via the jig/templated hole. An, example of using the CNC in the initial stages of the project, not directly on the project itself.
On the CNC/production side (I geek out about this because I’m big on process and habit of workflow – finding a system no matter what it is that you do) find jigs or layout lines or stop blocks, anything that allows you to do repetitive work on the CNC with minimal effort in-between your “go times” is so worth it up front for that capital investment to save you so much time. The jigs developed allow for set-up to do things to take minutes instead of hours. It maintains efficiency and more so, consistency between cuts on the production work – which is essential – and is a must have skill in CNC technology and CNC workflow.
SB: What is it that you find you want to do with the tool that you haven’t had the time to do yet?
AG: To develop the product line for my new Fargo closets company. I have realized that there is a big gap in the market for reach-in custom closet systems, or closet systems in general that are high quality and affordable (or relatively affordable). I subscribe to Mosaic cabinet software, and have been playing around with the software creating projects, and they are just sitting in a queue, waiting to be made. My father has contracted me to build the closets in his new home in Fargo, and the general design person, interior/industrial designer that is working with them on everything did a walk through of the house with me (and my step-mother) telling me exactly what she wanted for each of the closets. I know it’s achievable via Mosaic and the ShopBot. Kitchen cabinet quality with more budget-friendly pricing. It’s all about quality.
The ShopBot CNC has me so excited because I can’t wait to get done with the bar/restaurant job and get my Fargo Closets company going. I see myself possibly transitioning out of having a “day job” and doing this in my spare time to actually making it my full-time job.
By ShopBot, December 28th, 2017 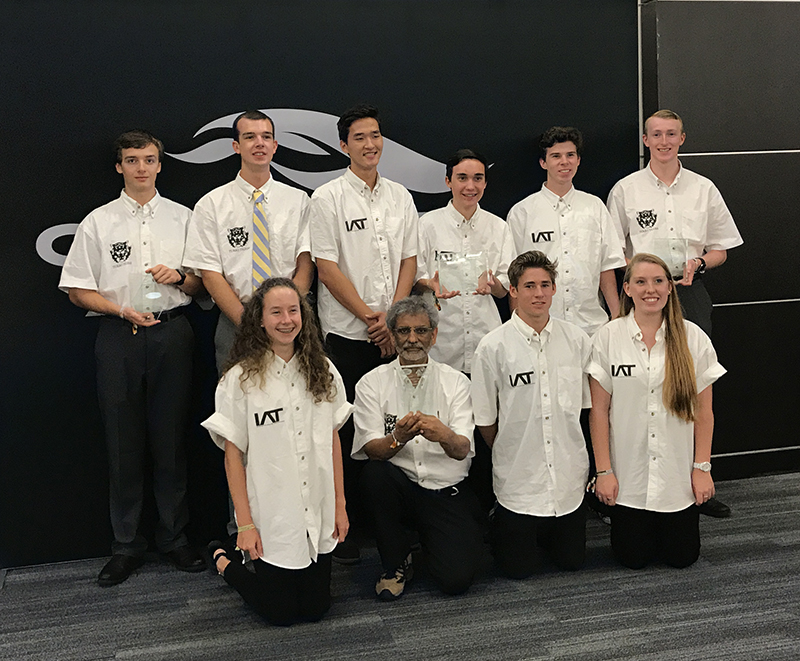 Jad Jadeja and the students from the Innovative Airflow Technologies and Turbo Tigers teams. Dripping Springs might not be the biggest city in Texas, but big things are happening at its only high school. As a school that is totally committed to providing students with challenging learning opportunities in science, technology, and math, the programming and engineering classes of teacher Jad Jadeja continue to impress. Not only have his students competed in multiple statewide events, but they have also advanced to national level competitions and now find themselves heading to a world competition in Dubai in December.
This past school year, Dripping Springs High School (DSHS) was awarded the title of Fab Lab from MIT. According to the official press release “Jad Jadeja’s room has been officially designated as a Fab Lab.” Of the 700+ Fab Labs worldwide, DSHS is the only high school in Texas to achieve this status. Part of attaining this designation involves providing a hands-on environment that takes a project from an idea all the way to a working model. This process involves not only learning engineering principles, but applying them using the latest technology. Students are required to learn how to use a variety of hi-tech equipment like 3D printers and CNC machines. As part of the design process, the students learned how to use software such as SolidWorks, Solid Edge, and Aspire.
After the design process came fabrication—and this is where Jad’s two ShopBot CNC machines (a ShopBot Buddy and a Desktop) played a critical role. Whether cutting wood, composite materials, acrylic, or aluminum, it seems that no project was too big or small for the ShopBot tools. Jad would be the first to say that not only did the machines work well, but ShopBot provided a great deal of support during the design and fabrication phase of each project.
Over the past two years, many students in Jad’s programming and robotics classes have completed certifications in SolidWorks, Solid Edge (this year), ShopBot* (including Aspire training), LabVIEW, and OSHA.
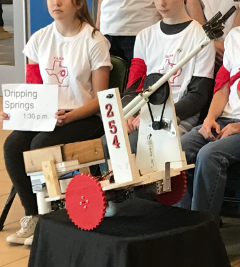
Last December, Jad’s students competed at the UIL Best Robotics Competition that included 5-A and 6-A schools from Texas, New Mexico, and Oklahoma. The students placed 6th in the state of Texas event and came in 15th overall. Approximately 80% of their robot was built using one of the ShopBots! In addition, another engineering teacher at Jad’s school enlisted his students’ support in cutting out aluminum parts on one of the ShopBots for the FIRST Robotics Competition.
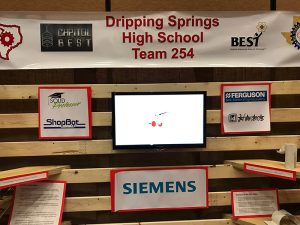
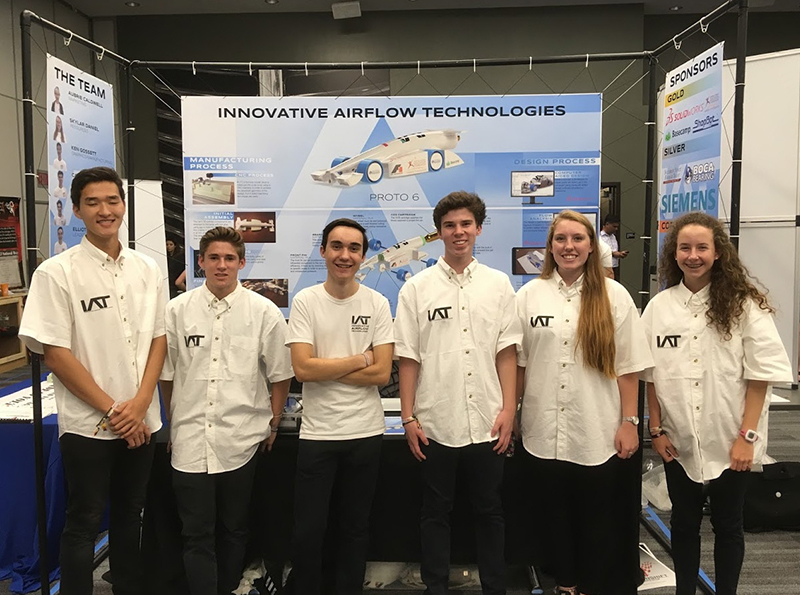 Innovative Airflow Technologies team in front of their booth at the competition. In January 2017, the success continued with the Innovative Airflow Technologies team of Aubrie Caldwell, Skylar Daniel, Ken Gossett, Cade Nowicki, and Elliott Turner. They placed high enough at the Texas F1 in Schools state competition in Austin to advance to national competition in Austin in June. F1 competitions include a complete race car, 3D designed to contest specs, and then fabrication of the car out of an expanded PVC block of material. The race car is then painted, and tires installed. Powered by CO2 cartridges, the cars compete (two at a time) on a 25-meter race track where the fastest times are recorded. The Innovative Airflow team employed the ShopBot rotary indexer to do four-sided machining while carving their race car on the ShopBot Desktop. In addition to designing and building an F1 race car, the team must also put together a display, project portfolio, and a marketing plan, which they then use to make an oral presentation to the judges at competition. As a little tune-up for Nationals, the Innovative Airflow Technologies team made a presentation at this year’s Austin Camp ShopBot to the delight of the attending ShopBotters.
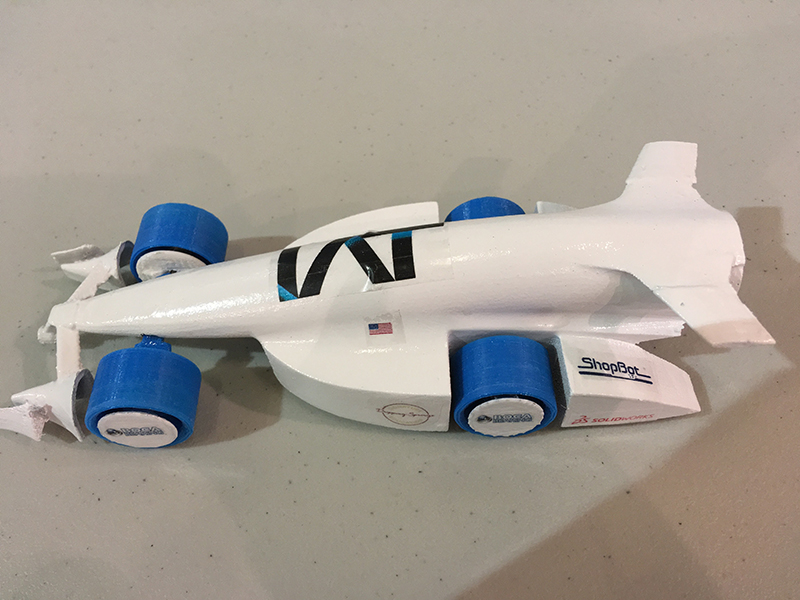 Innovative Airflow Technologies’ vehicle design for the competition. In addition to the F1 competition at state, there also was a 4×4 in Schools Challenge competition. The Turbo Tigers team of Ben Marsan, Henry Windsor, Cole Scott, Bryce Fitzpatrick, and Jason Fitzpatrick advanced to national competition as well.
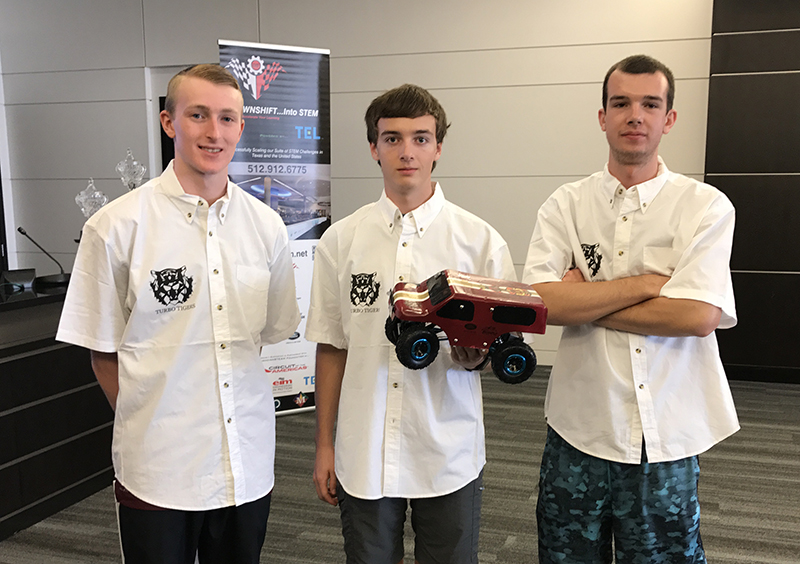 Members of the Turbo Tigers team. The Turbo Tigers team had requirements similar to those of the Innovative Airflow Technologies team, in regard to project design and fabrication, creating a display featuring some of the steps taken, and the requirement of a portfolio and oral presentation. Their remote controlled 4×4 had some unique features, including one feature that only this team had: telemetry. An embedded microprocessor in the car sent roll and pitch, temperature, altitude, and GPS data to an application the students monitored on a PC. The data was then converted into graphical displays. From the GPS data students could locate the car using an application like Google Maps, and then visually display the location on a map in real time.
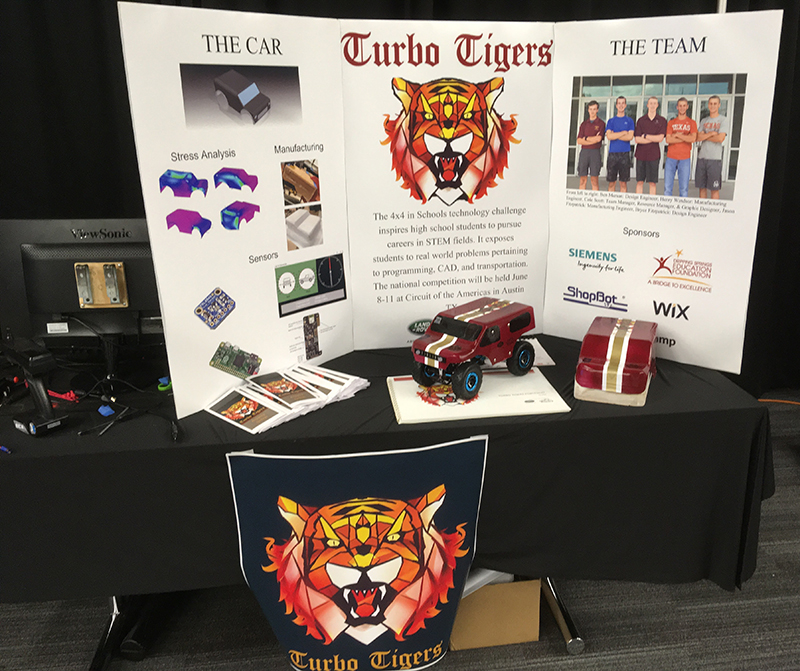 The Turbo Tigers’ competition display. One of the greatest challenges in the competition is navigating an extremely difficult obstacle course with your 4×4. The Turbo Tigers used a ShopBot to build the body for their 4×4. After importing their 3D model into Cut3D software, they sliced the model into three layers. They then used the ShopBot to cut the parts, glued them together, and sanded the entire mold for the car. Using a vacuum hold-down jig, heated plastic was vacuum formed around the mold and that was then removed and painted. Even though they faced stiff competition at nationals, the Turbo Tigers placed 2nd and qualified for the 4×4 World Competition in December, held in Abu Dhabi. Click here to see video from the first day of the World Competition.
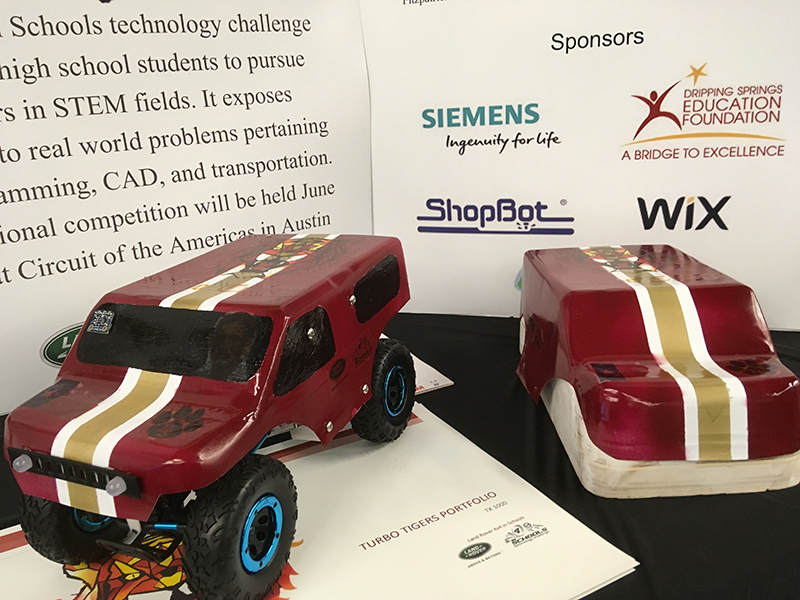 The Turbo Tigers entry into the 4×4 competition. Every time you think that Jad Jadeja’s students have reached their limit, they are off to another incredibly challenging project. This past year they started the preliminary work in building a solar car for the National Solar Challenge that will occur later this school year. In addition, the school has introduced an internationally recognized soldering certification program.
From being the first official Fab Lab High School in Texas, to advancing to national competitions in a variety of areas, to helping cut the parts for the school’s robot used in the FRC World Championship, to qualifying for the world 4×4 competition, Jad, his students, and his two ShopBot tools keep taking more territory every year. It looks like they will all have to make sure their passports are up to date – they are going to go far!
~ reported by Brett Dickinson for ShopBot Tools
*ShopBot Certification is currently a beta-test program in Texas with Brett Dickinson. For more information, contact ShopBot Tools via email: info@shopbottools.com
Shelter 2.0, the Open Design transitional housing design created by Bill Young and Robert Bridges, has just made the “release” files available for a new 8’x8′ design that not only reduces the materials needed, but includes a lot of small changes to make them easier to assemble and less hardware-dependent. You may have seen early versions of the 8’x8’ in the wild before, at places like the FabLabDC, the Big Build at the National Building Museum, and MakeLocal at the NY Maker Faire.
The interesting part of this though is how they have been released. One of the hardest parts of sharing designs like Shelter 2.0 is supplying files in enough formats, and with enough information, to be useful to fabricators. All the Shelter 2.0 designs are created and toolpathed in VCarve, so at the San Mateo Maker Faire this past Spring we asked the Vectric team if they had any ideas for sharing our VCarve files with people that might not have a copy of the software. The solution that they came up with was brilliant…to add special tags to Shelter 2.0 files that will allow them to be used in the free trial version of VCarve v9.
With these tagged files we can now include all the machining information to Shelter 2.0 files that we think is important but is not available in other formats. Users will not only be able to do a few modifications to the parts, but most importantly will be able to create toolpaths and run them on their own CNC tools. This will allow fabricators that might not have VCarve, or haven’t updated their copies yet to V9, to be able to use the files just the way we do when we cut them.
You can download the specially tagged files at http://vectricltd.cmail20.com/t/r-l-jrijdhhk-jlihdlhrtu-h/ and find cutting instructions and assembly instructions on Google Docs.
Our special thanks go out to the Vectric team, especially Chris and Steph, for making this happen. And of course to ShopBot for supporting Shelter 2.0 from the beginning.
By ShopBot, December 14th, 2017 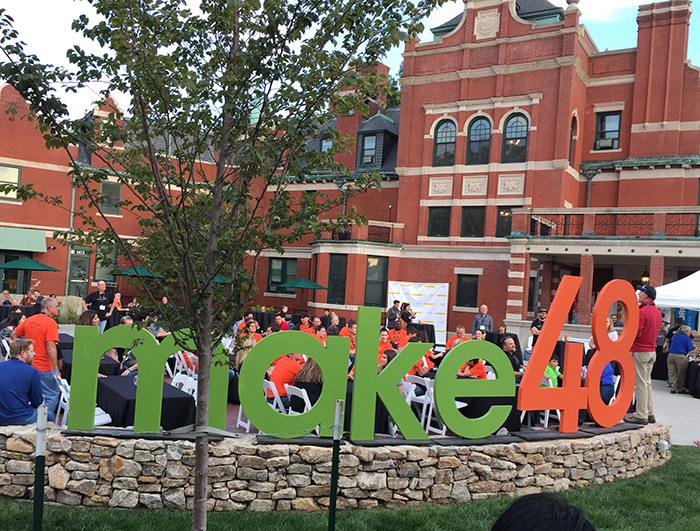 Make48 at the Kansas City Art Institute The new TV show, Make48 is kind of a combination hybrid of Iron Chef and Shark Tank. You start off with an unveiled topic and some resources and then set the clock ticking. Twelve teams now have 48 hours to: come up with an idea that fits the topic provided; do a patent search to see if their idea has been used already; prototype the idea–with the help of digital fabrication experts and craftsmen and using materials from a $200 shopping spree at Ace Hardware; throw out your idea already prototyped and try again; stay up late and perfect the idea; build a website and marketing materials to promote the idea; and then, finally, sell a finished product in eight minutes to a panel of experienced entrepreneur judges for constructive and de-constructive criticism. If you got through that laundry list of a sentence without taking more than one breath, you can begin to get a sense of what the two days are like.
Now in its second season, the show is hosted by the Kansas City Art Institute, who graciously opened up their campus and MakerSpace to the competition. My son, Bryan, and I were invited as volunteers and “Tool Techs” for the two ShopBot Desktop MAX machines that the school has so that we could help the contestants create their ideas. The teams also had the use of a bank of 12 Ultimaker 3D printers, an Epilog Fusion laser, a makeshift wood and metal shop out in the parking lot, and help from a team of professionals from patent lawyers to GoDaddy website workers. The weekend became a true immersion experience into the world of brainstorming, entrepreneurship, and the design process.
The creative leveraging of digital fabrication tools and great design software is what truly enables the success of product idea development in only 48 hours. It was rapid prototyping on steroids with some teams pulling all nighters to get their products completed. Bryan and I finished cutting Friday night around 2:00 AM. We witnessed each digital fabrication machine used for their strengths. The printers were creating plastic fan turbines of several designs that required internal structure and undercutting that could not be created any other way. The Shopbot Desktop MAX cut materials like MDF, hardwood, and plywood that the printers can’t use, and the laser was burning away on some acrylic with elaborate etched designs. The efficient workflow from idea to CAD to CAM to NC kept all the equipment active for most of the crunch time.
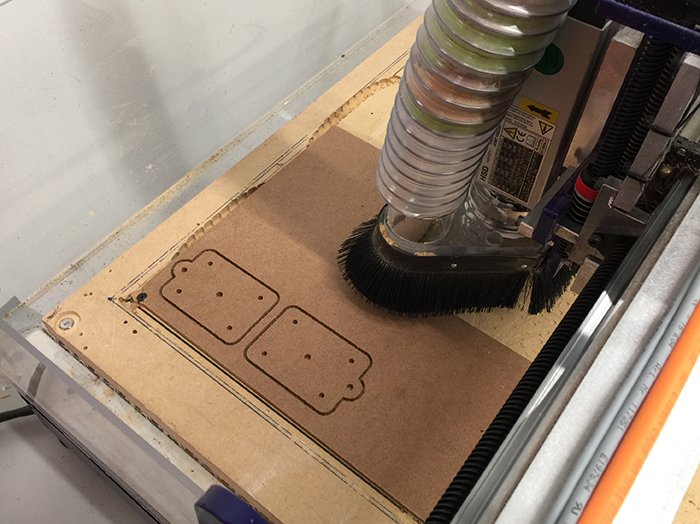 Pivot plate being milled with the ShopBot MAX.
The twelve teams were very diverse. One was made up of two high school girls and their Dads. Another was a group of inventors that already had successful products on the market. A husband and wife team came up with a very creative sports game, and an entrepreneur from across the pond in England teamed up with a woodworker from the U.S. Most of the groups had viable and interesting products that were well presented to the judges at the end. Unfortunately, I can’t reveal the products or the winners due to property rights and I don’t want to spoil the episodes for you. The three top winning teams receive ongoing assistance to design, patent, and get their products to market, which will later be a part of the final edit.
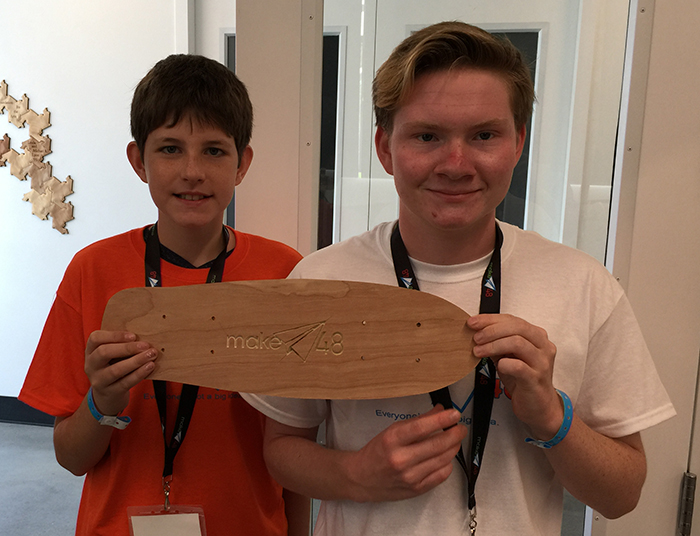 Bryan and Kyle showing off their skateboard design.
Here is a photo of the youngest ToolTech, Bryan (17) and the youngest team member, Kyle (11) from San Diego who both teamed up to design a skateboard with pivoting wheels to double as a rolling school backpack, an idea that they abandoned early on day two. Another product that I liked was a floating pool hockey game with a never ending supply of water to shoot your opponent’s puck into the goal (SEE VIDEO 2). This game was in violation of two different patents that when combined together shut down another great idea.
For more information, and to find out how to be a contestant on the next season, go to their website. There is also a complete listing of viewing times and public TV stations that are currently running season one.
~ Reported by Chris Burns
By Jennifer Nix, November 13th, 2017  One of the many signs created by Neathawk Designs When the recession of 2008 hit, housing and land developers found themselves hit particularly hard. Lindsay Neathawk was a graphic designer for a land developer, and soon was impacted by the recession as well come 2010—and found herself looking for a job. Instead of standing still and waiting for a job to come to her, she decided to invest in her first CNC tool (a CNC Shark) and began a sign making business in her garage. Neathawk Designs was born.
Because she was using her CNC tool for hours on end, and milling PVC over long periods of time, she kept breaking her machine. She found she outgrew the tool quickly, it only took about 2 months. But she continued on with the tool and used it for about a year before determining she needed a tool that was bigger and a bit more robust. In 2011, after much research she chose ShopBot’s Full Size PRSstandard. As a part of being able to get up and running on the machine in a timely manner, she and her husband attended one of ShopBot’s Basic Training sessions on-site at the ShopBot facility.
Once they returned home to Williamstown, MA in The Berkshires, Lindsay started working with the VCarve software and building sign files. That didn’t last too long, though. Three months after using VCarve, she decided to switch to Aspire. Lindsay told us, “I was so excited about doing 3D work, that I had to move from VCarve to Aspire to achieve the results I wanted.” Her first 3D project was a sign design for a dentist that included 3D teeth.
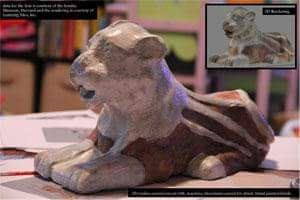
 The signs that jump started using Aspire for projects. While Neathawk Designs gets the majority of their work via word-of-mouth, referrals, or repeat business, sometimes a project comes up because of who you know, not just what you know. In 2012, Lindsay’s husband, Ryan, was speaking with one of their neighbors, Dr. Donald H. Sanders, an archaeologist. He had moved into the realm of digital media and had developed software that takes digital photos shot with a smartphone and converts them into 3D computer models, which can then be used for interactive archaeological visualizations. At the time, he was working with Harvard University’s Semitic Museum on a reproduction of a ceramic lion that had been destroyed 3,000 years earlier in the ancient city of Nuzi, in ancient Mitanni, (now northeastern Iraq). Apparently Ryan had the utmost confidence in his wife’s ability with her CNC tool, and suggested that they work together on a physical reproduction of the piece. While she hadn’t done this kind of project before, Lindsay forged ahead. She cut a prototype from foam on her ShopBot and when the people at the Harvard Semitic Museum were shown the result, they were blown away. She was then asked by the museum to create a full-sized version, using the same technique, for display in the museum alongside the remaining fragments of the original.
 The Nuzi Lion In subsequent years, Lindsay and Ryan determined that they wanted to expand their shop. First came the addition of a couple of pieces of equipment that gave them the ability to offer their clients more. Their sign business continued to thrive. They then realized that their garage just wasn’t enough space for the business and moved into a larger, much more spacious facility. More room to move, more room for equipment, and as it turns out, more room for larger projects.
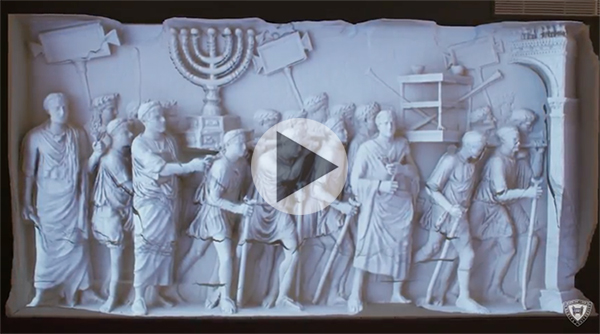
In the meantime, Learning Sites, Inc., the company founded and run by Dr. Sanders, had begun work on another project. The spoils panel from the Arch of Titus in Rome was being studied and re-colorized as a part of an exhibition “The Arch of Titus – from Jerusalem to Rome, and Back” for the Yeshiva University Museum. After exploring several options, the museum decided that having a full-scale replica of the important Roman sculpture would be the most beneficial way to display it in the exhibition. To enhance the experience, a digital replica and colorization that Learning Sites had developed would be projected over it. Learning Sites contacted their friends at Neathawk Designs again, hoping they could help as they had with the Nuzi lion. Lindsay accepted the challenge of recreating the Roman relief panel and got to work on the project that was going to consume her life for almost two months.
The final piece is 1.5’ deep x 12.5’ wide x 6.5’ tall. Quite a bit larger than the bed of her 4’ x 8’ ShopBot PRSstandard, but that didn’t stop her from figuring out a way to make it happen. She divided the full-sized piece into four smaller panels, then used Aspire to create slices of each panel, with the slices building one on top of the other to complete the final surface. Each panel is made up of nine slices which means there were 36 slices in total. Once the software work was done, it was time to put her ShopBot to work. In the beginning, Lindsay sometimes had her ShopBot running for 24 hours straight! After 49 days straight, averaging 10-12 work hours a day, the piece was finished. To meet the deadline, she had promised that she wouldn’t work on any other projects until the Arch of Titus panel was complete. By the time she completed it, she had 25 sign projects waiting for her attention.
When it comes to Neathawk Designs’ typical work, Lindsay’s background in graphic design and marketing have been a huge help. She still views what she does as graphic design and marketing, just in a different medium. Potential clients come in and discuss their needs with her and often think they then need to employ the services of a designer, thinking that Lindsay only does the physical fabrication of the signs. They are often pleasantly surprised to learn that Neathawk designs and makes the signs, which makes it much easier on them. She also likes to get the client involved in the design process from the very beginning. As she puts it: “They’re the ones marrying the project, so they should be involved in developing it.”
While Neathawk Designs is Lindsay’s full-time job, her husband Ryan participates in the business as well. He not only contributes ideas (which are often a helpful different perspective), he does some of the fabrication work as well, particularly in metals. One of his more recent contributions was building a plasma cutter from scratch. Although he has a full-time job as a general contractor, he’d like to eventually stop doing that and do work for Neathawk Designs full-time. They’re not quite there yet, but it’s not too far out of reach.
Yeshiva University created a video documenting the process and installation of the spoils panel of the Arch of Titus replica. You can view it by using the link below:
 Video courtesy of Yeshiva University
By Jennifer Nix, October 18th, 2017 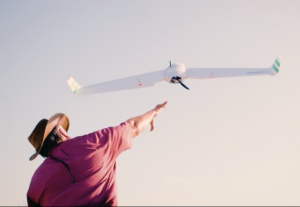 Robota’s Eclipse taking flight While working for a military systems manufacturer, Antonio Liska developed a sensibility regarding unmanned aircraft (UAVs). He was of the mind that unmanned aerial systems could be utilized beyond military applications—functionality that extended into more commercial applications and where they could serve far more altruistic purposes.
When military contracts started drying up in 2009, Antonio decided it was time to develop his own pursuits in the realm of UAVs—and started his own business, Robota. He began with autopilot development and used it with ready-to-fly airplane kits. This is where a Handibot® Smart Power Tool entered the picture. Antonio purchased a Handibot and used it to modify the fuselage of each airplane. He created a jig so that he could move the Handibot along the length of them and make changes better suited to Robota’s needs. But unfortunately, the model of the airplane they were using was discontinued.
It was at this point that Robota began designing and producing their own aircraft. This was also when they made the determination that they were in need of a larger CNC tool so that they had the ability to prototype, build, and customize the components needed to create their UAV, the Eclipse. Because Antonio had been happy with the work he had been able to do utilizing the Handibot, he decided to purchase another CNC made by ShopBot – the ShopBot Desktop.
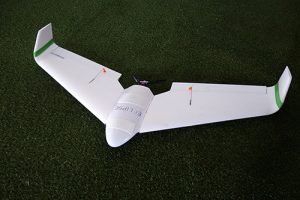 Robota’s Eclipse UAV The materials they use their ShopBot for vary—from wood to plastics to aluminum to fiberglass. This also includes using it to create the molds for the foam bodies of the aircraft, motor mounts cut from nylon, and trimming out parts after being thermoformed. “Whatever we can put on the ShopBot,” Liska says, “we do.” And just because they now have a ShopBot Desktop, that doesn’t mean that the Handibot sits by idly. The portability of the Handibot allows them to place it on top of larger pieces sitting in a jig (like a wing) and carve/engrave directly onto the already fabricated piece.
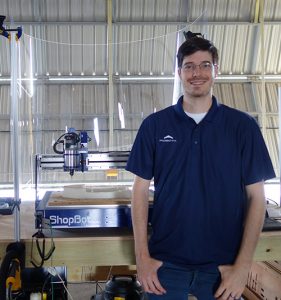 Antonio Liska and Robota’s ShopBot Desktop 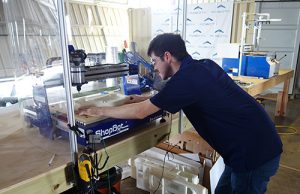 Antonio Liska cuts molds for a UAV with the ShopBot Desktop  Plastic mold for UAV being fabricated on the ShopBot Desktop  Aluminum being milled on the ShopBot Desktop  Manufacturing Technician, Antonio Medellin, uses the Handibot Smart Power Tool to cut into the edge of the wing of a UAV Robota’s UAVs are not hobby drones, they’re intended for use in mapping and survey applications, particularly for large areas. It enables survey professionals, engineering companies, and construction companies to get survey grade precision for imaging (down to a few centimeters accuracy on a map) in large areas without having to walk it in its entirety. This not only saves time, but also keeps people from having to manually survey potentially dangerous terrain. For example, they have customers in Houston currently utilizing Robota drones to assess the storm damage caused by Hurricane Harvey.
Because they not only create their own software, but also the majority of the hardware components, they are consistently making updates and improvements as they work. Their ShopBot Desktop assists in this. Liska told us, “One of the reasons we have a ShopBot is because we can make changes quickly. We have the tools to make modification to our tools, so that as things change, we can respond pretty quickly.” While they use VCarve for some of their basic 2D work, they use Fusion 360 for the 3D parts. They find that Fusion is the better solution for the CAM (computer aided machining) of what they do with their tools.
Although there is still a lot of education needed regarding the difference between hobby drones vs. work-based/utilitarian drones, Robota continues their quest in providing real-world solutions for the survey and construction professionals that use UAVs to get their own jobs done with accuracy and efficiency.
To learn more about Robota, see their video:
By ShopBot, October 9th, 2017 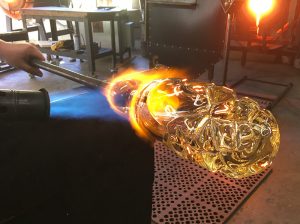 Iceberg glass vase in progress – on pipe after being rolled onto textured plate. In August 2017, Brian Gillespie and Tara Broyhill were artists in residence at the Pilchuck Glass School. During session 6, “Exploration”, they explored how generative design and digital fabrication can inform the form and texture of glass in new ways. It was with this in mind that they packed a Handibot® Smart Power Tool into their car, drove a couple of hours north of Seattle, and went to “summer camp for grown-ups.”
To read more about Brian and Tara’s exploration, as well as see more photos, visit the Handibot blog.
By Jennifer Nix, September 15th, 2017 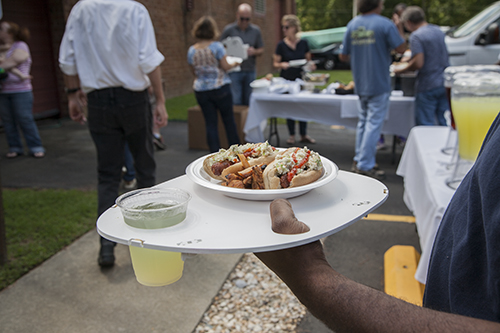
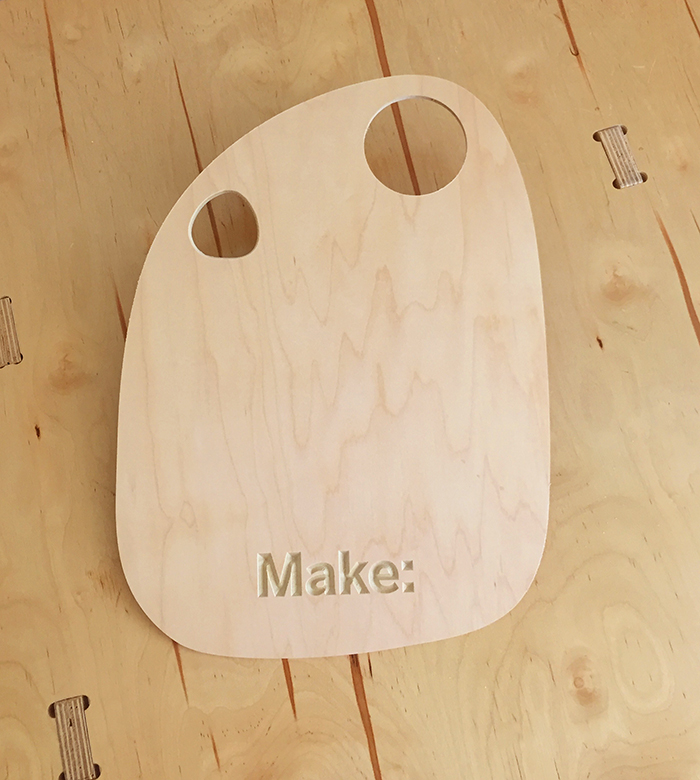
When ShopBot began preparing for this year’s World Maker Faire in New York, we determined that we wanted to showcase how ShopBot CNC tools integrate into a small scale manufacturing process. Then it was time to get the creative juices flowing. In this case, it was the highly caffeinated creativity of Bill Young. Enter the initial idea: A lightweight food tray that one could place food on, contains an opening to hold a beverage, and can be held in one hand while using the other hand to eat and drink–and that could be made for the cost of a hot dog at a food truck event.
Bill cut a prototype, complete with a logo V-Carved into the surface, on his full-size ShopBot out of plywood and brought it to the ShopBot offices to show it off. The intent of the tray is to use it when people are eating outside in an environment with limited (or no) seating and table space. For example–if you were to visit a food truck or were having a picnic, you’d have an easier time with all of your food and drink with the tray instead of trying to juggle it with both hands, and figure out some awkward way to hold something while you took a sip from your cup or took a fork full of food.
 Bill Young’s initial tray design. After a couple of us at ShopBot had an opportunity to hold the trays and get a sense of the comfort factor in holding it, there were some suggested changes and adjustments to experiment with on the next iteration of the tray. Should we make adjustments to the spot for the beverage? Do we need to add a support of some kind to keep the drink from falling through the hole if it’s of a smaller size? Should we add legs of some kind so that if one is sitting on he ground, they can put it down without it laying flat on the ground? What about a lighter weight material that is moisture resistant? Is the hole for your thumb to hold onto it in the right place and is it the right size?
Enter again, the creative mind of Bill Young and a new version of the tray. This time cut from sheets of expanded PVC, a material that is still reasonably lightweight, but also has durability. This latest version also had a removable support system/legs. Some more of us at ShopBot played around with the trays and looked at solving the securing of a drink if it’s smaller than the provided beverage hole. The use of a ponytail holder around a can of soda to stop slippage was experimented with (being that a lot of women/girls often have at least one of them on them or in their bag). What if we inserted a stretchable mesh or fabric to act as a sling for the drink? What if the legs of the tray folded up to make the tray flat again when not using them? While the group continued to brainstorm on this and other potential revisions to the design of the tray, we sought out some information from sources that could give us some genuine usability feedback: food truck owners.
Durham, being a particularly foodie town, has a wealth of resources when it comes to opinions on food related items. We took a few of the initial prototypes to someone that owns a high-end food truck that’s hired for special/private events such as wedding receptions, anniversary parties, corporate events, or graduation parties. Being an avid woodworker himself, he had an instant appreciation for the tray and its elegant simplicity. He also gave us a different perspective on uses of the tray. Being that there is limited space in the food truck, the trays would need to stack flat or up on a shelf so that they could easily be used, wiped clean, and stored again. He really liked the stand or “legs” but wanted something that was all one unit so he didn’t have to store pieces in different places on the truck and/or give instructions to customers on how to set it up. Being able to customize the trays for a special event, for a keepsake for the guests, is a win all day long. Being able to pre-produce trays that can then can be customized by VCarve engraving in small batches would give him a lot of flexibility.
We also shared the trays and stands with a friend of ShopBot who has a local industrial kitchen, along with numerous resources for food truck businesses, where food trucks use the kitchen to prepare their foods and that also contains a large event space. His reaction and ideas for the trays expanded further than what we’d discussed with others. To him, this was a great solution for being at the beach and needing a tray for snacks and drinks. He saw it as more of a “traveling” food tray that you’d keep in your car or with a lawn chair. That way it could be used at any event where a person would be hanging out for a while and need a place to set your food and drink down without it sitting directly on the ground. He also raised the concerns for making sure the tray wasn’t too heavy once loaded up with food and drink and wondered how a child or an older person might handle the tray, or how a disabled person might assemble and use it.
We returned from our local visits and feedback with a few new design challenges: could we add legs or a stand that would be out of the same material that would act as one unit and fold flat when not in use, use the ShopBot to manufacture the additional parts, and attempt to keep costs of production in check?
This is where ShopBot’s Brian Owen entered the arena and started working on an idea for the tray making use of foldable legs—so that a person can use the tray laying flat or open up the legs and use that added height when needed. He began experimenting with a system for the legs that didn’t consume a lot of additional material and could be assembled with additional parts that didn’t require specialty parts. What he came up with? A structure that involved some extra cuts into the tray (which, with a CNC, is a pretty easy task once built into the cut file), some small legs for the support structure, and rubber bands. Yes, rubber bands.
Not only did Brian’s adjustments work as legs to hold the tray, but with some additional minor adjustments, it also acted as a support underneath the tray for the drink in the beverage hole. We now had a product that incorporated the changes that made our food tray more multifunctional. Our next step was to see how well the tray functioned in an environment it was intended to be used in. This is where the employees at ShopBot got to be our beta testers—but also got fed a good meal and enjoyed being outside in the fresh air one late summer afternoon.
Using the CNC to cut all the parts for this tray was a huge success. It gave our design team a few restrictions that turned out to be key elements in the overall product design.
We’ve learned a lot along the way in the evolution of this project and it’s still evolving! Brian Owen has tweaked the design files to allow for faster and easier assembly, Bill Young continues to make tray variations, one dubbed the “winer” for a wine and cheese party (smaller tray, slot for wine glass stem), and we discovered that doing the VCarve engraving with a masking material applied first makes painting and finishing work much cleaner! With our project spec changes midway through this project, our cost per item did increase due to additional material used, cut time, labor, assembly, and overhead. So while we were looking to keep our cost per tray around that of a hot dog at a food truck event, we found it came in more around the cost of a cheeseburger, fries, and drink. Bill still hasn’t given up on the vision of the minimum viable product, “cost of a hot dog” version. We’ll be testing some of that one out at the Maker Dinner during the New York Maker Faire—everyone needs a place to hold their cup of beer while eating their plate of paella!
Stop by our booth at World Maker Faire in New York September 23-24. We’ll be showing the full production process in action.
|
|