At ShopBot, we’re understandably passionate about making things with CNC machines and about the power of digital fabrication tools. We’re always looking for ways to help show what these amazing tools can do, and for items that are made with a ShopBot that showcase several of the processes that a ShopBot tool can handle. Things that use multiple materials and techniques to give a broad overview of the power of CNC in a small, tangible package.
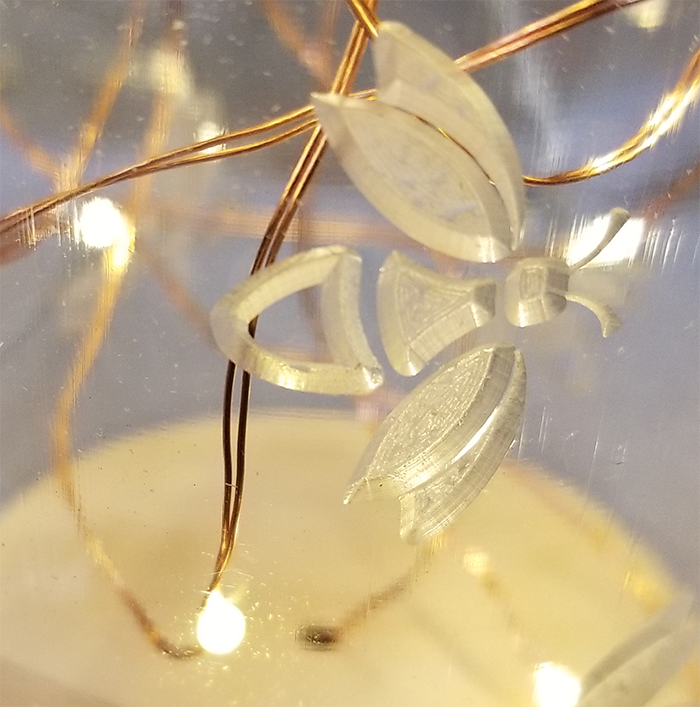
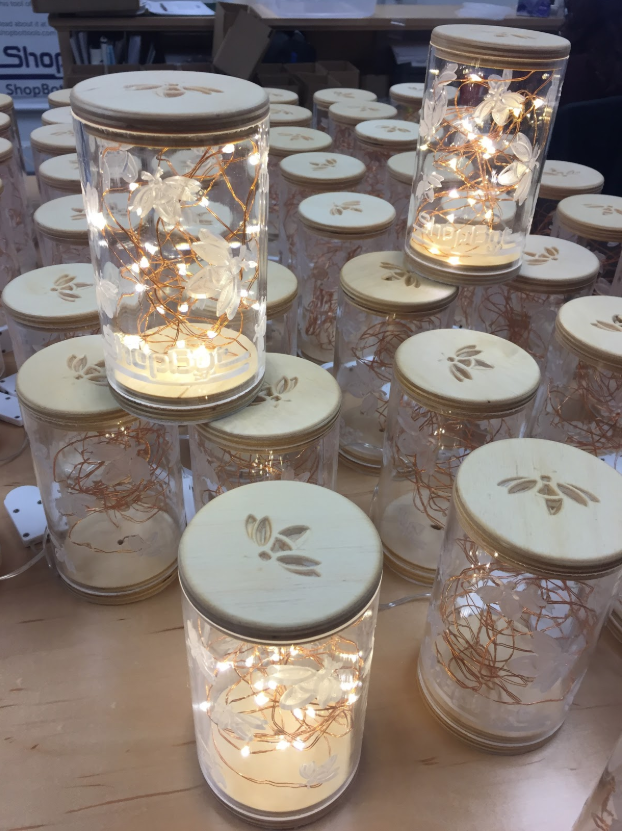
Every once in a while, Jeanne (Director of Marketing and Sales) at ShopBot prods me for something new, but it had been a while since an idea resonated with me. Then late last year, I saw some led lights on the Amazon “deal-of-the-day” that were inexpensive and looked kind of interesting to me. They were cheap enough that on an impulse I ordered a few strings without really having a project in mind for them. I kept thinking that they looked like fireflies, and decided that I would make an updated (and more humane) version of the jars full of fireflies we used to have in our bedrooms during the summer when we were kids. Digging through the scrap pile in my shop, I found some 3” clear acrylic tube, cut caps out of plywood scrap to fit in the ends, drilled a couple of holes, and stuffed the string of lights inside the tube. When I turned it on it looked pretty neat so off it went to my buddy Robert’s daughter Rowan to help her feel like summer wasn’t too far away!
I had enough tube and strings of lights to make a couple more, so on my next trip to ShopBot HQ I took my samples along to show Jeanne. They were kind of plain looking being just a tube full of lights, but I felt that with a little bit of CNC wizardry that they could be made pretty cool looking. I described my vision to her for carving designs in the tubes, and she not only liked it, she wanted 200 of them to give out to people! This meant that I had to go from playing around with one-offs to full production!
Tools
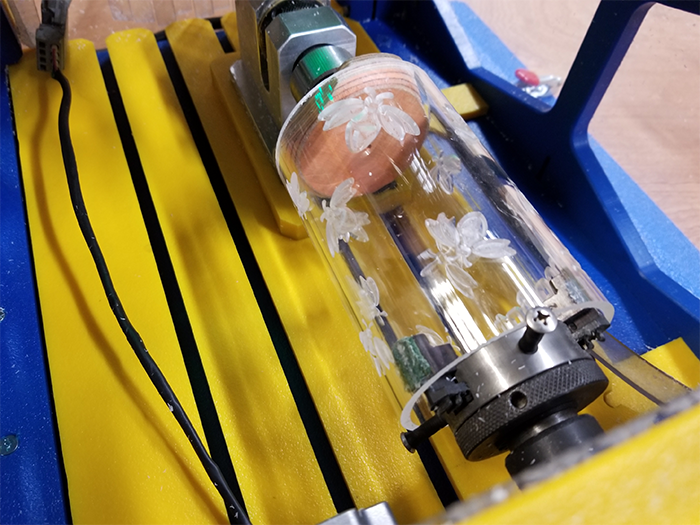
I’ve got a pretty good assortment of ShopBot tools in my shop, and figured that I could use my Desktop MAX to cut sheets of plywood discs for the end caps and a Handibot® to carve decorations into the lids and drill and groove for the wires in the bases. To engrave the designs on the tubes, I needed an indexer—a fancy version of a lathe that is precisely controlled and synced with the motion of the rest of the tool.
I told Jeanne that I needed an indexer if she wanted me to do the engraving that would make it interesting, and went home with a second Handibot mounted over an indexer. These three machines, along with some standard shop tools like table saw and sanders, would each do their part to turn my shop into a mini-factory.
Materials
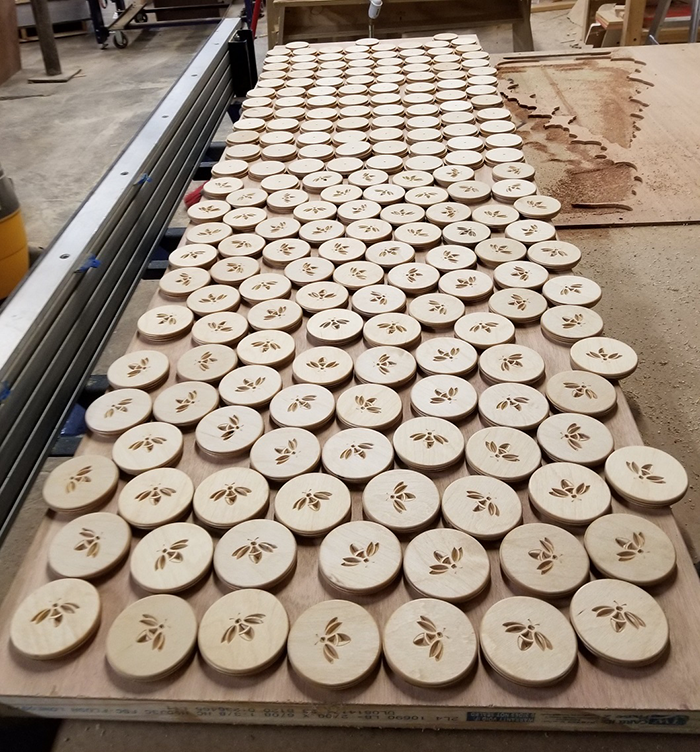
The materials were pretty easily available. The end caps were cut out of ½” baltic birch plywood, with 270 discs coming out of a 5’x5’ sheet, enough for 135 strings of lights. The full sheets were cut into 20″x30” blanks on the table saw to fit on the MAX… one of the most awkward jobs because of the size and shape of the sheets!
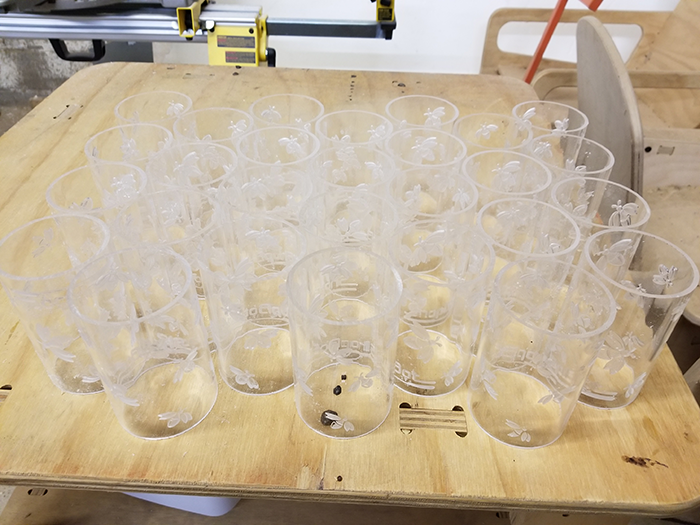
The acrylic tubes, 3” in diameter with ⅛” wall thickness, was purchased from Norva Plastics in Norfolk, VA. Each 6’ length yielded 15 tubes which were cut to length on a chopsaw with a stop block and a fine-toothed blade.
The lights and some sticky felt discs (to prevent sliding) to apply to the bottoms were available from Amazon, and all the shipping supplies were found in the dozens of ULine catalogs scattered around the shop
Software
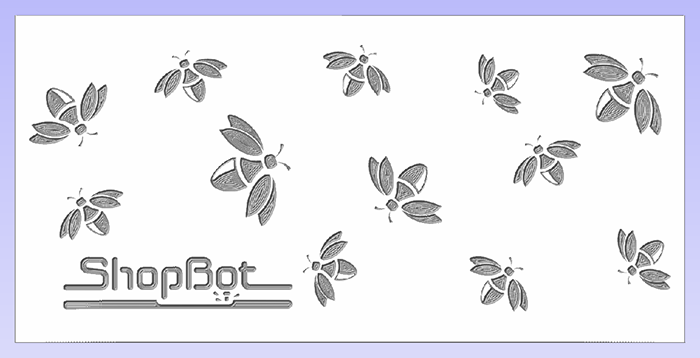
I only needed two pieces of software, Google and VCarve. My idea was that I would carve fireflies around the tube, with the ShopBot logo along the bottom. I had the ShopBot logo in a suitable format but needed fireflies, so I searched Google for firefly pictures and found one that I thought would work. Using the built-in tracing function in VCarve to digitize it, I made some changes to make it more carve-able and then modified it by rotating and changing the sizes to add some variety and to keep them from looking like they were rubber-stamped.
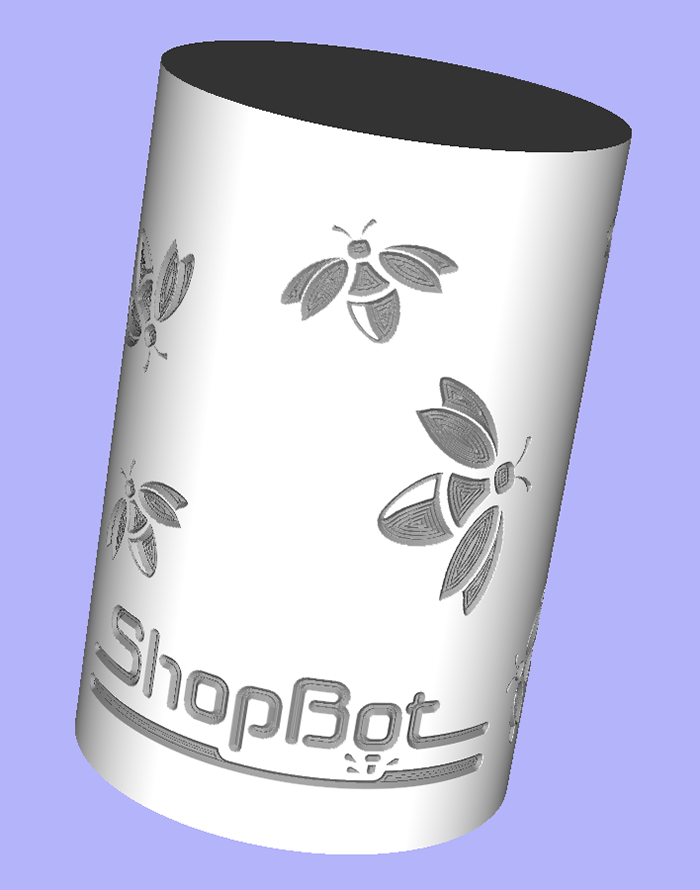
To place the fireflies and logo around the outside of the tubes I used a feature in VCarve software that lets you project a feature onto a surface and then “wrap” it around an object like my cylindrical tube. I toolpathed all the features with a 90-degree V-bit, limiting the depth of cut to 0.03” to make sure that I left plenty of the thin ⅛” wall uncut.
After spending way too much time moving fireflies around and spinning them just a little bit. I came up with a layout that both Jeanne and I were happy with.
It’s really hard to tell from a flat preview what it will look when it’s wrapped around the tube, but fortunately VCarve has the ability to preview the final file in-the-round. This helped confirm that it would look the way I wanted.
Engraving the Tubes
Engraving the tubes with the 90 degree V-bit would take about 12 minutes per tube, which would give me plenty of time to process the plywood parts and all the other jobs while they were cutting. I made some quick modifications to the headstock of the indexer to create stops to precisely hold the tubes, but other than that it was off-the-shelf standard.
To hold the tailstock end I cut a tapered disk with the Handibot that fit into the end of the tube and kept it secure and centered.
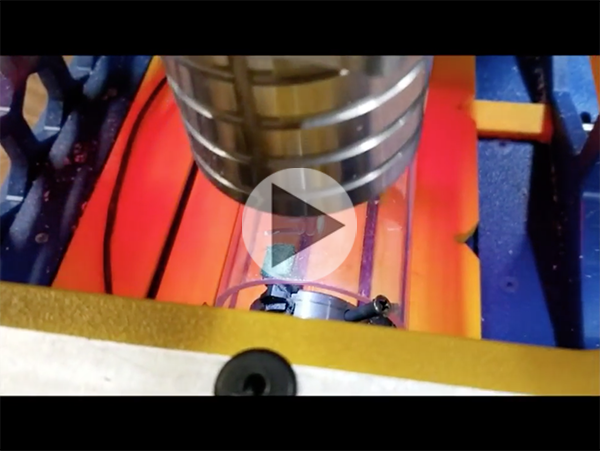
Every 12 minutes or so, a tube would have completed the engraving steps, ready to be removed from the indexer and replaced with a new one. They didn’t require any real post-processing, other than a quick sanding of the cut edges with a random orbit sander to remove any marks from the saw, and a shot of compressed air to blow off the dust.
Fabricating the Plywood Endcaps
The plywood discs were cut on the Desktop MAX with a ¼” bit. They needed a shallow lip around their edge to keep them centered in the tubes and hold them in place, so each disc was cut in two stages. First the lip and then the cutout. A single small tab held them in the sheet during cutting, easily removed during the sanding steps.
A holding jig was created for the Handibot to keep the discs registered and securely held in place using a small toggle clamp. Half of the discs became lids with a firefly carved into it with a V-bit.
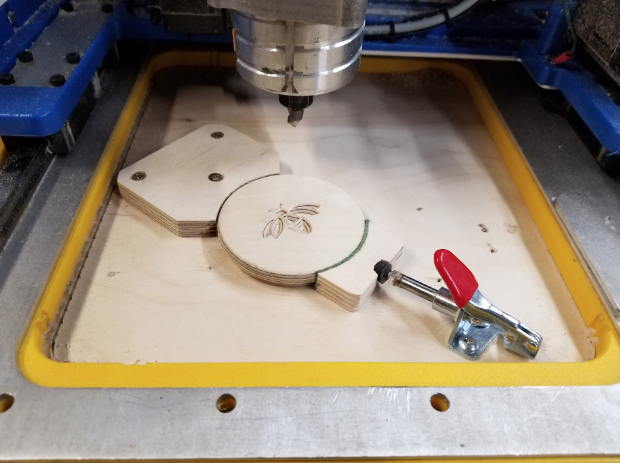
The other half of the discs became bases with a thru-hole for the wire and a groove so that it could exit from the side. These features were cut with a ⅛” straight bit.
All the plywood parts were completed with a final sanding and finished with finishing oil mixed with a little bit of clear polyurethane for durability. They were wet-sanded with 400 grit sandpaper to help fill in the porous birch’s grain, and then left to dry.
Final Assembly
I did the easy part–fabricating all the parts. Someone at the ShopBot offices got stuck assembling them all and packaging them for shipping. This involved:
- A final cleaning.
- Inserting a base cap into each tube.
- Threading the LED wire through the hole in the base and pulling all 10’ through.
- Stuffing the LED wire back into the tube and adding the top cap.
- Hot gluing the power wire into the groove in the base and then covering it with a felt disc.
- Wrapping for shipping, then finally boxing and labeling.
The Beans Need to Be Counted
Then came the hardest part—pricing them. After making almost 200 of them I knew pretty much exactly what it took in time and materials to make one, so it was just a matter of calculating what they should sell for to make it worthwhile…a real product that makes money.
The easiest method for me to figure it all out was to create a spreadsheet and enter every cost, broken into 3 categories: labor, materials, and machine time. Materials were easy, I had the cost figures for everything so all I had to do was add it all up. I added 100% to that figure to cover the cost of ordering, handling, and the general costs of the occasional, but inevitable, times when things go wrong and materials are unusable!
Labor was priced at $20/hour, a decent hourly rate. After listing and recording the labor costs for each step, I totaled them all, added, and again multiplied by 100% to cover costs like overhead (taxes, insurance, etc.) and general operating costs.
Machining time costs was a little more tricky. The time that someone had to spend to load and unload the tools was already included in the labor costs (including unproductive time waiting for parts to cut that only took a little time), so I calculated machine time costs to include electricity, bits, and enough to pay off the Handibot Smart Power Tools in a couple of months. I came up with $15/hour, but raised it to $25 just to give a bit of a cushion.
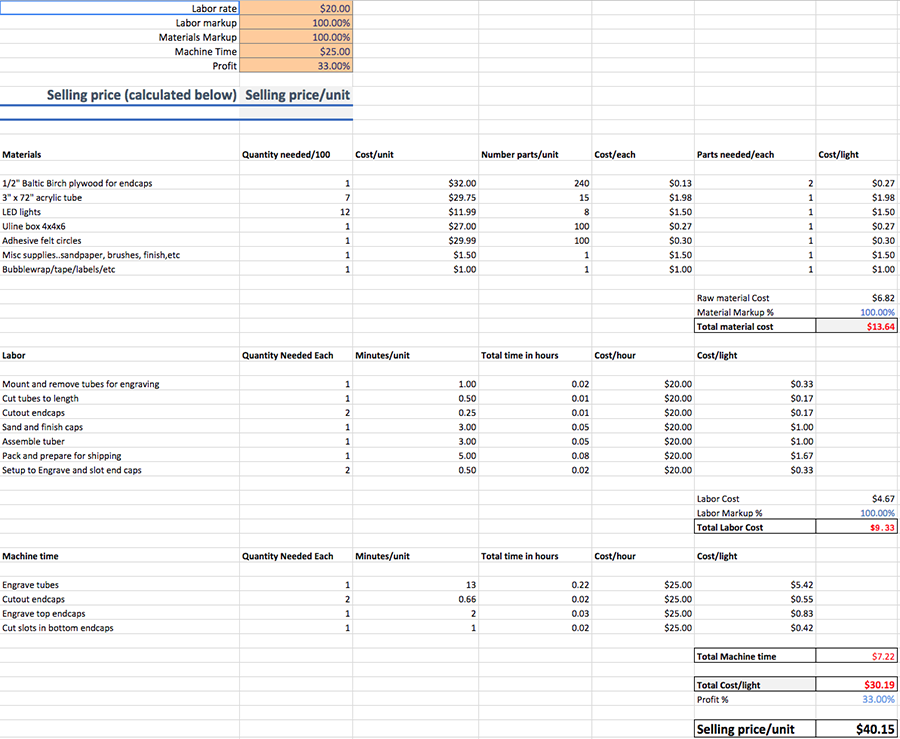
To reach the final selling price I totaled the labor, materials, and machine time figures and multiplied the total by 33% for profit. This made the retail price $40.15
If you’d like to play around with the numbers and see how each component impacts the final cost, here is my pricing estimation spreadsheet for you to download.
I Lied About That Being the Hardest Part…
The actual hardest part was, and still is, deciding on a name for them. Since the beginning I’ve liked the name “Tubers” because they’re…well…tubes. I continue to call them tubers even though Jeanne insists that it’s a stupid name for anything not involving a potato. She’ll win of course, but I’ll go down fighting!
_________________________
For more about the ShopBot Desktop MAX, visit the ShopBot website.
For more about the Handibot® Smart Power Tool, visit the Handibot website.
To learn more about VCarve Pro, visit the Vectric website.
Really nice product and great blog. Looking forward to learning what you named it.