Special Notice from ShopBot Technical Support (2019)
CAUTION – Before continuing with any of the recommended information below, the following maintenance information should be checked and double checked first, and our Technical Support team contacted before any adjustments are made to the gantry gussets or beam. The gantry is assembled in house using specialized jigs that align the beam and end plates, if the gussets are loosened, this alignment may be lost and cause further issues that are extremely difficult to rectify without the proper equipment.
First – Manually square the tool using the mechanical stops – The guide on how to do this can be found in the ShopBot 3 software under the **[H]elp->[S]quaring the X Car” drop-down. Do not adjust the gussets on the last page of this guide.
Resources:
Basic mechanical troubleshooting
Adjusting Lower V Wheels on YZ Car
Below is the original post published Dec 2, 2008.
Written & Published by: Gary Campbell
There are many reasons that your gantry can be out of square or plumb. The gantry can be jostled during shipping, bolts can loosen due to vibration, moving parts wear, metal can fatigue, or the machine may have had an impact. No matter what the reason, you should add checking for square and plumb to your monthly maintenance routine. After a month of our normal use, it is not unlikely that we could be off by .100” across the table. If you have a new machine you should run it for a week or two and then check for both square and plumb.
Checking for Plumb:
To check the spindle for plumb, place a framing square with the short leg on the table in the X direction and the long leg vertically alongside the spindle and against spindle mounting plate. Any gap between the square and the plate means that you will have to tip the Y extrusion in the direction needed to get plumb (perpendicular to the table). If adjustment is necessary, it will be done later.
Checking for Square:
The ShopBot manuals on squaring the X car show how to use the mechanical stops to square the gantry and hold it when powered. I prefer to have my X car square when unpowered also. This allows me to depress the reset button and have the gantry square itself. Since my mechanical stops are also set square, I can double check the car quickly when needed. One of the reasons I went down this route is that my control box cannot be reached while holding the car against the stops. Another is that my gantry is square every time I power up the machine. My method will add a few steps to the ShopBot methods.
Checking the Gantry for Square:
I wrote a short file (download the zipped file here) that cuts 3 shallow V groove crosses near the table extremities to allow us to quickly check how square our machine is cutting. To use the file you should have a fairly clean table to allow the shallow lines to be visible, a sharp V-Bit installed and have the bit zeroed to the table top.
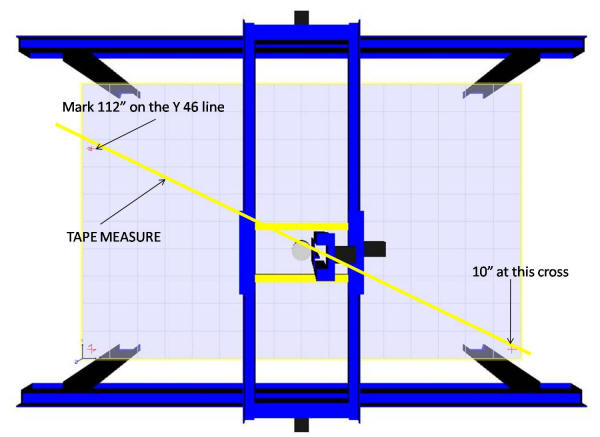
When you run the file it will v carve 3 crosses at X, Y positions 2, 2 94.021, 2 and 2, 46. After cutting the bit will return to 2, 2 and drop to .25 off the table over the cross. The file will now pause and give you a message box with the distance of 102” from the cross at 94, 2 to the one at 2, 46. Placing a tape across those crosses “cut” 10” on the 94, 2 mark and place a short pencil mark at 112” (we are cutting 10”, remember?)
This shows the table with marks previewed and tape measure in place:

Taking time to be very accurate will pay big dividends. When you place your tape across the marks make sure it is flat and straight. You will want to use the same edge of the tape to hold both the 10” cut and make the 112” mark. If 112” is the exact measurement to the cross, your machine is square.
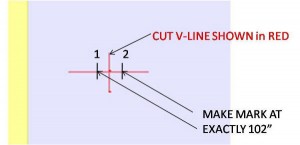
When you make your mark it will look like either (1) or (2) below:
The file will now give a message box that asks you to make your mark. When you hit ENTER the file will ask for the difference. Using a digital caliper measure the distance between the cross (RED) and your pencil mark (either (1) or (2). If your mark is to the left as in (1) then your difference MUST be a negative number. The file will then display a message box and ask you for the distance from the bit to the Y = 0 (front) wheels. Measure this and enter the number (+/- .25”) Hit ENTER. CAUTION: The machine will move slightly! This will adjust the amount needed to properly square the gantry.
The file will now display a message box and tell you to clamp the X car. I do this by clamping a 2” by 6” by ¾” wood block with a ¼” deep v groove in it on either side of the wheels to the X extrusion with rubber covered bar clamps. I then use another clamp that holds the gusset down securely to the extrusion. When this is done, hit ENTER.
A message box will display and ask if you are ready to move. Hit ENTER. CAUTION: The tool will now move to the Y = 46 line and drop the bit to .125 off the table. 2 message boxes will display with instructions to loosen bolts and shut down control box. Hit ENTER at both, put SB3 software in preview mode and power down the control box.
Loosening the Bolts:
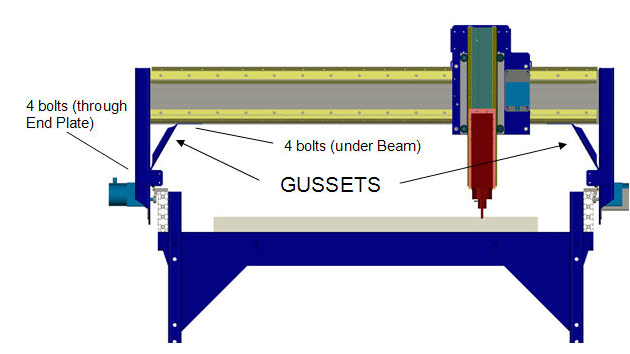
If the difference between your pencil mark and the cross was less than .100” then you should just have to loosen the bolts under the Y extrusion. (see illustration)
If the difference was greater than .100” then you will have to loosen both the under beam bolts AND the bolts thru the end plate.
If you determined earlier that you want to plumb the spindle, then you must loosen the under beam bolts, end plate bolts AND the 16 hex socket head bolts that hold the end plates to the extrusion. Whichever combination you select, you should loosen the bolts and leave them finger tight. This allows adjustments to be made, but keeps the parts close to alignment. As you make your adjustments, you may have to snug, loosen and resnug these bolts to keep parts properly aligned and get everything square, plumb and of course, level.
BEFORE LOOSENING BOLTS, PLACE A PENCIL MARK UNDER THE BIT AND WRITE DOWN THE X COORDINATE SHOWN ON THE CONTROL PANEL.
 (illustration courtesy ShopBot Tools, Inc.)
Plumb Spindle:
If you are not plumbing the spindle, skip this step.
Place a clamp on the +Y end plate to insure the wheels are seated on the rail. Loosen the 8 +Y hex socket bolts ¼ turn additional. Check to see if the extrusion will tilt in the direction needed. If not, loosen all but the lower left of the –Y hex socket bolts. Move the extrusion as needed to align with framing square. Lightly snug the 8 –Y hex socket bolts. Making sure that the +Y wheels are properly seated in the rails; lightly snug those 8 bolts also. Recheck spindle. Repeat as needed. When spindle is plumb, carefully tighten all 16 hex socket bolts securing the side plates to the Y extrusion. Remove the clamp from the +Y side plate.
Square the Gantry:
IF you did not have to plumb the spindle your goal is to move the +Y end of the gantry so that the bit is over the cross. If you did tilt the extrusion, then you will need to move the +Y end of the gantry the decimal difference between the displayed X coordinate and 2”. If display is 2.15 then difference equals negative 0.15” If display is 1.85 then difference is plus 0.15. The difference is the amount to move the bit in the direction indicated. (Plus = positive X direction.) Using the caliper set to the proper number, make a new pencil mark from the mark that is under the bit. That mark is the target mark to move the bit to.
I like to move the end of the gantry past the mark and let it relax back to it. Using a block as above with a v groove in it to push the end plate to the target mark (or just past), clamp block down to X extrusion with padded clamp. Use another clamp to seat wheels on rail. In 2 stages tighten all bolts starting at the –Y side and ending with the +Y side. Release clamps and check that bit is over target mark and wheels are seated properly. If not, loosen bolts and repeat. You may have to push end plate farther beyond mark to insure that gantry “settles in” just above the target mark as you retighten bolts. Double check all bolts to insure that they are tight. YOU ARE DONE!
You may want to run the file in 2D offset (-1” X, -1”Y) to check your results. When you are satisfied that you are square, this would be a good time to adjust the stop blocks to the square gantry. We run this check anytime we notice cuts not perfectly square, and usually around once a month. Hopefully, you will find it as valuable as we do.