When I built my vacuum table I knew there would be items which would not lend themselves to being held down with the vacuum, so I incorporated T-tracks into the table. Not being sure how I was going to use them, I figured I’d come up with various hold-down devices as the need came up. Well I’m pleasantly surprised to say that my first such device is an unqualified success. It’s a cam-powered lever that bolts to the T-track using an aluminum hub. The hub has a flange that keeps the whole assembly tight to the table while allowing the plywood lever to pivot. It only takes a small amount of offset in the cam – 1/16” seems to be plenty – to create enough force to crush the edge of the workpiece.
The easiest way to describe how it works is to show you a few of the set-ups I’ve found useful over the past few months.
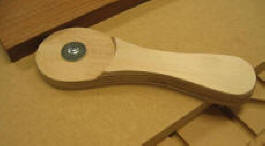
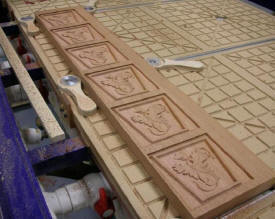
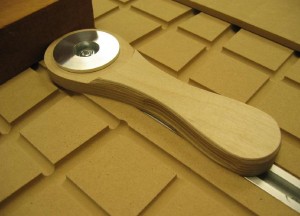 Close up of cam lever in action. The lever is made from Baltic Birch Plywood. |
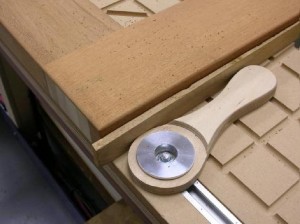 The cam action generates enough force to crush the soft mahogany. The shim protects the edge of the door but is not needed for clamping. |
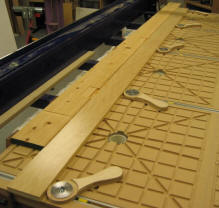
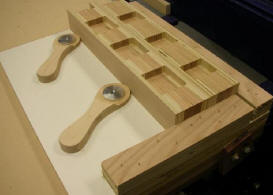
 It sure is nice when the size of the workpiece matches the T-track layout. |
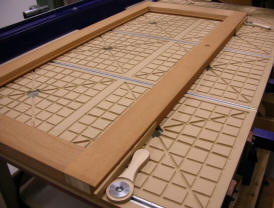
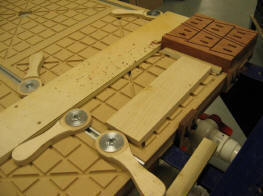
 A Cypress door jamb is machined for hinges using cam levers and stops which are bolted to the edge of the table. A plywood strip spreads the clamping pressure, especially at the end where the workpiece doesn’t reach the T-track, but care must be taken not to make the caul too wide or there can be a tendency for the workpiece and caul to “hinge” where they meet and rise off the table.
|
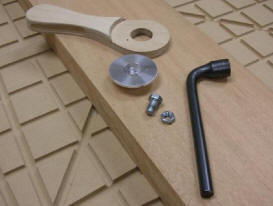 The working parts. The fixed wrench makes adjustments quick – a half-turn to loosen the nut, slide the lever up tight to the workpiece, and another half-turn to re-tighten. Then rotate the handle away from the workpiece to tighten the cam. It takes longer to describe than to do.
|
 Working prototype of the screw-down version, using a bushing and fender washer instead of a hub. Also a good way to try the system for yourself using hardware store parts and some scrap plywood.
|
 The final screw-down version – a little smaller and lower profile, with a smaller hub and hole sized for a screw – had no problem securing these solid wood parts for edge notching. The entire jig took only minutes to staple together and is itself being held to the table with the vacuum system.
|
 Don’t try this at home! I should have used the screw-down version, but I hadn’t made them yet – so I improvised.
|
 It was nice not having to run the vacuum for hours while these keystones were being machined.
|
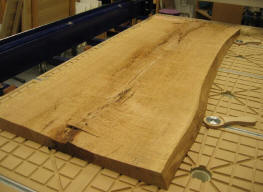 Securing a large slab for surfacing. This is the application that prompted me to create the cams in the first place. The slab is from a local tree that fell over after Hurricane Ivan passed through a few years ago.
|
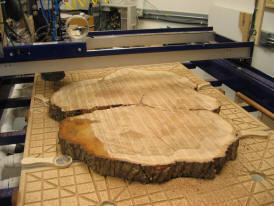 Gravity probably would have sufficed as a hold-down method on this one, but why take chances?
|
As you can see I’ve come up with new uses for these cams on almost every job. I used to use all wood versions of these and just put a screw in the center, but the center hole would wear out making the cam unreliable, plus it required screwing multiple holes into the table. The aluminum hub can be bolted (or screwed) tight to the table without wearing out and the plywood handle is still free to pivot but will not lift. The T-track versions work great and are easy and quick to adjust but they take a little creativity sometimes when the workpiece doesn’t fit the track spacing. For smaller parts, I made a jig with 2 fences that I can screw a couple of cams down on, then I can use the T-track to bolt the jig down to the table. I designed a smaller version of the hub that works well in this application.
For a little background on how I got some hubs to try out, check this post from the TalkShopBot forum. Many thanks to Shawn Fennell for making the first sets of hubs for me. So how can you get a set? Make your own using these specs (pdf version), have some turned by a local machine shop or do what I did – work something out with Shawn. Actually, for those who would rather buy than make, send me an e-mail – if there is sufficient interest we’ll make enough for everyone. You can also make a half-decent screw-down version using a bushing and a fender washer instead of the aluminum hub. For light cutting such as V-carving several ‘botters have modified the concept to use pegs and holes instead of the aluminum hub. See here for an example.
I figured I’d have designed a bunch of different hold-downs for the T-track by now, but so far the cam levers have handled just about everything that wasn’t suitable for the vacuum or just being bolted directly to the T-track. It’s proven to be a simple solution that works.
edited to add – the cam clamps are now available at welcometothesandbox.com.