In prior articles I wrote about my vacuum table and how I used the Fein Turbo III vacs to hold my parts. The Feins are quiet and ready to connect and run right out of the box. ShopBot can even provide you with them!
For those of you who want to get started using vacuum as a means to hold work on your machine, and want to either save some cash or build it yourself, there is another option for you to consider. Surf on over to http://www.lighthouseenterprises.us and let Ward fix you up with Imperial vacuum motors and mufflers. You will be looking at the heart of the vacuum systems, the motor. These are not going to be complete units ready to plug in, but the parts to assemble a wonderful vacuum source. You will have to wire up motors, drill holes and build a box. I will be showing you how I experimented with my motors from Lighthouse Enterprises. I am not suggesting that you should follow my example. Do look at the ShopBot Forum and see how others are using the same motors and just how fancy some have made the enclosures for their systems. The scope of my project was to get vacuum cheap and quick. I also wanted to build this vacuum source without using my ShopBot. The reason for this is simple, if I were just getting started, I would not have a vacuum source to hold parts down to cut this project in the first place! If this project sounds like something you want to tackle, then read on.
First I needed to mount the motors to something. I figured that drilling a hole the same size or larger than the inlet hole would be just fine. I used All Star spoilboard gasket between my motor and the box, but now Lighthouse Enterprises supplies a gasket with the motors. Since I didn’t have a drawing of the vacuum motor flange handy, I took some scrap threaded rod and sharpened one end at the bench grinder. This rod will now be use as a long center punch. I put a washer and nut on the other end and positioned them so the rod would be suspended just a tad bit above the surface I was going to mount the motors on. This way the rod would hang straight and I could mark where the center of the mounting holes needed to be. Next I drew a circle around the base of the motors and found the center of that circle. This would later become the center of the motors inlet hole. None of the dimensions are critical! Let me quote Bill Young from his February 2007 article, “Unless you’re cutting out valves for artificial hearts, don’t feel like you need micro precision either.” This project is a good example of what he said. I will be using scraps to make this vacuum source!
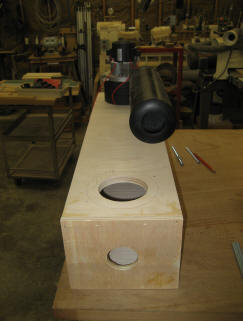
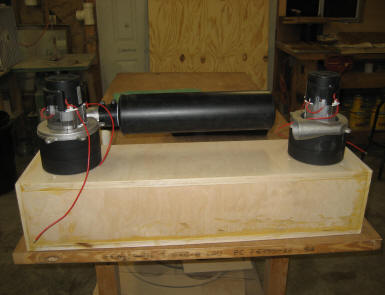
I was going to get fancy and use T-nuts on the inside of the box for the threaded rod to screw into but decided that was going too far. I grabbed a hole saw that would cut a hold that I could just get my hand into to put a washer and nut on the rod inside of the box. I also put a washer and nut on the outside to lock the threaded rod in and prevent the nut inside from working lose. A dab of thread lock would be a good idea here as well. The next steps were very simple, I just built a box. No fancy joinery but I used plenty of glue and narrow crown staples to assemble the box. I found another hole-saw that will cut a hole almost the right size for the flexible vacuum hose I am going to use. A wrap or two of blue painter’s tape on the hose makes the fit real tight. For those who are still making “heart valves”, here are some dimensions of my box. They are sized like this because that is what I had in the scrap box. 33″ long, 8.5″ wide, 7″ tall. I used a 4″ hole saw to cut the holes for the motors to mount over. I think smaller holes would be better, but I had a 4″ hole saw handy. The hose connection could have also been a PVC pipe or pipe flange with a short flexible coupling between the box and the ShopBot. At first I wired up an extension cord with the female end cut off as my power cord to test the system. Now I am using the ShopBot relay board to automatically control my vacuum motors and my dust collection! Next month I’ll show you all about that!
Below are some pictures that will show you how I knocked together a quick, cheap but very effective vacuum source for my ShopBot. I have been using it for over a month now and am very happy with it.
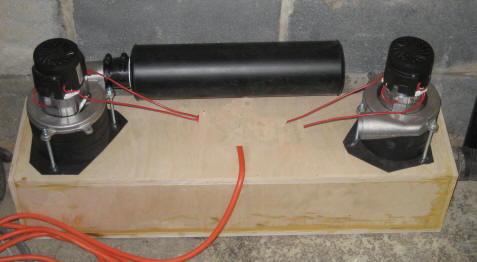
The long black device pictured is the exhaust muffler that Lighthouse Enterprises can provide you with. The muffler will eliminate the high pitch scream from the exhaust port. The motor will still provide you with audible feedback so you will know if it is turned on or not. If you experiment with reducing the sound of the motor even more, remember to keep a good supply of air moving past the motor.
I think the following pictures will be self explanatory. Good luck with your vacuum source project.
 |
 |