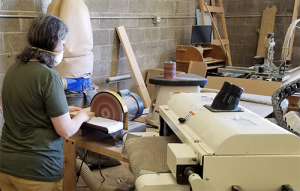
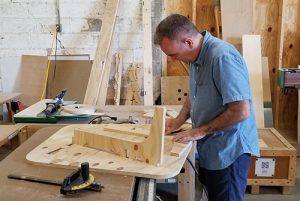
No matter what kind of work you do, occasionally you’ll need a “blunt instrument”–something you can use to pound on things. This is my version. I’ve made a bunch of them over the years out of odd corners of sheets of ½” plywood I was cutting, but all the parts fit nicely on a 16”x16” blank of whatever ½” material you might have laying around. I’ve included the VCarve Pro files (at the end of the post), along with these step-by-step instructions, so you can make one of your own.
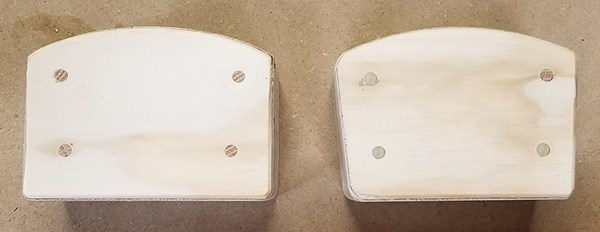
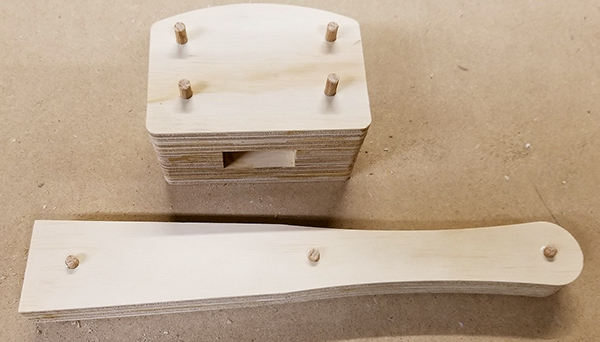
There are two versions of the head. One has faces that are parallel to each other (shown on the left) and is best for general pounding. If you plan on using it to hit a chisel or something like that, I find the one with slightly angled faces (shown on the right) to be a bit more comfortable to use.
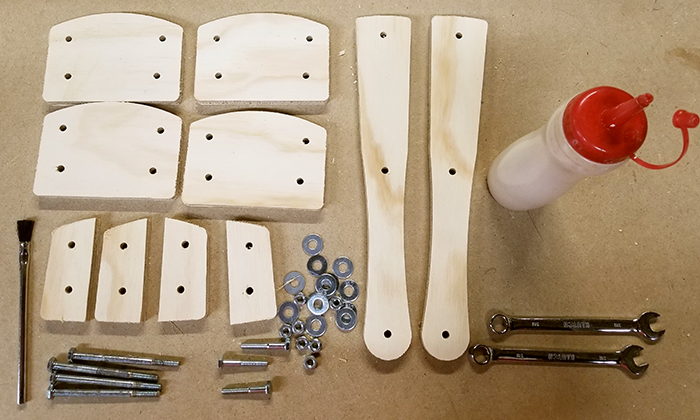
Along with the cutout plywood parts, you’ll need a few supplies. The parts are glued together using plain old carpenter’s glue (I like Titebond 3), but pretty much any wood glue will do. For temporary clamping while the glue sets, you’ll also need four ¼-20 hex bolts that are at least 3.5” long for the head, and three that are at least 1.5” long for the handle. Two flat washers and a nut will be needed for each of these bolts, along with 7/16” wrenches and a disposable brush to spread the glue. You’ll also need around 18” of ¼” dowel.
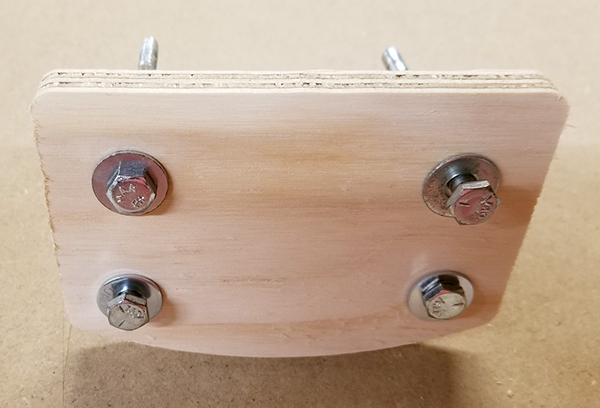 Put a washer on each of the four longer bolts and insert them into the four holes in one of the larger head parts. Put a washer on each of the four longer bolts and insert them into the four holes in one of the larger head parts.
 Spread glue on the face of this piece, making sure to cover it completely. You’re better off with too much glue than too little, so be generous. Spread glue on the face of this piece, making sure to cover it completely. You’re better off with too much glue than too little, so be generous.
 Add a second large plate and slide it down the bolt. Next, take two of the smaller spacers, look at how they will be assembled, and flip them over. Spread glue all over their faces. Add a second large plate and slide it down the bolt. Next, take two of the smaller spacers, look at how they will be assembled, and flip them over. Spread glue all over their faces.
 Flip them back so they are glue side down, slide them down their corresponding pair of bolts, and then repeat with the other pair of spacers. Flip them back so they are glue side down, slide them down their corresponding pair of bolts, and then repeat with the other pair of spacers.
 Coat the face of this layer with glue. Coat the face of this layer with glue.
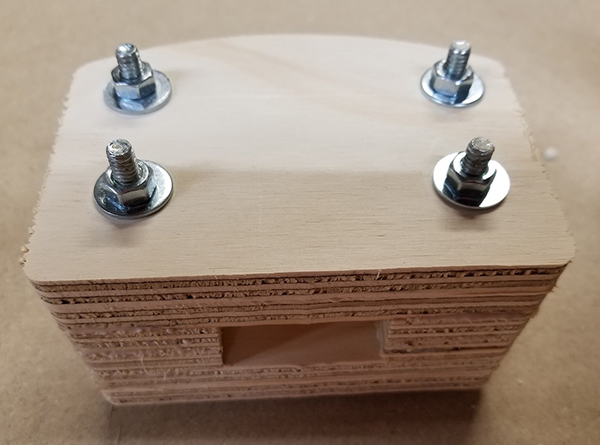 Add the third large piece, coat its face with glue, then add the last plate. Put a washer and nut on each bolt and then tighten the nuts to clamp it all together. Don’t go too crazy tightening the nuts because the washers will make indentations. You want to tighten it just enough that a little of the excess glue squeezes out and it’s securely held. Add the third large piece, coat its face with glue, then add the last plate. Put a washer and nut on each bolt and then tighten the nuts to clamp it all together. Don’t go too crazy tightening the nuts because the washers will make indentations. You want to tighten it just enough that a little of the excess glue squeezes out and it’s securely held.
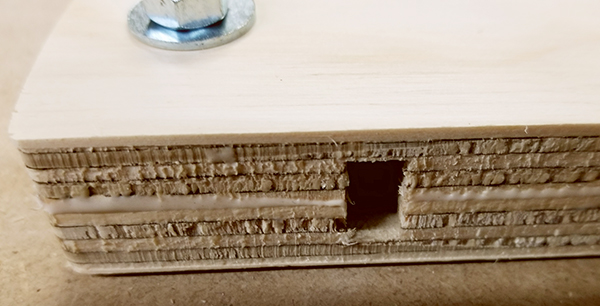
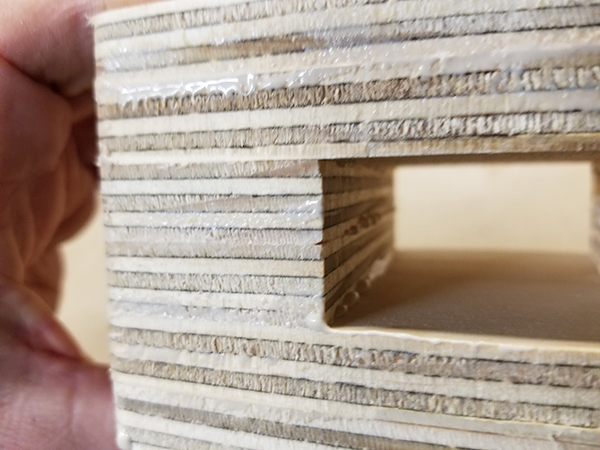 Scrape off as much squeezed out glue as you can, especially in the open recess. It’s easier to remove it before it cures than afterwards, especially inside this area! Scrape off as much squeezed out glue as you can, especially in the open recess. It’s easier to remove it before it cures than afterwards, especially inside this area!
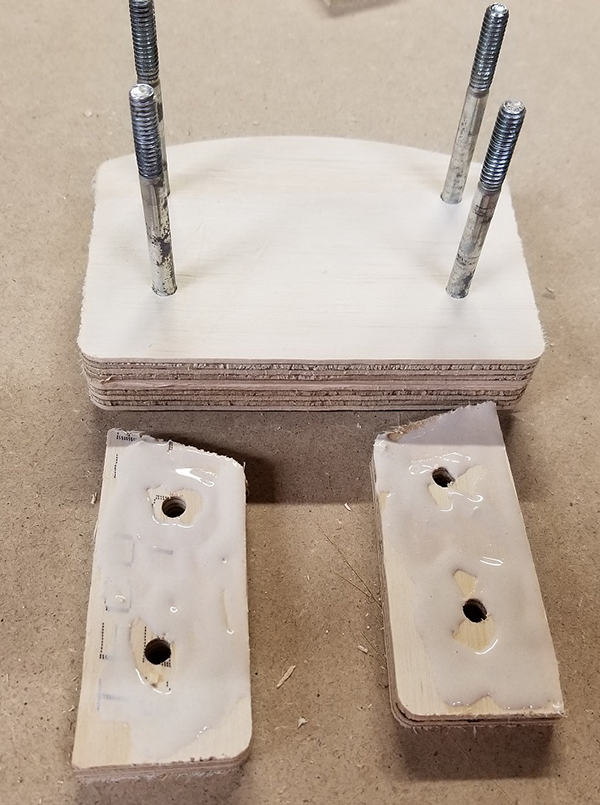
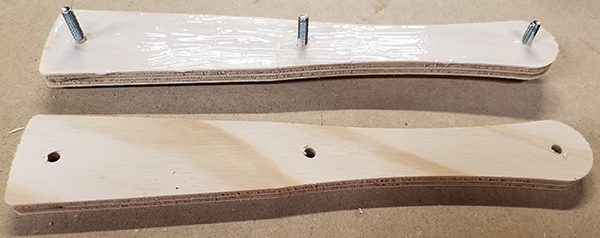 Repeat these steps with the two handle parts and the three shorter bolts. If you are using the weighted handle option, see the instructions below. Repeat these steps with the two handle parts and the three shorter bolts. If you are using the weighted handle option, see the instructions below.
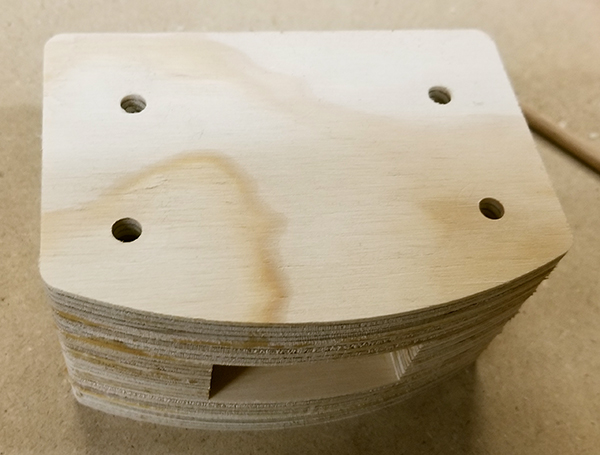 Set aside these parts to let the glue cure completely, then remove the bolts. Clean out the holes with a drill and a ¼” bit. Set aside these parts to let the glue cure completely, then remove the bolts. Clean out the holes with a drill and a ¼” bit.
 Cut four 3.25” lengths of ¼” dowel for the holes in the head, and three lengths that are 1.25” long for the handle. Put a little glue in each hole and drive in the dowels so that a little sticks out of both sides. Let the glue cure. Cut four 3.25” lengths of ¼” dowel for the holes in the head, and three lengths that are 1.25” long for the handle. Put a little glue in each hole and drive in the dowels so that a little sticks out of both sides. Let the glue cure.
 When this glue has cured, cut off the ends of the dowels and then sand all the edges. A belt sander works well. But any kind of sander will work and even a rasp or file if that’s all you have. When this glue has cured, cut off the ends of the dowels and then sand all the edges. A belt sander works well. But any kind of sander will work and even a rasp or file if that’s all you have.
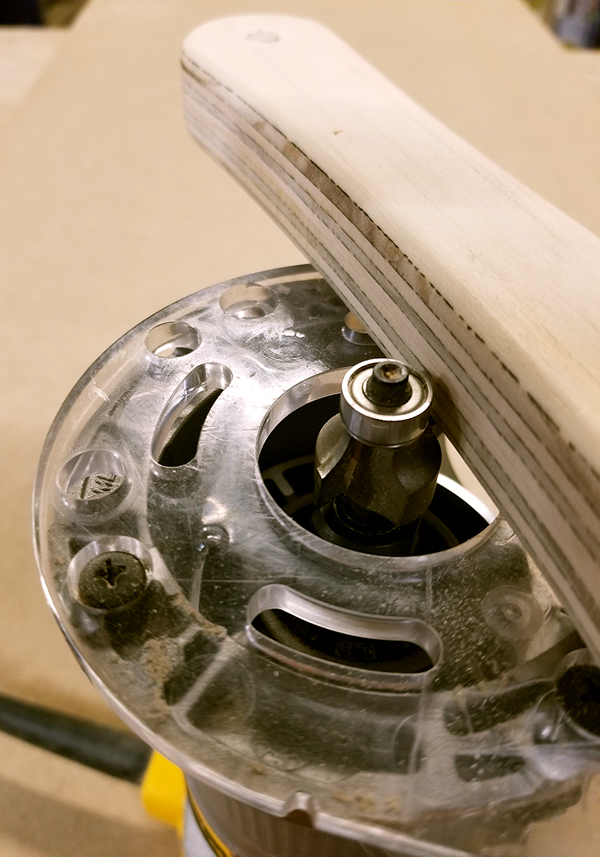
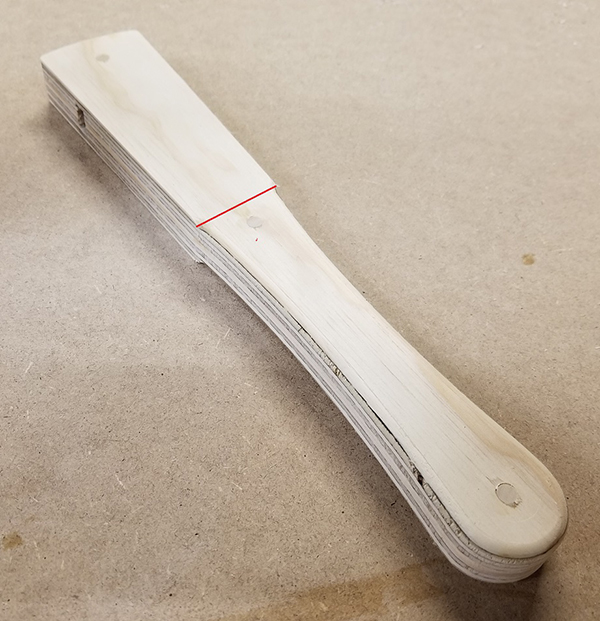 Next, round over the edges to make the grip more comfortable. I like to round over just the handle section that I’ll be holding, starting at the straight tapered section (the red line in this picture) and continuing around the handle to the other side. Flip and repeat. Next, round over the edges to make the grip more comfortable. I like to round over just the handle section that I’ll be holding, starting at the straight tapered section (the red line in this picture) and continuing around the handle to the other side. Flip and repeat.
When you’re done, sand the handle until it’s nice and smooth. Your hand will thank you!
 I sometimes round over the edges of the head, but mostly just to keep them from getting too banged up. Sharp edges won’t stay sharp for long, especially when you’re pounding on things! I sometimes round over the edges of the head, but mostly just to keep them from getting too banged up. Sharp edges won’t stay sharp for long, especially when you’re pounding on things!
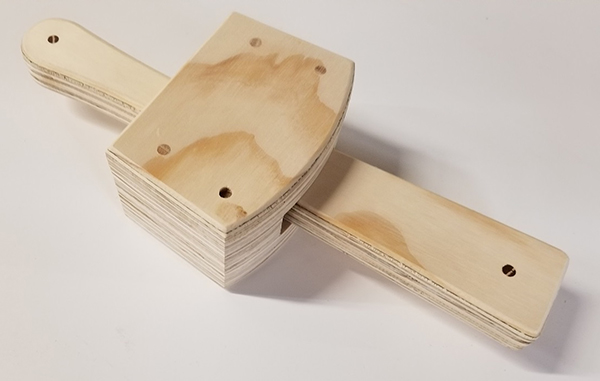 The slight taper in the head and handle allow you to easily insert and remove the handle. Slip the handle through the hole in the head, slide it as far as you can, then turn it over and tap it several time on a concrete floor or other solid surface. Inertia will securely tighten the head on the handle. The slight taper in the head and handle allow you to easily insert and remove the handle. Slip the handle through the hole in the head, slide it as far as you can, then turn it over and tap it several time on a concrete floor or other solid surface. Inertia will securely tighten the head on the handle.
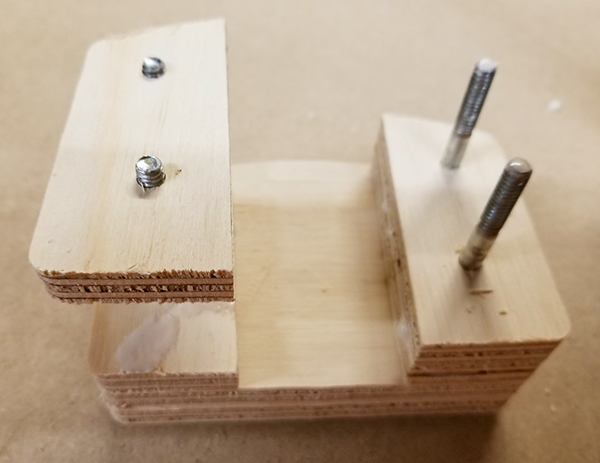
An optional weighted handle:
Sometimes you want a little more heft when you’re pounding on stuff, so included in the VCarve Pro files I provided below are optional pockets that can be cut into the handles. If you’ll be doing this version, I’d suggest cutting the parts with the “good” side of the plywood down since the pockets will be on the sides that will be glued together.
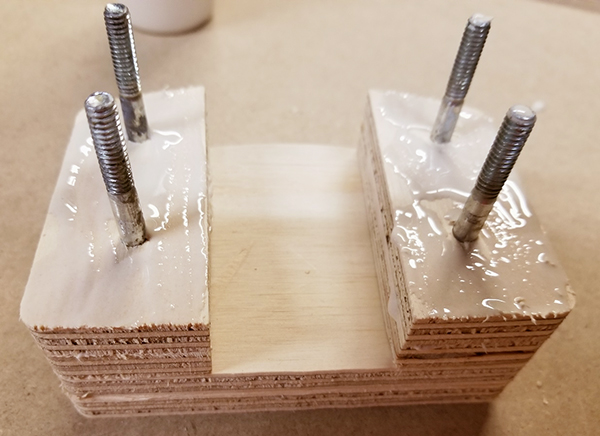
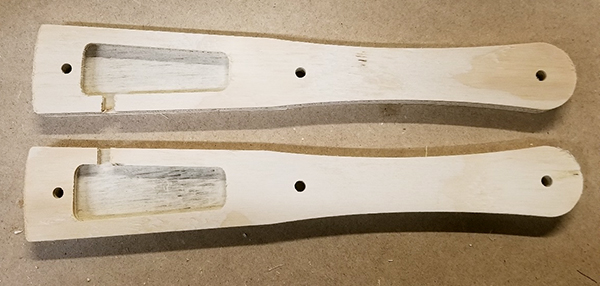 The pockets are mirror images so that when the two handle halves are glued together, they will create a void in the middle with an access hole on one side. You’ll glue and clamp the two halves together, just like a non-weighted handle. The pockets are mirror images so that when the two handle halves are glued together, they will create a void in the middle with an access hole on one side. You’ll glue and clamp the two halves together, just like a non-weighted handle.
 Generously spread glue on both halves and clamp together with bolts, nuts, and washers. If there’s any gunk in the access hole, clean it out now before the glue sets. Generously spread glue on both halves and clamp together with bolts, nuts, and washers. If there’s any gunk in the access hole, clean it out now before the glue sets.
 After the glue has set remove the bolts, sand the edges, and glue in the dowels. Trim the dowels and round over the edges, just like a non-weighted handle. After the glue has set remove the bolts, sand the edges, and glue in the dowels. Trim the dowels and round over the edges, just like a non-weighted handle.
 Stand the handle on one edge and start filling with BBs or lead shot. Stop every once in a while to tap it on the table to level the BBs and check the weight. If you fill the cavity completely with bb’s you’ll add between 4-5 ounces of weight, which is just right for me. If you want it even heavier you can use lead shot instead of bb’s…lead weighs three times as much as steel! Stand the handle on one edge and start filling with BBs or lead shot. Stop every once in a while to tap it on the table to level the BBs and check the weight. If you fill the cavity completely with bb’s you’ll add between 4-5 ounces of weight, which is just right for me. If you want it even heavier you can use lead shot instead of bb’s…lead weighs three times as much as steel!
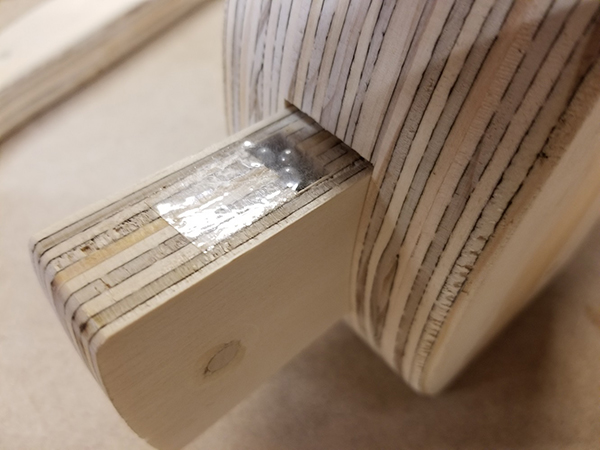 When you have it just the way you want it you can plug the access hole using a hot glue gun, but I find a piece of Scotch Tape works well to keep things together until the mallet is assembled . Once you (carefully!) install the handle in the head, the access hole will be covered and the weights won’t fall out. When you have it just the way you want it you can plug the access hole using a hot glue gun, but I find a piece of Scotch Tape works well to keep things together until the mallet is assembled . Once you (carefully!) install the handle in the head, the access hole will be covered and the weights won’t fall out.
If you haven’t filled the cavity completely, the weights shifting around will act to minimize any rebound when pounding, but the noise may end up annoying you. If it does, squirt glue, resin, or even paint into the hole and shake it around to coat the pellets. Let it solidify completely before using.
Here are the files to make both the flat-faced and angle-faced mallet.
Due to popular demand, the files contained in the link above now include the .dxf files as well.
By ShopBot, February 12th, 2019 Special Notice from ShopBot Technical Support (2019)
CAUTION – Before continuing with any of the recommended information below, the following maintenance information should be checked and double checked first, and our Technical Support team contacted before any adjustments are made to the gantry gussets or beam. The gantry is assembled in house using specialized jigs that align the beam and end plates, if the gussets are loosened, this alignment may be lost and cause further issues that are extremely difficult to rectify without the proper equipment.
First – Manually square the tool using the mechanical stops – The guide on how to do this can be found in the ShopBot 3 software under the **[H]elp->[S]quaring the X Car” drop-down. Do not adjust the gussets on the last page of this guide.
Resources:
Basic mechanical troubleshooting
Checking Pinion Play
Adjusting Lower V Wheels on YZ Car
Below is the original post published Dec 2, 2008.
Written & Published by: Gary Campbell
There are many reasons that your gantry can be out of square or plumb. The gantry can be jostled during shipping, bolts can loosen due to vibration, moving parts wear, metal can fatigue, or the machine may have had an impact. No matter what the reason, you should add checking for square and plumb to your monthly maintenance routine. After a month of our normal use, it is not unlikely that we could be off by .100” across the table. If you have a new machine you should run it for a week or two and then check for both square and plumb.
Checking for Plumb:
To check the spindle for plumb, place a framing square with the short leg on the table in the X direction and the long leg vertically alongside the spindle and against spindle mounting plate. Any gap between the square and the plate means that you will have to tip the Y extrusion in the direction needed to get plumb (perpendicular to the table). If adjustment is necessary, it will be done later.
Checking for Square:
The ShopBot manuals on squaring the X car show how to use the mechanical stops to square the gantry and hold it when powered. I prefer to have my X car square when unpowered also. This allows me to depress the reset button and have the gantry square itself. Since my mechanical stops are also set square, I can double check the car quickly when needed. One of the reasons I went down this route is that my control box cannot be reached while holding the car against the stops. Another is that my gantry is square every time I power up the machine. My method will add a few steps to the ShopBot methods.
Checking the Gantry for Square:
I wrote a short file (download the zipped file here) that cuts 3 shallow V groove crosses near the table extremities to allow us to quickly check how square our machine is cutting. To use the file you should have a fairly clean table to allow the shallow lines to be visible, a sharp V-Bit installed and have the bit zeroed to the table top.
When you run the file it will v carve 3 crosses at X, Y positions 2, 2 94.021, 2 and 2, 46. After cutting the bit will return to 2, 2 and drop to .25 off the table over the cross. The file will now pause and give you a message box with the distance of 102” from the cross at 94, 2 to the one at 2, 46. Placing a tape across those crosses “cut” 10” on the 94, 2 mark and place a short pencil mark at 112” (we are cutting 10”, remember?)
This shows the table with marks previewed and tape measure in place:
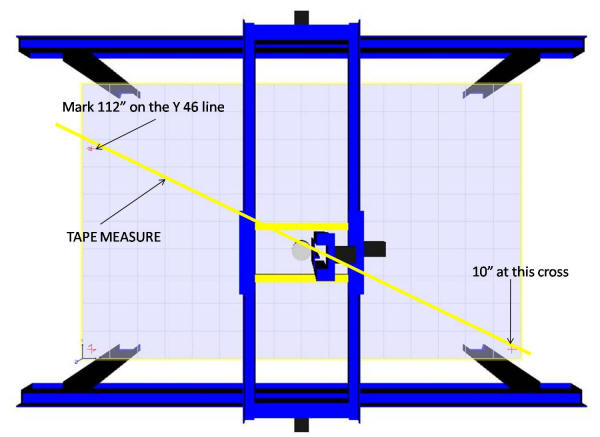
Taking time to be very accurate will pay big dividends. When you place your tape across the marks make sure it is flat and straight. You will want to use the same edge of the tape to hold both the 10” cut and make the 112” mark. If 112” is the exact measurement to the cross, your machine is square.
When you make your mark it will look like either (1) or (2) below: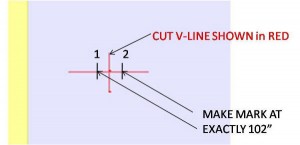
The file will now give a message box that asks you to make your mark. When you hit ENTER the file will ask for the difference. Using a digital caliper measure the distance between the cross (RED) and your pencil mark (either (1) or (2). If your mark is to the left as in (1) then your difference MUST be a negative number. The file will then display a message box and ask you for the distance from the bit to the Y = 0 (front) wheels. Measure this and enter the number (+/- .25”) Hit ENTER. CAUTION: The machine will move slightly! This will adjust the amount needed to properly square the gantry.
The file will now display a message box and tell you to clamp the X car. I do this by clamping a 2” by 6” by ¾” wood block with a ¼” deep v groove in it on either side of the wheels to the X extrusion with rubber covered bar clamps. I then use another clamp that holds the gusset down securely to the extrusion. When this is done, hit ENTER.
A message box will display and ask if you are ready to move. Hit ENTER. CAUTION: The tool will now move to the Y = 46 line and drop the bit to .125 off the table. 2 message boxes will display with instructions to loosen bolts and shut down control box. Hit ENTER at both, put SB3 software in preview mode and power down the control box.
Loosening the Bolts:
If the difference between your pencil mark and the cross was less than .100” then you should just have to loosen the bolts under the Y extrusion. (see illustration)
If the difference was greater than .100” then you will have to loosen both the under beam bolts AND the bolts thru the end plate.
If you determined earlier that you want to plumb the spindle, then you must loosen the under beam bolts, end plate bolts AND the 16 hex socket head bolts that hold the end plates to the extrusion. Whichever combination you select, you should loosen the bolts and leave them finger tight. This allows adjustments to be made, but keeps the parts close to alignment. As you make your adjustments, you may have to snug, loosen and resnug these bolts to keep parts properly aligned and get everything square, plumb and of course, level.
BEFORE LOOSENING BOLTS, PLACE A PENCIL MARK UNDER THE BIT AND WRITE DOWN THE X COORDINATE SHOWN ON THE CONTROL PANEL.
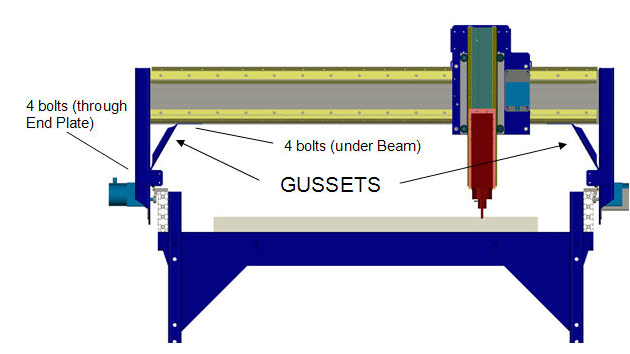 (illustration courtesy ShopBot Tools, Inc.) (illustration courtesy ShopBot Tools, Inc.)
Plumb Spindle:
If you are not plumbing the spindle, skip this step.
Place a clamp on the +Y end plate to insure the wheels are seated on the rail. Loosen the 8 +Y hex socket bolts ¼ turn additional. Check to see if the extrusion will tilt in the direction needed. If not, loosen all but the lower left of the –Y hex socket bolts. Move the extrusion as needed to align with framing square. Lightly snug the 8 –Y hex socket bolts. Making sure that the +Y wheels are properly seated in the rails; lightly snug those 8 bolts also. Recheck spindle. Repeat as needed. When spindle is plumb, carefully tighten all 16 hex socket bolts securing the side plates to the Y extrusion. Remove the clamp from the +Y side plate.
Square the Gantry:
IF you did not have to plumb the spindle your goal is to move the +Y end of the gantry so that the bit is over the cross. If you did tilt the extrusion, then you will need to move the +Y end of the gantry the decimal difference between the displayed X coordinate and 2”. If display is 2.15 then difference equals negative 0.15” If display is 1.85 then difference is plus 0.15. The difference is the amount to move the bit in the direction indicated. (Plus = positive X direction.) Using the caliper set to the proper number, make a new pencil mark from the mark that is under the bit. That mark is the target mark to move the bit to.
I like to move the end of the gantry past the mark and let it relax back to it. Using a block as above with a v groove in it to push the end plate to the target mark (or just past), clamp block down to X extrusion with padded clamp. Use another clamp to seat wheels on rail. In 2 stages tighten all bolts starting at the –Y side and ending with the +Y side. Release clamps and check that bit is over target mark and wheels are seated properly. If not, loosen bolts and repeat. You may have to push end plate farther beyond mark to insure that gantry “settles in” just above the target mark as you retighten bolts. Double check all bolts to insure that they are tight. YOU ARE DONE!
You may want to run the file in 2D offset (-1” X, -1”Y) to check your results. When you are satisfied that you are square, this would be a good time to adjust the stop blocks to the square gantry. We run this check anytime we notice cuts not perfectly square, and usually around once a month. Hopefully, you will find it as valuable as we do.
At ShopBot, we’re understandably passionate about making things with CNC machines and about the power of digital fabrication tools. We’re always looking for ways to help show what these amazing tools can do, and for items that are made with a ShopBot that showcase several of the processes that a ShopBot tool can handle. Things that use multiple materials and techniques to give a broad overview of the power of CNC in a small, tangible package.
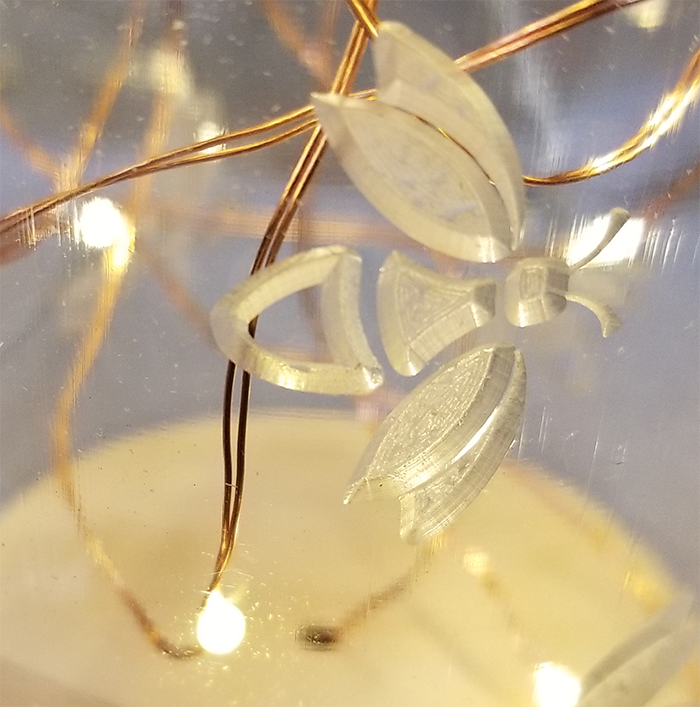
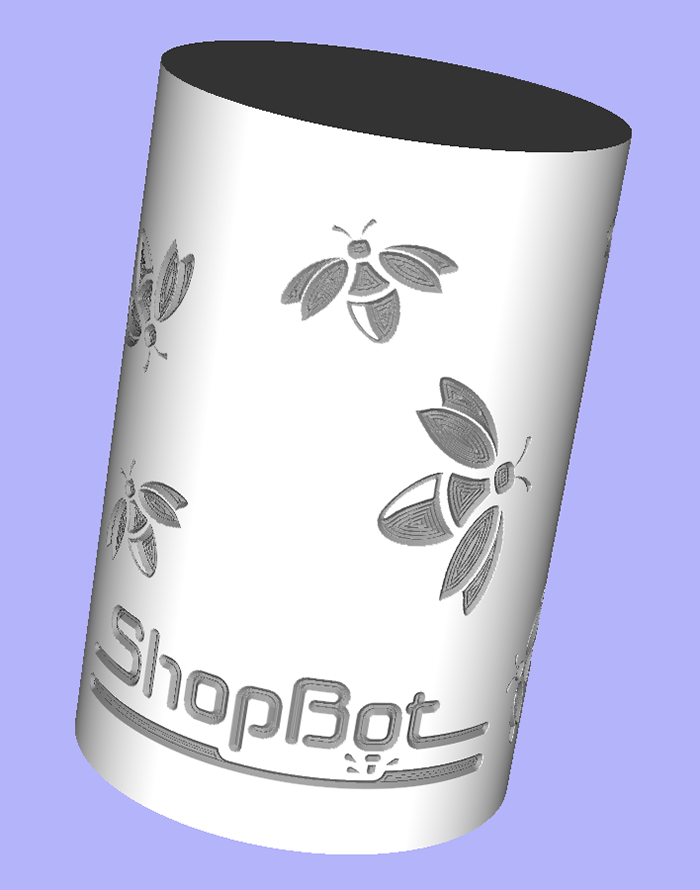
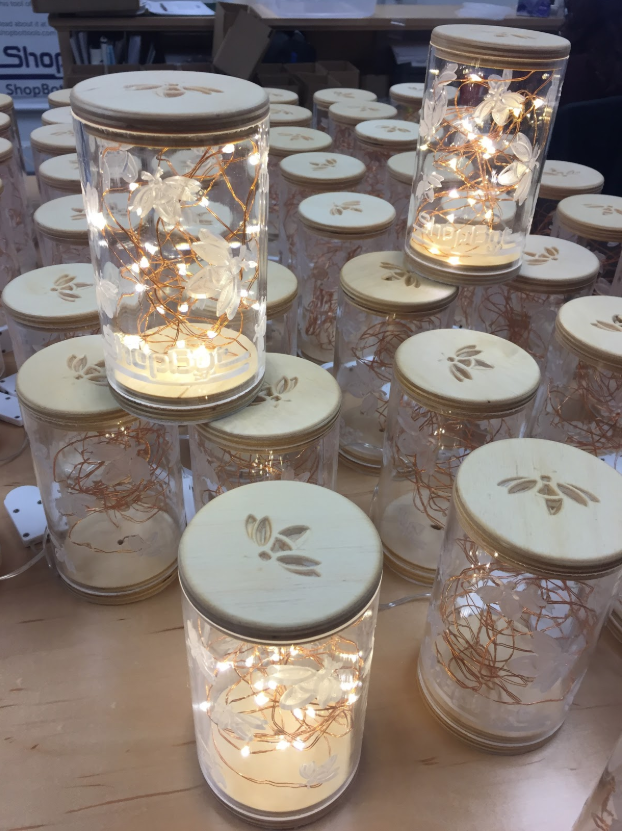
Every once in a while, Jeanne (Director of Marketing and Sales) at ShopBot prods me for something new, but it had been a while since an idea resonated with me. Then late last year, I saw some led lights on the Amazon “deal-of-the-day” that were inexpensive and looked kind of interesting to me. They were cheap enough that on an impulse I ordered a few strings without really having a project in mind for them. I kept thinking that they looked like fireflies, and decided that I would make an updated (and more humane) version of the jars full of fireflies we used to have in our bedrooms during the summer when we were kids. Digging through the scrap pile in my shop, I found some 3” clear acrylic tube, cut caps out of plywood scrap to fit in the ends, drilled a couple of holes, and stuffed the string of lights inside the tube. When I turned it on it looked pretty neat so off it went to my buddy Robert’s daughter Rowan to help her feel like summer wasn’t too far away!
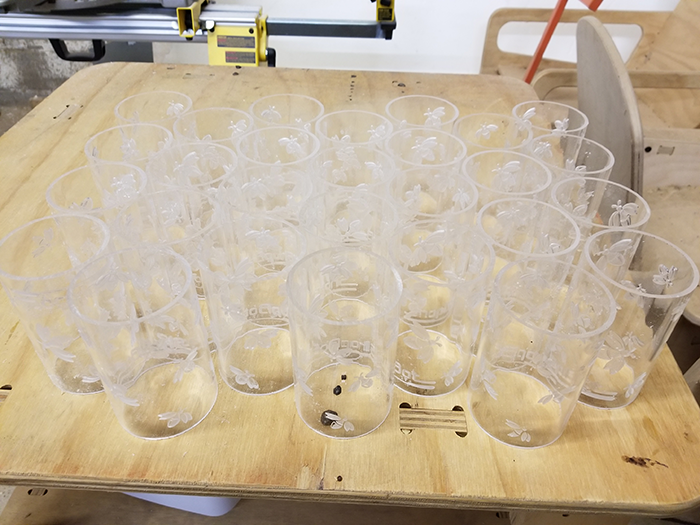
I had enough tube and strings of lights to make a couple more, so on my next trip to ShopBot HQ I took my samples along to show Jeanne. They were kind of plain looking being just a tube full of lights, but I felt that with a little bit of CNC wizardry that they could be made pretty cool looking. I described my vision to her for carving designs in the tubes, and she not only liked it, she wanted 200 of them to give out to people! This meant that I had to go from playing around with one-offs to full production!
Tools
I’ve got a pretty good assortment of ShopBot tools in my shop, and figured that I could use my Desktop MAX to cut sheets of plywood discs for the end caps and a Handibot® to carve decorations into the lids and drill and groove for the wires in the bases. To engrave the designs on the tubes, I needed an indexer—a fancy version of a lathe that is precisely controlled and synced with the motion of the rest of the tool.
I told Jeanne that I needed an indexer if she wanted me to do the engraving that would make it interesting, and went home with a second Handibot mounted over an indexer. These three machines, along with some standard shop tools like table saw and sanders, would each do their part to turn my shop into a mini-factory.
Materials
The materials were pretty easily available. The end caps were cut out of ½” baltic birch plywood, with 270 discs coming out of a 5’x5’ sheet, enough for 135 strings of lights. The full sheets were cut into 20″x30” blanks on the table saw to fit on the MAX… one of the most awkward jobs because of the size and shape of the sheets!
The acrylic tubes, 3” in diameter with ⅛” wall thickness, was purchased from Norva Plastics in Norfolk, VA. Each 6’ length yielded 15 tubes which were cut to length on a chopsaw with a stop block and a fine-toothed blade.
The lights and some sticky felt discs (to prevent sliding) to apply to the bottoms were available from Amazon, and all the shipping supplies were found in the dozens of ULine catalogs scattered around the shop
Software
I only needed two pieces of software, Google and VCarve. My idea was that I would carve fireflies around the tube, with the ShopBot logo along the bottom. I had the ShopBot logo in a suitable format but needed fireflies, so I searched Google for firefly pictures and found one that I thought would work. Using the built-in tracing function in VCarve to digitize it, I made some changes to make it more carve-able and then modified it by rotating and changing the sizes to add some variety and to keep them from looking like they were rubber-stamped.
To place the fireflies and logo around the outside of the tubes I used a feature in VCarve software that lets you project a feature onto a surface and then “wrap” it around an object like my cylindrical tube. I toolpathed all the features with a 90-degree V-bit, limiting the depth of cut to 0.03” to make sure that I left plenty of the thin ⅛” wall uncut.
After spending way too much time moving fireflies around and spinning them just a little bit. I came up with a layout that both Jeanne and I were happy with.

It’s really hard to tell from a flat preview what it will look when it’s wrapped around the tube, but fortunately VCarve has the ability to preview the final file in-the-round. This helped confirm that it would look the way I wanted.
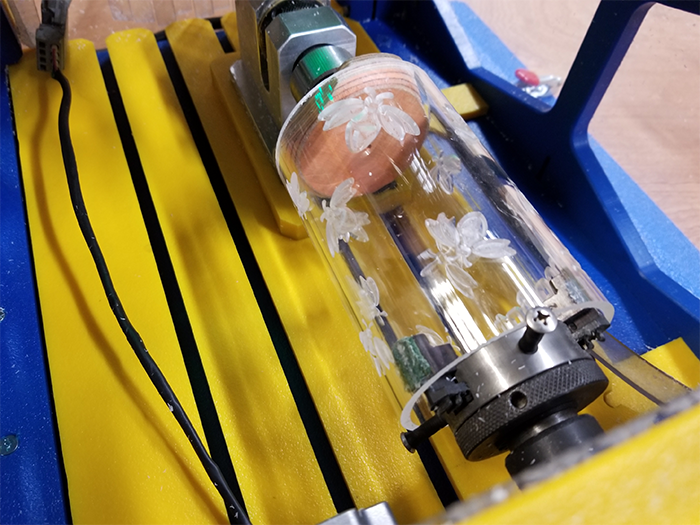
Engraving the Tubes
Engraving the tubes with the 90 degree V-bit would take about 12 minutes per tube, which would give me plenty of time to process the plywood parts and all the other jobs while they were cutting. I made some quick modifications to the headstock of the indexer to create stops to precisely hold the tubes, but other than that it was off-the-shelf standard.
To hold the tailstock end I cut a tapered disk with the Handibot that fit into the end of the tube and kept it secure and centered.
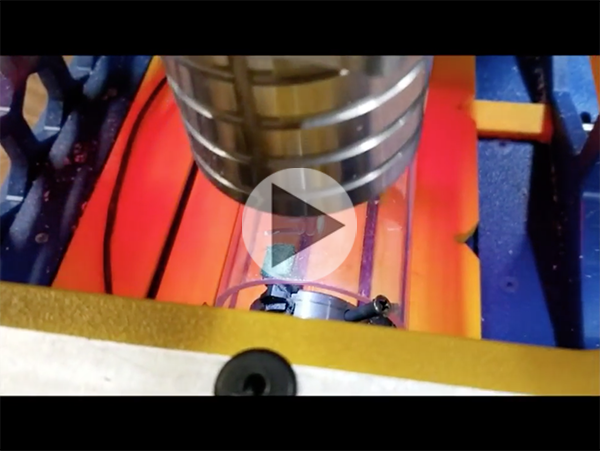
Every 12 minutes or so, a tube would have completed the engraving steps, ready to be removed from the indexer and replaced with a new one. They didn’t require any real post-processing, other than a quick sanding of the cut edges with a random orbit sander to remove any marks from the saw, and a shot of compressed air to blow off the dust.
Fabricating the Plywood Endcaps
The plywood discs were cut on the Desktop MAX with a ¼” bit. They needed a shallow lip around their edge to keep them centered in the tubes and hold them in place, so each disc was cut in two stages. First the lip and then the cutout. A single small tab held them in the sheet during cutting, easily removed during the sanding steps.
A holding jig was created for the Handibot to keep the discs registered and securely held in place using a small toggle clamp. Half of the discs became lids with a firefly carved into it with a V-bit.
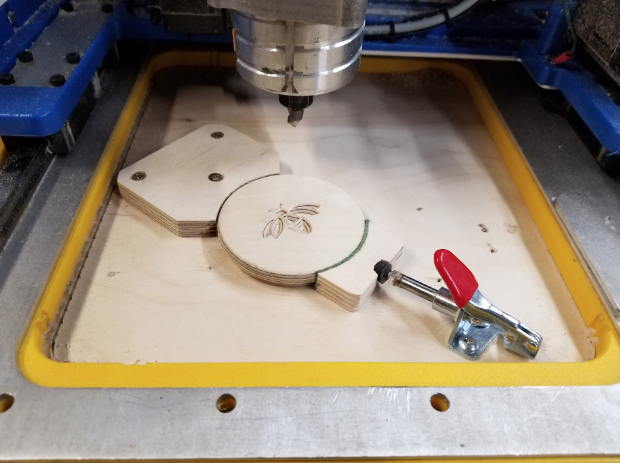
The other half of the discs became bases with a thru-hole for the wire and a groove so that it could exit from the side. These features were cut with a ⅛” straight bit.
All the plywood parts were completed with a final sanding and finished with finishing oil mixed with a little bit of clear polyurethane for durability. They were wet-sanded with 400 grit sandpaper to help fill in the porous birch’s grain, and then left to dry.
Final Assembly
I did the easy part–fabricating all the parts. Someone at the ShopBot offices got stuck assembling them all and packaging them for shipping. This involved:
- A final cleaning.
- Inserting a base cap into each tube.
- Threading the LED wire through the hole in the base and pulling all 10’ through.
- Stuffing the LED wire back into the tube and adding the top cap.
- Hot gluing the power wire into the groove in the base and then covering it with a felt disc.
- Wrapping for shipping, then finally boxing and labeling.
The Beans Need to Be Counted
Then came the hardest part—pricing them. After making almost 200 of them I knew pretty much exactly what it took in time and materials to make one, so it was just a matter of calculating what they should sell for to make it worthwhile…a real product that makes money.
The easiest method for me to figure it all out was to create a spreadsheet and enter every cost, broken into 3 categories: labor, materials, and machine time. Materials were easy, I had the cost figures for everything so all I had to do was add it all up. I added 100% to that figure to cover the cost of ordering, handling, and the general costs of the occasional, but inevitable, times when things go wrong and materials are unusable!
Labor was priced at $20/hour, a decent hourly rate. After listing and recording the labor costs for each step, I totaled them all, added, and again multiplied by 100% to cover costs like overhead (taxes, insurance, etc.) and general operating costs.
Machining time costs was a little more tricky. The time that someone had to spend to load and unload the tools was already included in the labor costs (including unproductive time waiting for parts to cut that only took a little time), so I calculated machine time costs to include electricity, bits, and enough to pay off the Handibot Smart Power Tools in a couple of months. I came up with $15/hour, but raised it to $25 just to give a bit of a cushion.
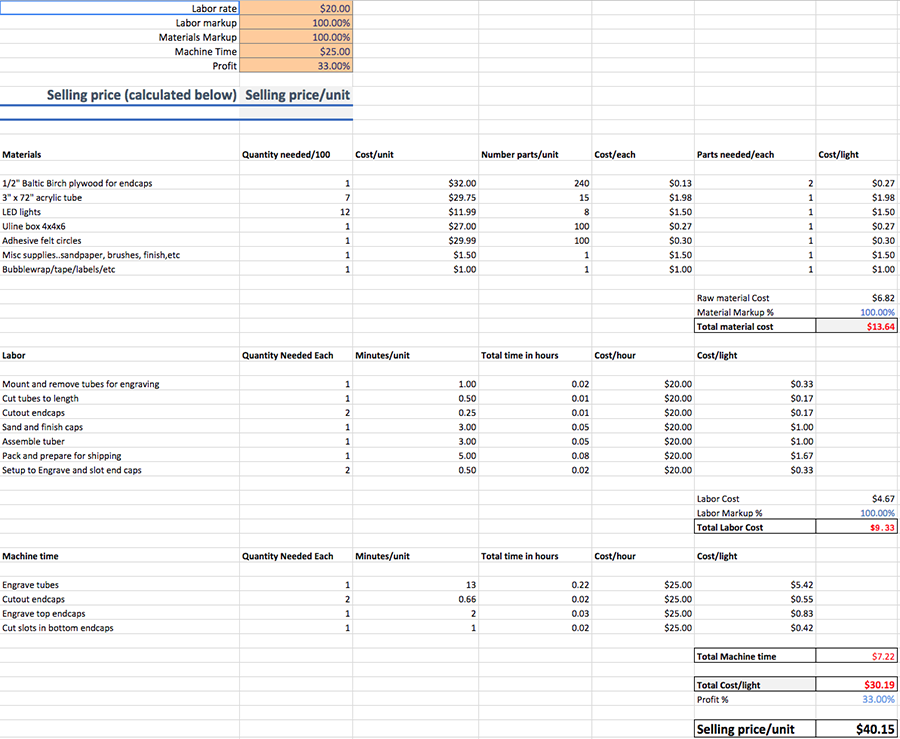
To reach the final selling price I totaled the labor, materials, and machine time figures and multiplied the total by 33% for profit. This made the retail price $40.15
If you’d like to play around with the numbers and see how each component impacts the final cost, here is my pricing estimation spreadsheet for you to download.
I Lied About That Being the Hardest Part…
The actual hardest part was, and still is, deciding on a name for them. Since the beginning I’ve liked the name “Tubers” because they’re…well…tubes. I continue to call them tubers even though Jeanne insists that it’s a stupid name for anything not involving a potato. She’ll win of course, but I’ll go down fighting!
_________________________
For more about the ShopBot Desktop MAX, visit the ShopBot website.
For more about the Handibot® Smart Power Tool, visit the Handibot website.
To learn more about VCarve Pro, visit the Vectric website.
At ShopBot, we have been designing and building affordable CNC tools for almost 25 years. ShopBots were the first affordable CNC routers for small manufacturing. Our design choices have been based on our experience manufacturing and using low-cost robotic equipment that is optimized for small and medium production operations. Our leadership and innovation in mechanical components and software has been a key to making CNC technology as widely accessible to all shops as it is today.
The design and construction of our tools is derived from two perspectives:
- The importance of mechanical rigidity – A CNC tool does subtractive work. It is a piece of digital manufacturing equipment whose primary feature is shaping components by using a spinning cutter to aggressively remove material – good cutting force and resistance to deflection during cutting is required, as is a smooth and vibration-free motion during the machining process. While pure bulk can be helpful to machining, a CNC tool does not need to be expensive or heavy and immovable to produce fast, smooth cuts and be a great producer.
- The importance of control system software – You hear a lot about “smart” when it comes to technology these days, but “smart” means more than just running your CNC tool with a computer. Smart tools take advantage of progress in microcontrollers and programming to enhance the cutting and machining performance of a tool, to move it with intelligence, to monitor its condition, to communicate with operators, and to help make the production process friendlier and more interactive. Smart tools can now interact with humans in increasingly helpful ways. They are versatile, configurable, and programmable, making them adaptable to your workflow and production process. This is what we mean by smart.
A). The Importance of Mechanical Rigidity
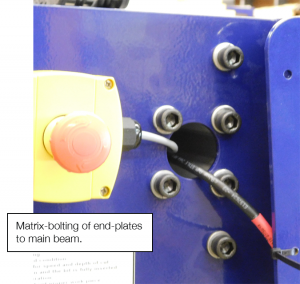
Large ShopBots Are Configured On-Site – Our Tables Are Matrix-Bolted
Full-size gantry ShopBots are set-up on-site. You position them where they best fit your shop’s needs and production flow. This versatility means they can be put in areas that have limited access to heavy equipment, in a basement or above the ground floor.
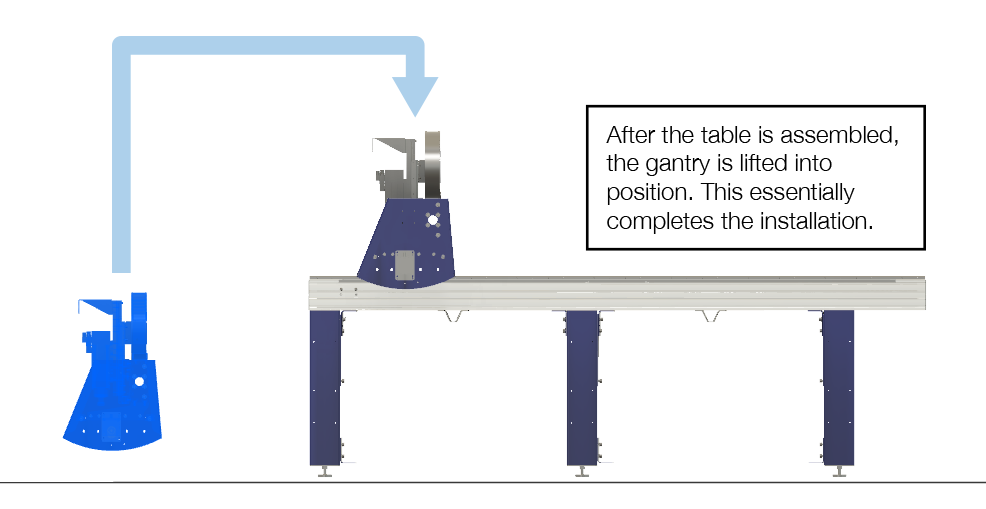
The set-up of our full-size tools involves two steps: 1) assembling the steel and aluminum table; and, 2) placing the gantry on the table. The gantry is shipped fully assembled from our factory. The motors on the Y and Z axes have been mounted, and all wiring and hardware installed. The table goes together in a few hours. After the table is assembled, the gantry, which has been fully configured and adjusted at the factory, is simply placed in position on the rails (with a “team lift”). Note that for a gantry-style CNC tool, the gantry essentially is the tool because almost all the components ride with the gantry. That means that after you put the gantry in place, attach the x-motors, cables, and control box, your tool is complete and ready for action.
Shipping large tools as components is a more manageable and safer method than dealing with a large, bulky, and vulnerable single structure. Going through the set-up process creates an opportunity to develop a good understanding of the machine as you ready it for work. Optionally, if your operation needs to hit the ground running, we can send a technician to your site to set-up the tool and then train your team.
Note: Our smaller tools, the ShopBot Buddy® CNC, which is a mid-size tool, and the ShopBot Desktop CNCs are all shipped fully assembled, ready to be powered-up and put right to work.
The stiffness of the ShopBot gantry table comes from its engineering not from weight. ShopBots are assembled with airframe-style bolt-matrixes for strength. Heaviness in a machine-tool can certainly help reduce vibration, but we make full use of materials, such as extruded aluminum profiles, that naturally dampen vibration. You’ll always find YouTube experts who still believe that heavy, cast, or welded frames are important for machining, but heaviness can be overrated and too often simply compensates for other inadequacies of a machine. The practical problem with “heavy” is that it makes a tool less agile, more limited in the locations in which it can be positioned or moved, more power hungry, more expensive to repair, and less friendly for small shops. Such machines (sometimes referred to as “monuments”) do not fit well with a lean production focus which emphasizes a flexibility based on being able to readily reconfigure production flow and processes for competitiveness.
Significantly, a bolted table can also be realigned using standard mechanic’s tools after the inevitable shop accidents. We avoid welded joints that can become distorted with time and are difficult to re-square or realign. Sure, truly massive welded or cast tools can be impressive and do have the advantage of bulk, but few low-end, welded, CNC tables are built with the mass, weldment thoroughness, and the attention to alignment required for stability in a factory environment. Be careful not to end up with a tool that is just heavy enough to make it difficult to fit into your production flow and not quite massive enough to prevent it from falling out of alignment.
ShopBot’s Tall Table Sides / A Rigid Gantry Platform
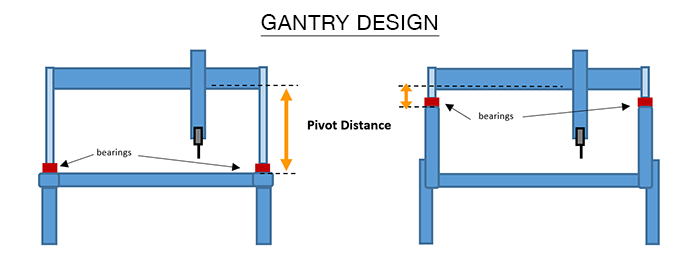
The most identifiable features of a ShopBot gantry tool are its raised table sides. Beginning with the patented architecture of our original ShopBots, our full-size gantry tools have minimized cutter chatter and improved cut quality by reducing the pedestal height of the gantry. This effect is a matter of physics. The taller a gantry pedestal – that is the further the distance from the table rails up to the pivot point on the beam for the Z arm – the greater the instability of the gantry. Of course, we want clearance above the work, but rather than just make the gantry taller, our design solution has been to raise the base for the gantry rails using rigid table sides. This significantly reduces the pendulum “moment,” improves cutting smoothness, and allows faster acceleration and deceleration.
Raised table sides have the second advantage of helping contain the material being machined. This provides operators and observers an extra safety shield of protection from cut material and flying debris (e.g. broken cutters) that might break loose during cutting and machining operations if not contained by the dust collector/guard around the cutter.
Our tall table sides/guards mean that our standard large tools are most conveniently end-loaded (front or back) and are well-suited to natural panel flow through most shops. A suggestion: If you expect that you will be primarily side-loading large sheets, whatever brand CNC you purchase, you may want to consider an extended bed so that the gantry can be parked beyond the length of the material to permit easy side-loading without the obstruction of a gantry in the work area.
ShopBot’s Beam Extrusions
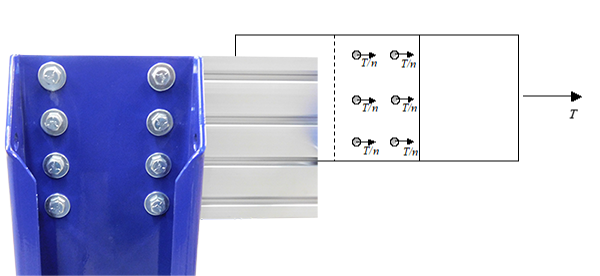
We engineered the main beam on our gantry tools especially for our CNC tools. Our beams are thickly webbed aluminum extrusions with a strengthening and vibration-absorbing cross-section. They are available for tools having up to a 9 ft. wide cutting area. A mounting face for the linear rails is thickened in the extrusion and then precisely machined and fitted with rails and bearings. As with other elements of our table, this beam is designed to be matrix-bolted to the gantry’s steel end-plates. The beam carries the steel Y-axis car on which the vertical Z-axis, fitted with a router or spindle, is mounted. Each axis moves on a heavy-duty linear rail and bearing system. A sturdy beam is the heart of CNC routers and it is where smooth, precise cutting begins.

Drive Mechanisms Choices: Rack-and-Pinion, Screw-Drives
We utilize rack-and-pinion mechanical drive on gantry-tools and screw-drive on desktop tools. We’ve had a lot of experience with various types of motion components for CNC tools and fit the best solution for the needs and purposes of each type of tool we produce.
Our desktop uses Teflon-coated, precision lead-screws with anti-backlash nuts. The screws are integral to the motors which virtually eliminates all backlash. On the desktops, the lower screw and rails are fully covered and protected from dust and debris. This integral screw-drive provides a very high resolution for our desktop machines.
For larger tools, we have found that rack-and-pinion provides the most straightforward and reliable drive system. Rack-and-pinion is highly impervious to the dust and debris of a shop and does not require precise alignment to prevent binding. The modern geometry for grinding rack-and-pinion gearing insures smooth action with limited friction and low backlash. Components can be easily replaced if they become worn. We rarely see significant wear on the rack, but pinions do wear, so you can expect to replace them every year or two during normal use.
The debate over the motion mechanism for CNC routers – rack-and-pinion drive vs. screw drive – can get hot and heavy. We think both systems are pretty good, and over the years we’ve built tools employing each. In theory, ball screws offer the advantage of being virtually friction-free and very smooth. However, they are also more complex. They require a constant precise alignment to avoid binding and are very vulnerable to being disabled by dust and debris, so they must be kept very clean. As the length of an axis gets longer, increasing stiffness in the ball screw is required to prevent the screw from wobbling. This results in large, heavy, and expensive screws (which, in turn, require larger motors just to get them up to speed) that must be well-protected from dust.
Perhaps one factor to keep in mind with respect to CNC mechanicals is that these industrial components have been used as motion components of machine tools and automation equipment for the last 150 years – they are not, recently-evolved mechanisms that are unique to CNC. Over those 150 years, the quality and performance of each type of mechanical drive has been perfected. Gearing design and manufacturing have become highly refined as have the various screw-drive mechanisms for producing smooth motion. Look at a few $100,000 and up CNC tools. In these tools the drive mechanism is only a small part of the overall cost, so the drive decisions have been made primarily with respect to performance. You’ll note that in these tools both types of drive system are used. Sometimes in the same tools screw drives are used for one axis and rack-and-pinion for another. The bottom line is that either mechanism can produce good performance.
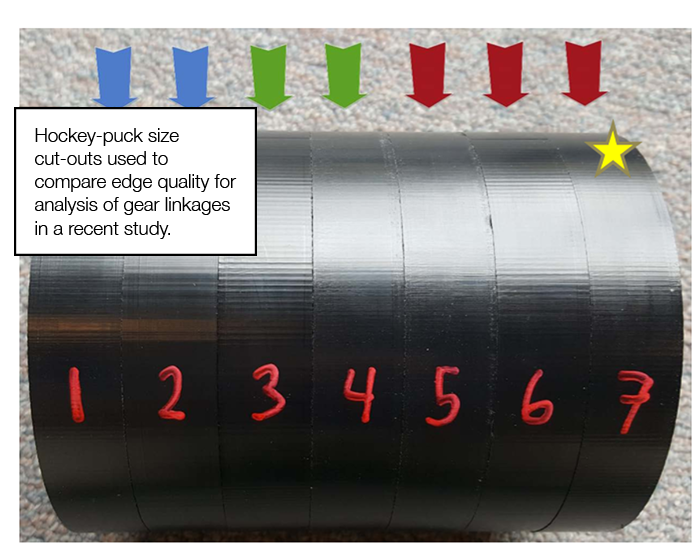
We have recently completed an experimental analysis and tests of drive mechanisms that specifically included assessment of helical gearing, a refinement of standard rack-and-pinion. We also evaluated the importance of the gearhead or belt-linkage between motor and pinion. Helical gearing represents a conceptual improvement over straight rack as it produces a more continuous engagement of gear teeth and, in theory, less backlash. We were optimistic about the potential for helical gears, but in our testing, we found that helical gearing added little improvement to cut quality, particularly in comparison to other factors. Our tests actually identified backlash in the linkage between motor and effector (that is, between motor and pinion for rack-and-pinion drives; between motor and ball-screw in a ball screw system) to be the primary source of backlash and the primary determinant of cut quality. For us, this emphasized that the focus for smooth cutting should be the reduction of backlash in the gearing of the motor linkage rather than the specific type of rack-and-pinion. For gantry ShopBot tools, we improve the standard spur gear linkage between motor and effector by using tapered-hob gearheads on all tools (see image below). These gearheads put the emphasis on reducing the backlash that directly results in smoother cutting.

Open-Loop AND Closed-Loop Motors and Servos
The cutting motion of ShopBots is powered by stepper motors. Steppers are an incredibly precise form of motor that have the unique feature of never producing incremental errors. A stepper is just as accurate at 80″ as it is at 8” because the rotary position of the motor shaft is just as accurate after dozens of turns as it is after one turn. Stepper motors are inherently digital and thus they are a perfect match to digital computers, digital control, and digital cutting.
Conventional open-loop stepper motors such as those employed on our PRSstandard tools and our Desktop tools are the most affordable solution to producing CNC motion. The counterintuitive feature of stepper motors is that the faster they go, the less power they have. This means that they have the limitation that they can be overpowered if one attempts to cut too fast – losing track of location in the process. However, when used appropriately, these motors will produce excellent cuts, day-in, day-out as they do in a wide range of devices from printers, to CNC mills, to medical equipment.
For heavy-duty, production work we recommend our PRSalpha tools. These tools use closed-loop stepper motors and high-performance hybrid drives. These closed-loop motors have sensors (called encoders or resolvers) that continuously monitor performance and the precise location of the motor shaft. When forces on these motors increase, or if the shaft is pushed slightly from intended position, the motors instantly increase force and recover to the correct position. Servo motors also have built-in feedback and are commonly used in CNC tools. They can be a good solution for CNC, but we favor the closed-loop alpha-step motors because of the hybrid technology combining crisp digital control in stepper mode for small moves while responding with servo-like dynamics when higher power, speeds, or position compensation are required. Undersized servo motors may not provide the speed, power, or acceleration you expect. Our PRSalpha CNC routers can travel at 1800ipm and have 150-250 pounds of cutting force.
MORE INFO … Learn about alphaStep OM Motors
On our gantry tools, we have exclusively used motors built by the Japanese manufacturer Oriental Motor (OM). OM is an international company that has been building high-quality motors for more than a hundred years. Their industry-leading technology has been much imitated, it’s easy to find budget motors that have been made to look like OM products. The copies often fail to live up to the OM performance, which depends on extremely high-grade bearings, precisely cut armatures, dense magnets and carefully wound coils. ShopBot has used OM motors on our gantry tools for over 20 years, shipping almost 40,000 of them. During this period, we’ve had fewer than 6 failures, which means these motors can be counted on for day-in, day-out production – absolutely.
When you are considering the bulk and power features of a tool, do watch out for the macho-power and capital-cost game; it is easy to get ratcheted-up into a large capital layout trap in the form of a leased tool that you need to constantly feed with work, just to make those lease payments. As one of our customers recently noted: “You have to wonder about a tool when they start quoting you an hourly lease cost.” The new industrial revolution is about technologically empowering tools that are becoming available to all sizes and nature of production facilities with prices that are going down – this trend of decreasing tool price has been expressed as a “democratizing of the tools of production.” While new technology tools will cost something, they are becoming increasingly accessible to all shops. Make sure you can afford your new tool.
Our Design Philosophy: Iterate and Iterate Again
We are continuously evolving the capabilities and functionality of our tools. We occasionally introduce new models, but our policy is to, as much as possible, evolve our tools as opportunities arise with small iterative improvements that we can introduce immediately and make available to older tools. For example, we currently offer new versions of our Z-axis that is backwards compatible for tools up to 16 years old. Also, as we create new accessories for tools, we focus on making them usable on all tools. This is the advantage of building the equipment ourselves and not to be dependent on changing shipping parts from overseas, or on a gallery of changing designs that depend on what vendor is offering the best export deal. We work to avoid putting you in an obsolescence loop – we always have parts for older tools, and we frequently have upgrade parts that will improve performance.
B). The Importance of Control System Software
Smooth and Easy Motion Software
In the 1990’s, the first ShopBots took advantage of the emerging personal computer (PC). PC’s allowed us to make CNC technology more accessible and affordable. Our early tools made use of the new devices to control the tools, rather than relying on expensive, electronic motion boards for control. This means that from our origins, we have integrated the creation and development of control system electronics and control software with the mechanical aspects of CNC tools. We appreciate that good tools start with good mechanicals, but over the years of producing and using CNC tools we have come to a strong belief that software control systems are equally important. In the beginning, software was a focus for us in helping get the costs of equipment down, but as our products developed, our focus shifted to control system software and that provides both smooth efficient cutting and ease-of-use in production.
This means that the hardware and software systems that run our tools are tightly integrated with our tools because they were designed for the tools. Our recognition of the importance of software distinguishes us as the only manufacturer of affordable CNC tools that produces its own controls and software.
Software for Smooth, Efficient Cutting
Our software provides smooth cutting motion and crisp acceleration. We have focused on getting high-resolution, straight line and complex curved motion that is chatter-free with crisp accelerations and decelerations to make cutting efficient. ShopBot’s feed rates, speeds, and accelerations are fully adjustable in the tool’s software interface and from within toolpath files.
Software for Ease-of-Production
ShopBot’s software interface is straightforward and intuitive to use. Carrying out basic tasks and house-keeping functions such as homing is intuitive. The control software runs toolpath files (part files) generated from virtually any CAD/CAM program. It can utilize files in standard g-code format (Fanuc/NIST RS274) and well as toolpath files that have been created in OpenSBP, an open-syntax CNC language (supported by most current CAD/CAM software). OpenSBP is a “conversational” and programmable language developed by ShopBot and contributed to the public domain.
Thus, you are able to run ShopBots with two different types of CNC files. Traditional g-code is fine for just running files output by CAD/CAM programs. It may feel particularly friendly if you are a CNC operator experienced with other tools, but g-code is an old format that was optimized to be read from early paper tape input devices. It’s awkwardness and illegibility are no longer necessary for digital efficiency. ShopBot’s OpenSBP option provides a second and more ‘conversational’ language that is easy for a human to read, understand, and use. Unlike g-code, OpenSBP includes built-in programming functions (such as variables, logic testing, and looping) that make it readily programmed using friendly, BASIC-language-like expressions. OpenSBP makes it straightforward to do everything from creating a button for moving a tool to a position you frequently want it to go, to creating special production routines that will improve the efficiency of workers as they manage jobs and files and move parts through your production process.
Programmability and configurability make ShopBots easy to set up for even highly specialized jobs, and they can be readily reconfigured for the next job, a day or a month later. Truly interactive digital tools with interfaces that are congenial to production line functionality and automation are what makes a tool helpful and efficient beyond just getting a part cut. It’s what makes a tool ‘smart.’ Don’t assume that because an imported tool calls itself smart, it has any of this flexible configurability or programmability.
Software That Is Available and Up-to-Date
As with hardware, we continuously evolve our control systems and software as opportunities to add capabilities and features as they become available. The most recent software for your tool is always available for download from our website, FREE. When the availability of new electronics allows us to develop improved controllers, we also make them available for older ShopBots. It is possible to retrofit our latest control cards or control box – greatly improving the functionality of a tool – to virtually any age ShopBot.
MORE INFO … see how one large cabinet making operation makes use of ShopBot programmability
Coming Soon: Our new FabMo software (short for FABrication and MOtion control platform; currently available on Desktop Tools and Handibots) is our next generation digital fabrication software. FabMo software make use of advanced “S” shaped curvilinear profiles for accelerations and decelerations. These profiles provide smoother action than the trapezoid-shaped, linear acceleration profiles found on most CNC tools. Our profiles are optimized to reduce “jerk” (jerk is a technical term for the 3rd derivative of speed; it is a measurable type of disruption of motion). Jerks cause bumps in cut edges. When they are not managed carefully, they limit how fast a tool can work and contribute to chatter in cutting. ShopBot’s profiles are specifically oriented to reduction of jerk for given acceleration rates and feed speeds. This means our tools work faster, more efficiently, and with smoother cutting – all without adding weight or cost. FabMo software includes an improved environment for creating custom production solutions and for new ways to monitor and interact with tools. FabMo software will be unique to ShopBots as we make it available on all our tools in the coming year.
And, We’re Here to Help, Whether You Purchase a ShopBot or Not
For almost 25 years, ShopBot has been developing and manufacturing CNC tools for use in small manufacturing and by individuals. We believe that digital fabrication is the key to making small manufacturing in our communities competitive again. We believe that digital manufacturing is how we can again do competitive, realistic and fulfilling production.
MORE INFO … see essays, written by our CEO, Ted Hall, on reviving small manufacturing
We pioneered affordable CNC. It’s no surprise that we have more competitors today than 25 years ago, when we were the only manufacturer providing digitally-controlled routers appropriate for the needs of small manufacturing. We are frequently asked how we feel about companies that have recently adopted our approach and are now offering affordable technology tools. Well, actually … we feel good.
Of course, we’re flattered, but there is more because we believe that digital fabrication is the single most important key to returning manufacturing. Increasing the availability of affordable CNC technology will help promote local manufacturing and bring more work for all of us. Additionally, some of our competitors offer mechanical approaches not available from us – tools that differ because of design choices with respect to one or another of the options described here. As we note, many of the options are equally good, or offer different sets of trade-offs that may be right for some shops. We won’t hold it against you if you choose another tool. What we want to do is encourage you to continue to use the amazing resources of our website, our free interactive web training, and our user forums. There is a tremendous amount of how-to information of general CNC interest available to you from our site.
And you can always give us a call to talk over any question you may have about CNC.

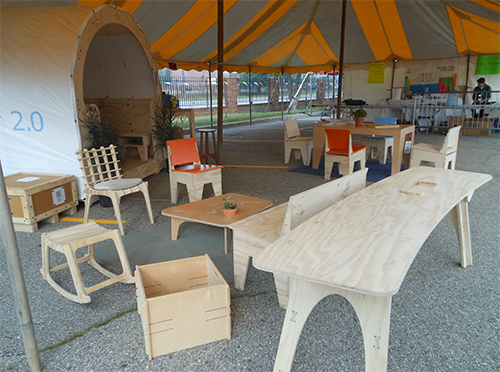
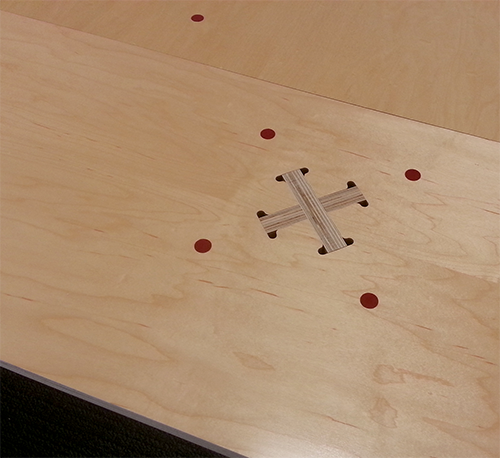
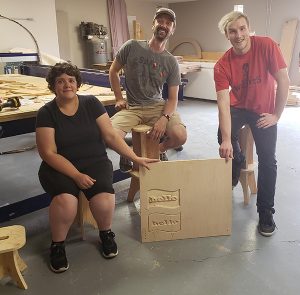
In the Fall of 2011 we were setting up the ShopBot booth at the NY Maker Faire and noticed some interesting plywood furniture across from us. It had obviously been fabricated on a CNC machine, with dogbones in the inside corners (which the designers called “snigglets”) and engravings on the tops to describe the process. Ted and I introduced ourselves to Anne Filson and Gary Rohrbacher, architects and University of Kentucky professors, who it turns out had been following our work via 100kGarages. Their design firm, AtFAB, had been designing furniture and making the files publicly available—using 100kGarages fabricators to get much of it made.
I’ve kept in touch with Anne and Gary over the years and have fabricated a handful of projects with them. We did the “Open Source Living Room” together at the 2014 Detroit Maker Faire that showcased Open designs of all kinds, from AtFAB stools and tables to the first 8×8 Shelter 2.0 design.
I also fabricated pieces for an exhibition they had at a gallery on the MIT campus in 2013, but the biggest project by far involved fabricating the furniture for MakerBot’s penthouse office in Brooklyn in 2013: the reception desk, meeting and conference tables, assorted chairs and desks, and even Bre Pettis’ office desk.
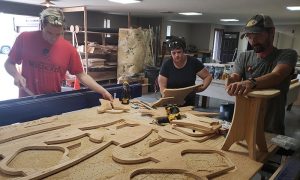
All these projects were fun to do so I was excited when I got a call from Anne a couple of weeks ago about a new project they were working on. They were both on sabbatical this semester and were working on some CNC fabrication instructions, and wondered if they could come to my shop in VA, talk a bit, and do some test cutting. I quickly agreed and made sure I had a couple of sheets of 3/4″ Radiata pine plywood and enough propane in the grill to cook hot dogs for lunch!
We started out by toolpathing a sheet in VCarvePro, our toolpathing preference, and cutting them out with bits that they had brought, an 1/8″ straight bit to mark the location of screw holes and a 1/4″ upspiral to cut out he parts. Although I generally cut 3/4″ plywood in 2 passes at 4″/sec, I wanted to be somewhat conservative for this and use the rule-of-thumb and cut each pass at the bit diameter, 1/4″.
I’ve written about my toolpathing and cutting techniques in a Medium post “A slacker’s take on CNC fabrication” and used basically the same system for these parts. There were a handful of small parts that I cut first using a spiral plunge, with a single tab at the start point. The rest of the parts I organized in increasing size, using a straight 4″ plunge and no tabs. The sheet finished machining in about 40 minutes, with Anne spending a little time cleaning things up on my assortment of sanders and Gary assembling the pieces.
At the end of the day, my wife and I joined them for a great seafood dinner at The Shanty in Cape Charles VA, and the next day we were off to Baltimore to visit OpenWorks in Baltimore.
While we were at OpenWorks, they had the opportunity to cut the same parts they had cut in my shop, out of ApplePly on the $60k Laguna CNC machine in the OpenWorks production shop. As you would expect, the parts from the Laguna turned out really nice and needed no sanding, but took a full sheet of parts to dial in the settings and required two passes each with downspiral and upspiral bits to get that quality.
When it was all over I asked Anne and Gary what they thought about the cutting and how they thought my 10-year-old ShopBot compared to the $60,000 Laguna. Gary said, “In the end, maybe I’m biased, but I think you can get just as good a finish with the ShopBot”
Anne said, “After dialing in the Laguna process, I suppose we could’ve quickly pumped out a huge job with a large number of sheets. Perhaps that’s where you’d find an advantage over a ShopBot? Or maybe not, if your shop and machine were organized for industrial jobs.”
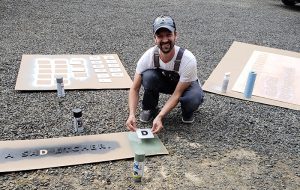
By Sallye Coyle, October 18th, 2018 Sea Reach Ltd. in Sheridan, OR, is a design company that also makes signs. Their strong commitment to the environment and education, both nationally and internationally, is something that is very apparent by the content they post to their blog. In addition to working on private projects, Sea Reach’s clients include the U.S. Forest Service and other government agencies, as well as educational institutions.
Sea Reach designs and prints graphics on-site, and has a production facility for manufacturing a wide variety of things—from the posts signage hangs on, to outfitting a van that will be a mobile visitor’s center for Shenandoah National Park in Virginia. Where appropriate, they used to outsource some aspects of a project, like v-carving a sign, or cutting out graphics printed on high pressure laminate. In order to bring some of that back in-house, they purchased a pre-owned ShopBot from a company in Portland. The ShopBot came with an operator who had used the machine for working with wood, but the operator had moved on.
Recently, Sea Reach received a grant related to Workforce Development in Oregon. The grant provided the opportunity to hire someone from ShopBot to travel to Oregon to tune-up and upgrade their ShopBot, as well as give 5 days of training and support to teach a number of their employees the true capabilities of the machine.
Before going out to their facility, I consulted with Kelly Crees, Operations Manager of Sea Reach, via email and phone calls to determine what they wanted to do with their ShopBot and what supplies they might need. Kelly sent photos of the ShopBot to help identify the components of the tool, including the control box and card, motors, pinion gears, Z-axis, and spindle. The tool was a PRTalpha with a Colombo spindle, circa 2004. A new computer for design work, new Aspire CAD/CAM software, and consumables such as pinion gears, bits, and collets also became part of the package.
The initial visit indicated that the ShopBot had been well-maintained by the previous operator, and a creative vacuum hold down system had been put in place. The charred state of the bits and collets used for cutting out the high-pressure laminate (a paper infused with plastic) told me that the company could use some help with feeds and speeds for cutting different materials. Since the tool was useable as it was, we jumped into training Melissa (graphic design), Chris (woodworking) and Danny (summer assistant) on how to set up the ShopBot and use Aspire to create files. ShopBot founder Ted Hall was on vacation in Portland on the third day and was recruited to help with changing out pinion gears, reprogramming drivers, and tweaking settings to make the tool hum as it did its work. Should they choose to put the tool into full-time production in the future, there are a few upgrades Sea Reach can make, such as replacing the 14- year-old spindle and upgrading the control card to bring the control box up to the current ShopBot tool standards.
The grant also includes more time for consulting on specific projects, such as v-carving and using Aspire to create 3D models for casting bronze. Sea Reach’s use of their ShopBot for new and exciting projects is just beginning.
 Ted Hall was recruited into tweaking one of the first PRTalpha tools to enhance its performance.
-
-
Since there were no chairs in the woodshop, a first project was to make a family of Shop Stools for the wood shop. The files for the project can be found on the ShopBot website: http://www.shopbottools.com/mSupport/projects.htm
-
-
Introducing the text tools and toolpathing to create raised letters or engraved letters were part of the lessons on the first day.
-
-
Another sign project emphasized pocketing, inlays and painting techniques.
-

-
Melissa and Chris work on ensuring that the design printed on the High Pressure Laminate matches the graphics created on the computer. Registration guides are printed with the graphics to help align the CNC machine, and to test if the materials stretched in either or both axes during the printing process. By using the correct bit and adjusting the RPM’s of the spindle, the HPL cut out smoothly and easily.
__________________________________________________________________
ShopBot is pleased to offer (for a fee) help with upgrading an older ShopBot and training new operators on how to use it effectively and efficiently. A document on the ShopBot website can help customers identify what tool they have when they’re ready to discuss a tool upgrade with the staff at ShopBot.
Contact ShopBot via phone at 888-680-4466, or visit the website, for information on training options, including free videos and documentation, classes at the ShopBot facility in Durham, NC, and customized professional development on-site.
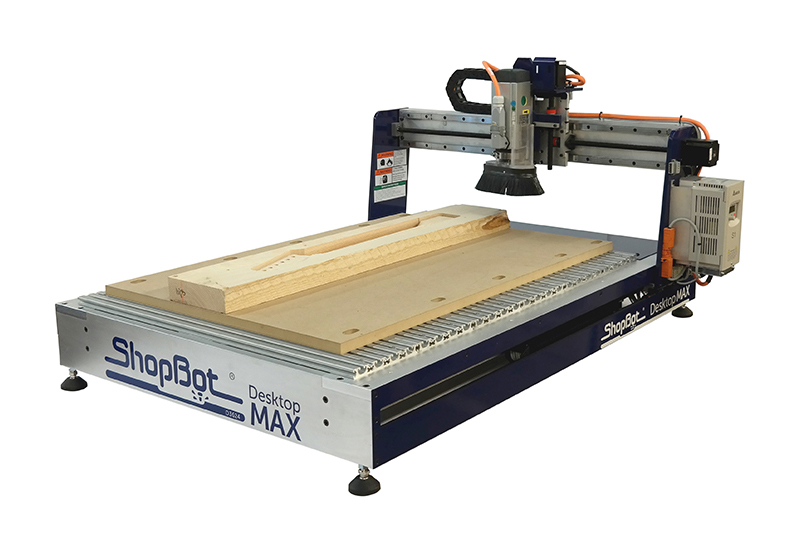
The CNC below is frequently compared to our ShopBot Desktop and ShopBot Desktop MAX tools. This tool is imported from China by several different resellers in North America. It is also available directly from China from the internet. Prices for the tool vary from $2,800 to $6,500, depending on the reseller. From published specs, the tools are apparently identical though they do have different decals. We thought it helpful to directly compare a few of the characteristics, capabilities, and features of this tool to the ShopBot Desktop and Desktop MAX CNCs.
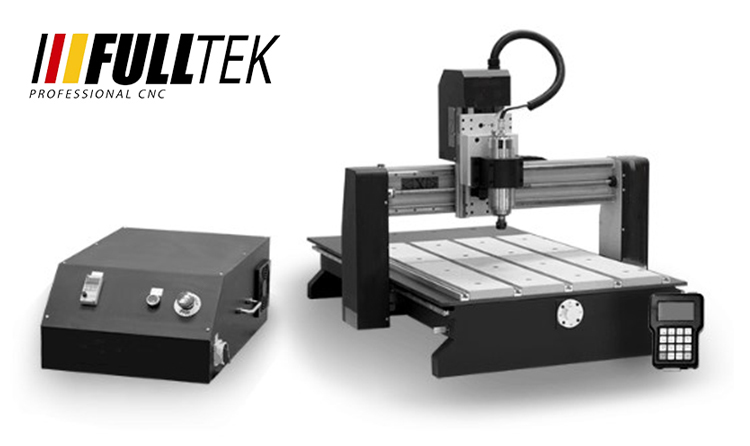
Mechanicals
ShopBot Desktops and Desktop MAXs have a heavy, solid aluminum frame and a ‘dual-drive’ gantry. Dual-drive means there is a motor and drive system at each side of the gantry. Dual-drive insures that the gantry moves evenly and that it will not be deflected or racked when machining on the left or right side of the centerline. In contrast, the imported CNC has a single, center-drive screw and motor for the gantry that is positioned in the middle of the bay under the deck. This screw is attached to a tie bar that is then attached to the two ends of the gantry. With this system, as cutting moves further and further off the centerline, the gantry can be deflected or racked from the asymmetrical forces to each side of the centerline. One less motor and one less drive system helps reduce costs in the imported tools, but racking will be a source of inaccuracy that needs to be managed. The limitations will come into play with any heavy work, such as cutting or carving hardwoods or machining aluminum. It will also show up in edge quality when cutting plastics and it will make it more difficult doing precision work such as inlays, routing printed circuit boards, or carving jewelry difficult.
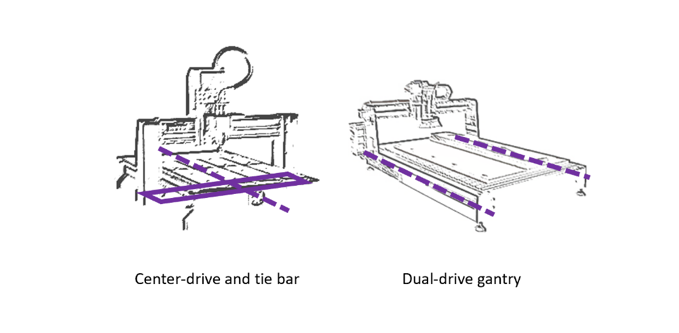 A second advantage of the ShopBot’s dual-drive design is that it leaves the area under the bed of the router available for other functionality. In comparison, on a center-drive tool, the tie-bar mechanism moving back and forth under the deck makes that area unavailable for other use. A second advantage of the ShopBot’s dual-drive design is that it leaves the area under the bed of the router available for other functionality. In comparison, on a center-drive tool, the tie-bar mechanism moving back and forth under the deck makes that area unavailable for other use.
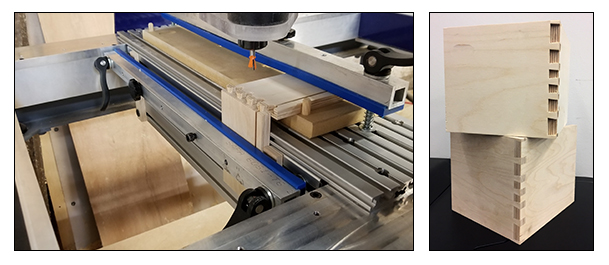
For example, with the open, dual-drive of the ShopBot Desktop and Desktop MAX design, the area under the deck is available to create a full vacuum hold-down system (which you can make yourself or purchase from us). Moreover, the deck can be removed to allow machining of larger blocks of material, or to add fixturing such as that for our joint-making edge clamp (see detail below), or even to create space for something like an extra-large indexing/turning system.

We do favor using a screw-drive mechanism of some type for motion production in Desktop CNC’s. Screws provide excellent precision and virtually eliminate backlash. However, there are several options for such screws. After having experience with ball-screw systems (these employ ball-bearings inside the nut that rides on the screw) on earlier CNC tools, we chose a Teflon-coated lead screw for our Desktops, manufactured integral to the motor, along with a composite anti-backlash nut (that does not employ internal ball-bearings). The integral-screw keeps the mechanism simple and the axes aligned. In a typical ball-screw installation, couplers, universal joints, and outboard bearings must all be kept in alignment with the ball-nut – a complexity that increases the likelihood that maintenance attention to alignment will be needed. A bigger issue with the ball-screw on these tools is that lubrication with oil is required. It’s a maintenance thing, but more importantly, because the upper-gantry screw is close to the cutting area and unprotected on these small tools, the oil will attract dust and debris and clog the ball-bearings and their channels. Sure, a lot of big CNC’s use ball screws. But, there is typically protection of those screws in the form of shrouds or bellows. For our Desktops, dust simply falls off our Teflon screws as they spin.
A final mechanical issue is the spindle. We’ve noted that the water-cooled spindle on the imported tools probably won’t be a deal-breaker because it can be replaced. The rationale for the water-cooled spindle is that it is inexpensive – and that it will get you started. But water-cooling is awkward and involves the distracting maintenance of keeping a bucket of water from getting moldy and a pump clean and functioning. It makes these spindles a production liability, particularly in comparison to the air-cooled, European-style spindles that have been the industry standard for 50 years. In contrast to the imported tools, the ShopBot Desktop and Desktop MAX CNCs come standard with HSD, air-cooled, industrial spindles.
Electronics, Software, and Controls
In comparison with the very basic control system of the imported tool, ShopBots come standard with a full ShopBot controller and ShopBot Control Software. This controller is the same as on our larger tools and includes all ShopBot functionality, including expandability to additional axes and control of additional accessory functions.
A full CNC control creates opportunities to add features like a rotary indexer accessory that converts your Desktop into a turning daemon, doing carvings, ornamental turnings, and 3D objects in the round. The controller also supports other standard CNC attachments such as active, tangential, knives for cutting fiber materials. We think of our Desktop CNCs as platforms for digital productivity – with options for numerous types of manufacturing assistance and supported by a set of full and expandable controls.
The electronic control and software system that run our tools are tightly integrated with our tools because they were designed for the tools. We believe that good tools start with good mechanicals, but over the years of producing and using CNC tools we have come to believe that software control systems are equally important. Our software focus is on a control system that provides both smooth, efficient cutting and ease-of-use in production. Our recognition of the importance of software distinguishes us as the only manufacturer of affordable CNC tools that produces its own controls and software.
Our software provides smooth cutting motion and crisp acceleration. We have focused on getting high-resolution, straight-line and complex curved motion that is chatter-free with crisp accelerations and decelerations to make cutting efficient. ShopBot’s feed-rates, speeds, and accelerations are fully adjustable in the tool’s software interface and from within toolpath files.
ShopBot’s software interface is straightforward and intuitive to use. Carrying out basic tasks and housekeeping functions such as homing is intuitive. The control software runs toolpath files (part files) generated from virtually any CAD/CAM program. It can utilize files in standard g-code format (Fanuc/NIST RS274) and well as toolpath files that have been created in OpenSBP, an open-syntax CNC language (supported by most current CAD/CAM software).
You are thus able to run ShopBots with two different types of CNC files. Traditional g-code is fine for just running files output by CAD/CAM programs. It may feel particularly friendly if you are a CNC operator experienced with other tools. ShopBot’s OpenSBP option, provides a second and more ‘conversational’ language that is easy for a human to read, understand, and use. Unlike g-code, OpenSBP includes built-in programming functions (such as variables, logic testing, and looping) that make it readily programmed using friendly, BASIC-language-like expressions. OpenSBP makes it straightforward to do everything from creating a button for regularly moving a tool to a standard position, to creating production routines that will improve the efficiency of workers as they manage jobs and files and move parts through your production process.
Software That is Available and Up-to-Date
We continuously evolve our control systems and software as opportunities to add capabilities and features become available. The most recent control software for your tool is always available for download from our website, FREE. When the availability of new electronics allows us to develop improved controllers, we also make them available for older ShopBots. It is possible to retrofit our latest control cards or control box – greatly improving the functionality of a tool – to virtually any age ShopBot.
Our software provides an incredible base of learning resource for CNC. That’s because all ShopBots work the same. Information across our wide spectrum of users makes it easy to get any question answered. Check out our huge web library of free training videos and webinars. Or, look through years of information, help, and hints about fabbing with CNC in our Talk ShopBot Forum.
All our tools come with two, CAD/CAM design software packages. VCarve Pro is acknowledged as one of the easiest-to-use design tools for getting into CNC. For advanced, engineering-driven work, we provide a year’s license to Autodesk’s Fusion 360, a full design, modeling, and rendering program with integrated CAM.
Making a Benchtop CNC an Agile Production Monster!
The concept of a desktop or benchtop tool is that it is agile and portable. That for a given project, it can be put on one bench or another or put on a rolling bench and moved around the shop or factory floor. Portability is not possible if a new 220V circuit must be installed every time you want to move the tool, or if a long, heavy 220V cable needs to be dragged across the floor of your shop. Our Desktop CNCs are designed to provide the highest level of speed, power, precision, and cutting force in a tool that is connected to a standard 110VAC outlet. When you are ready to move a ShopBot Desktop or Desktop MAX CNC to another location. Do it – and, then just plug it into a different outlet. We designed and built these tools from the ground up with agility and configurability in mind. ShopBot Desktops have the power and rigidity of full-size CNC’s and they have as much spindle power as can be packed into 110V. (*If you may have been considering a CNC tool with a woodworking router, please have a look at this white paper comparing the measurement of router cutting power to spindle cutting power).
We’re very enthusiastic about benchtop CNC tools as production assets for small manufacturing. These tools are frequently as productive as full-size tools when material size is small. They are capable of high precision and powerful cutting because, relatively speaking, they can be quite rigid. Many can double as small mills for working with aluminum and can optionally power a 4th, rotary axis for turning and 3D shaping.
In This Case, Buy American Because You Get More for Your Money
It is often believed that the cost difference between imported products and products like the ShopBot Desktop and Desktop MAX is a result of inexpensive offshore labor. It does cost a little more to build equipment in the US than offshore. But as far as our Desktop CNC tools go, the cost differences in comparison to these imported tools reflects what you are getting. Our tools offer a stronger design that provides greater capabilities and more extensive features. You are buying more tool. You are buying the capability, configurability, agility, and support system to best accomplish your work and to make you productive.
By Jeanne Taylor, October 8th, 2018 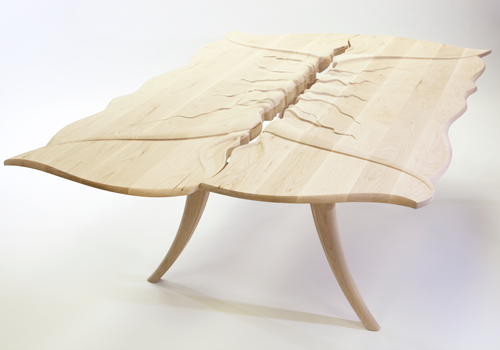 “Tablescape No. 1.” • Hard rock maple, stainless steel • 58 x 90 x 32 inches. Now showing at the Houston Center for Contemporary Craft – Texascraft 2018 • Winner of one of three Juror Merit Awards. Meet Artist and Industrial Designer Brooke M Davis
We’ve been following Brooke M Davis’ work since 2012 after she purchased her full size ShopBot. Brooke has continued to design and fabricate beautiful, organic, functional furniture that can easily be categorized as art. In fact, Brooke’s work can be found at the CraftTexas 2018 show at the Houston Center for Contemporary Craft, September 29, 2018 — January 6, 2019.
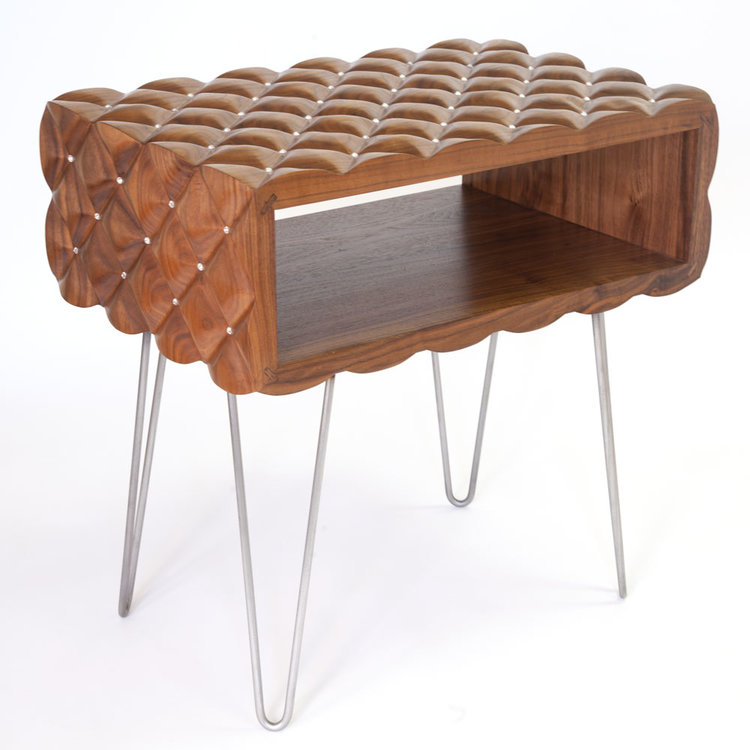 “Pilo Side Table” • Wood Side Tables 2019 • Walnut, Swarovski Crystal, Steel Brooke’s newest work includes the plush tufted walnut side table (above) that is both elegant and inviting. Not only will it be displayed in the Texas Furniture Makers Fair at Kerr Arts Cultural Center in November, she will be showing it in Milan at the Salone Del Mobile in April 2019.
Keep an eye on her website: brookemdavisdesign.com for more exciting work to come.
MakeShift, her design consulting service and production facility, continues to thrive and regularly sees a wide variety of work through the shop that keeps things interesting. Brooke and her team handle prototyping work, product development classes, design consultation, and more to the Austin, TX area—and beyond. This is a unique space where real product ideas come to life.
We are looking forward to seeing what’s next for Brooke.
Take a look back at the story about Brooke from 2012 below.
Originally written & published by: Michael Berliner
Websites: Brooke’s original furniture & objects: brookemdavisdesign.com, Design consulting services & production facilities: makeshiftatx.com
ShopBot Tool: PRSstandard 96 X 48
Brooke M Davis Design blurs the line between artisan and designer by combining artistic expression with design precision to produce luxury craftsmanship. The process involves coupling mass production techniques like computer aided design with hands on master craftsmanship to create new and exciting results. With individuality in mind, this process allows for ease of customization at the client’s request.
Brooke’s process of discovery and creation for Tablescape No. 1 is much like it is for all her original works. “It’s a fluid process, and it always involves my ShopBot CNC,” notes Brooke. “I always have in mind that CNC is going to be integrated into my process. I’ll often start by making a 2D pencil sketch, then build on the idea by doing quick modeling in wet clay, to see where this takes me. I’ll photograph the models, and bring them into computer and use CAD to hone and clean up the lines … It’s a fluid process. I’ll then go back to clay to continue to play with the work. Sometimes I’ll draw on top of the photographs and bring that into the computer to further develop the design.”
Brooke’s collections range from high-end one-of-a-kind pieces to limited run productions. With quality craftsmanship and attention to detail, every piece is made to order with quality in mind. She works with individual clients, interior designers, and architects to offer a variety of services to meet innovative project needs. Specialties include limited run CNC production, industrial design, furniture design, and custom architectural installations.
“I’d worked with ShopBots throughout my education and teaching positions, so I was very familiar with their tools and capabilities. CNC technology became ingrained into my creative processes from the start, and I always integrate it into my design and production process. I finally bought my own ShopBot in May of 2011 and it’s been everything I knew it would be.
One of the things I really like about ShopBot is the community that surrounds it. The people at ShopBot are great — very helpful if I ever have a question. And there’s a very supportive and active group of users on the forum, so you feel like you’re part of a larger group that’s very much into CNC and helping one another succeed.”
Brooke also founded the community hacker space, make+SHift in 2011. ” It’s the only Design on Demand Shop for product developers in Texas!” says Brooke. “We provide you with the necessary design resources to make your ideas a reality. We offer design consulting services, CNC prototyping, and classes to advance professional development, plus comfortable work-space all in one place.”
Brooke notes, “One of the things that’s been wonderful about opening make+SHift is that I learn something new all the time from my customers. They bring new projects and challenges to the table, and my team gets to think of new ways of solving problems. It energizes my own design thinking as well.”
By Sallye Coyle, September 11th, 2018 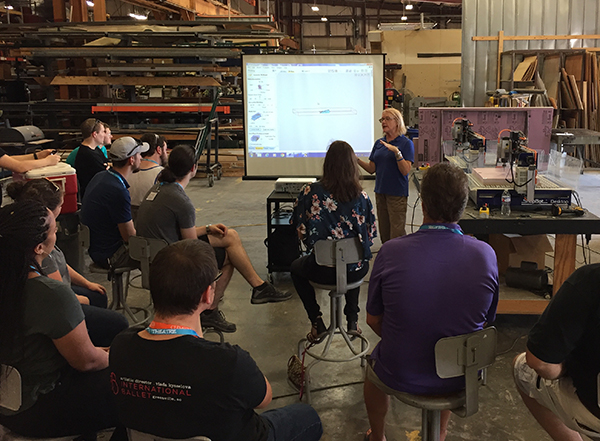
The scene shop at Coastal Carolina University in Conway, South Carolina, has been making good use of their 4’x8’ ShopBot PRSstandard for creating various props for stage productions, including plywood forests of trees. Recently, the theatre department asked ShopBot to conduct a series of Master Classes for the Southeast Section of USITT (United States Institute for Theatre Technology) to learn more about, and share the capabilities of, their CNC machine with other theatre programs throughout the southeast.
One topic that seemed to spark everyone’s interest was 3D carving. With that in mind, the first demonstration was how to import a 3D file, in .stl format, into the VCarve Pro software, which is shipped with each ShopBot tool. Placing the “component” into the software in the correct orientation is a simple process. The model we chose to make was thicker than the 1.5” pink insulation foam that we had available, so we foreshortened the Z-height in the model to create a “bas” or low relief that would not be evident when looked at straight on. Another option to create the effect would be to use the slicing feature available in VCarve to create a series of carvings (slices) that could be stacked up after machining. Since we went for speed rather than detail, we used the same .25” ball nose bit to do a roughing pass over the entire model, and a finishing toolpath over the right side of the model.
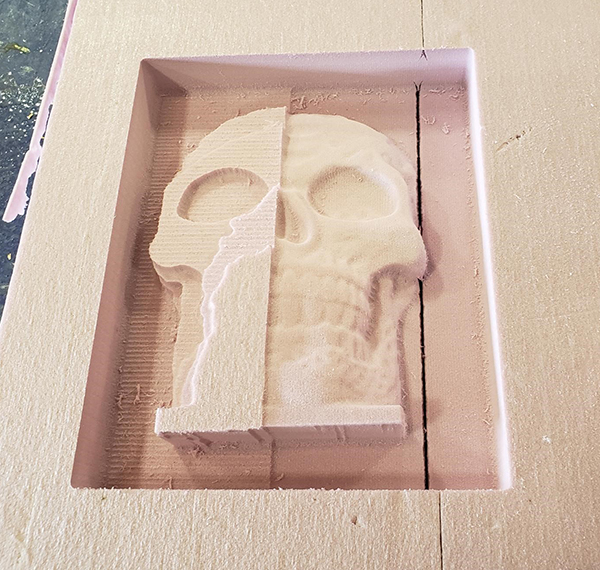 The bas relief of the imported Dia de los Muertos skull was subjected to two different tool paths. The entire model inside the larger rectangle was given a roughing pass to clear away the excess material. For the finishing pass, a smaller rectangle was selected. The stepover and feed/rate were changed to enhance the final result.
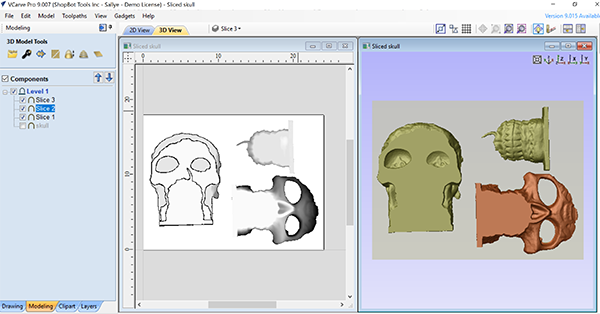 Another option is to use the slicing option available in VCarve Pro/Aspire to slice the model into sections that are the thickness of the available material, and stack them up after 3D carving. Even experienced ShopBot operators learned something new when going over the basics of ShopBot set-up and the tools within VCarve Pro. Want to join all the open segments in an imported .dxf file or change all the individual segments into a sweeping curve? Want to trace a bitmap? Want to recalculate all the toolpaths in one go? Want to get an estimate of the time to machine a part? There’s a tool for that.
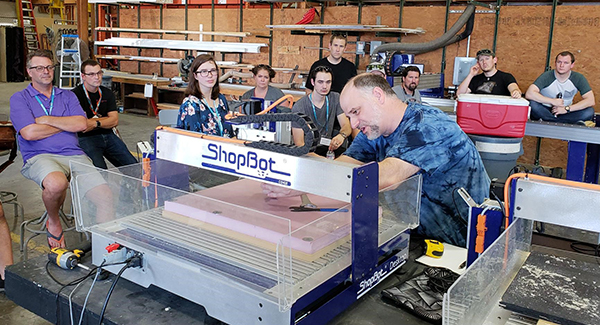
While the skull was being 3D carved, we split up and worked with smaller groups on different projects on different machines. On the big ShopBot gantry tool that belongs to Coastal Carolina University, we worked on a shop stool project that is available on the ShopBot website.
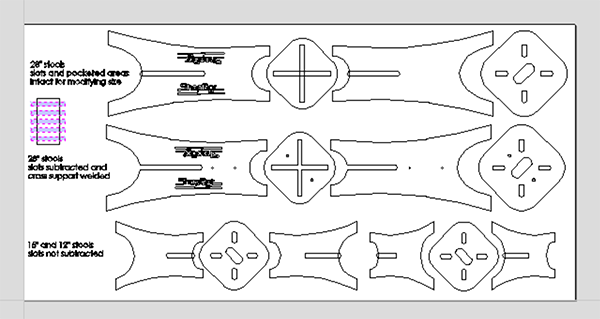 Screen shot of shop stools laid out so that the slot size can be adjusted for the actual thickness of the material.
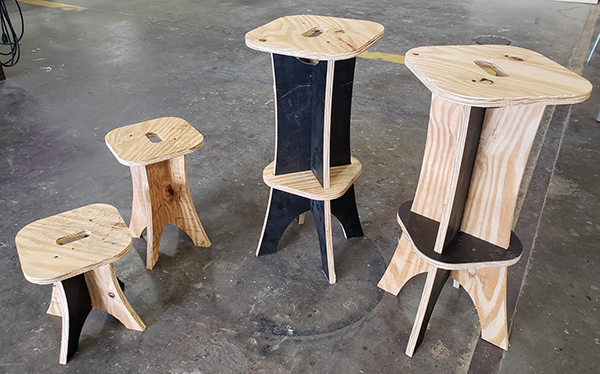 Finished shop stools. On the other Desktop, we worked with a V-bit. Richard demonstrated how to import a bitmap, trace it, and VCarve the result. The CC was an example of how to use the VCarve toolpath tool to create a raised design by selecting the design, and a border. The CC is reversed so that the carving can be used as a stamp for textile design.
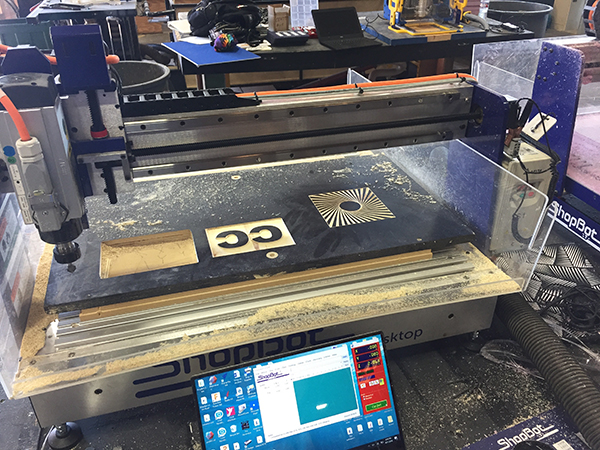 By painting the board first, then carving into it, one can easily create a two-color sign or design. (Or perhaps you have a piece of scrap material, and the board was already painted and placed back in the material pile.) Session 2 of the Master Class included some additional options. VCarve Pro is 2D CAD and 2D/3D CAM software, so you can import 3D files and toolpath them, but you cannot design them or manipulate one that you have imported. Aspire is the big sister of VCarve Pro, and is a 2D/3D CAD and CAM software. In other words, you can “puff up” 2D vectors into 3D models. Another of one of the tools in Aspire allows you to import a black and white image and create a 3D component based on the grayscale of the photo. As an example, we snapped a photo of a fish on the wall at our restaurant, and used Aspire to create a 3D carving.
 Art object on the wall. Photo snapped to be turned into a 3D component in Aspire.
 Underlying vectors of fish and a border “puffed up” into 3D in Aspire.
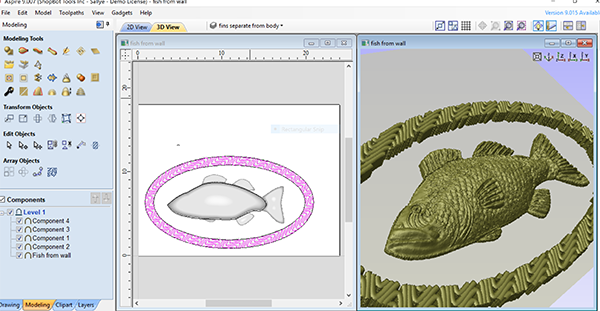 Pattern of fish extracted from photograph and laid over the underlying 3D model.
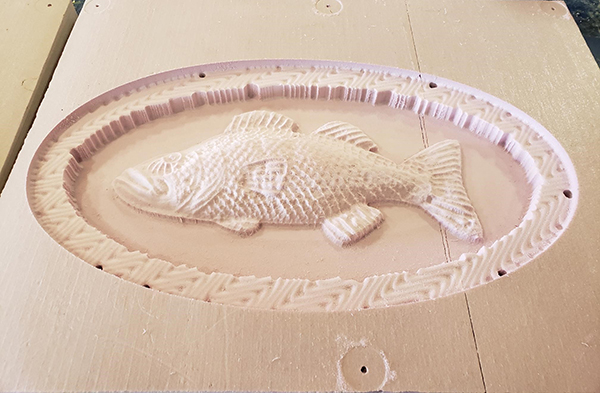 Model machined in pink foam with a .25” ball nose bit. With the small size of the second session, attendees could get some in-depth instruction on options or ideas that they were interested in. Two-sided machining, setting up jigs for multiple copies, and the rotary indexer for machining in the round were but a few of the topics that had heads spinning and ideas flowing as folks headed back to their own shops.
By ShopBot, September 4th, 2018 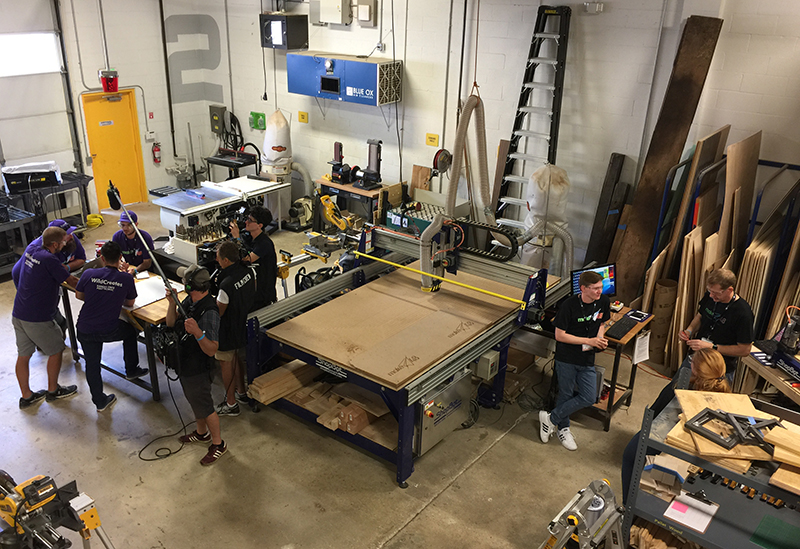 Make48 Film Crew at Work As a product design student walking into an event where teams are tasked with designing a product, I didn’t quite know what to expect. Every day at school we brainstorm ideas, sketch them out, prototype them over and over, and then at the end of the project, market and present a finished prototype to our peers. As I looked around the empty shop in the quiet hours before the competition began, I wondered how closely what I was about to witness would resemble the process of product development that I had grown so familiar with. I was in Towson, Maryland at the Stanley Black & Decker Makerspace for Season 3 of the TV show “Make48” in which 48 contestants have 48 hours to develop a product, produce a working prototype, create a short promotional video for that product, present it to a panel of judges, and do it all within the given challenge category and specific budget constraints. Sounds easy enough, right? This year, the contestants were all college students from universities all over the country—but I wasn’t there as a contestant. I was invited as a tool tech for ShopBot Tools, there to help the teams realize their ideas through physical prototypes and to guide them through the process of 3D modeling and 2D vector design for CNC machining.
Once the contestants began to arrive and I had a chance to talk with them a little, it became apparent that the competition drew a heavily engineering-based crowd. Of course, there were outliers who didn’t fit into this category, and there was one team that didn’t have a single engineering or design-based member. Those were the teams I was most interested in following. Sometimes throwing people out of their element and having them do things they wouldn’t normally do can yield surprising and positive results.
Right before noon on Friday, we all gathered around the huge stop clock at the front of the room, eagerly waiting for the 48 hours of chaos to begin. The giant steam whistle blew loudly, like the start of a factory workday in days gone by. It’s then time for the teams to get down to business and time for the tool techs to stand at the ready once the prototyping begins. Straight out of the gate, each team tackled the brainstorming phase in different ways. Within the first two hours, one team had created a model and 3D printed a rough prototype while many other teams struggled to narrow down the category of products that they wanted to focus on. Some teams immediately turned to sketching out their thoughts, while others pulled their ideas together into ordered lists, and one team had a mess of notes scattered across the table with no rhyme nor reason. Unfortunately for me as a tool tech, I was merely a spectator in these first few hours as teams decided what they wanted to create. It wasn’t until they began thinking about prototyping that my expertise came into play. One-by-one, the teams began to send their members out to the tool techs to begin fabricating their ideas.
 Cutting prototypes for the TV camera. For me, that was when the most rewarding part of the whole weekend began; the first contestant came to us with their idea, and we helped them translate their idea into a real, tangible product. We worked with them to create or edit their CAD files and guide them through the process of converting those vectors into a ready-to-cut .sbp file. As the machine warmed up and we zeroed the axis to the new material, I watched the whole team gather around the tool. As the spindle began to cut away at the material, there was a visible change in their expressions as the magic of technology brought their vision into reality. Watching their faces light up with pride as they watched the ShopBot cutting out their product or their logo was rewarding.
If there’s one thing I’ve learned about design in my time at school, it’s that presentations matter. There were many rapid prototyping techniques available at this event to bring these teams’ projects to life. In addition to the two ShopBot CNC machines, there were twelve Ultimaker 3D printers, an Epilog laser cutter, a large vinyl cutter, a Bridgeport mill, and a CNC plasma cutter, as well as a well-stocked wood and metal shop filled with many Stanley Black & Decker power and hand tools. Although several universities represented have ShopBot tools in their programs, the teams unfamiliar with CNC technology found some machines intimidating. Once we cut out a few things on the ShopBot ourselves, you could see the curiosity and confidence in the faces of the contestants begin to grow as teams got excited about the potential of prototyping on CNC. On the last day, as I looked out on the stage as each team presented their products to the panel of judges, I admired all the work we’d done with the ShopBot. Without our ShopBot Desktop and large PRSalpha 5’x10’ gantry – or any of the other digital manufacturing machines – the outcome of this competition would have been very different, and certainly would have taken longer than 48 hours. In the world of design, an idea is nothing if you can’t see it through to a working product.
I really wish that I could tell you more about all the incredible products that the teams produced, but I’m not allowed to share that information until the show is released next year, so you’ll have to wait until then. For more on the show, including what channels the first two seasons can be viewed on, visit Make48.com.
Reported by Sarah Burns. Sarah is a third-year product design student at Appalachian State University in Boone, NC. She works at their Makerspace in the library where they have a ShopBot Desktop.
|
|