During this somewhat strung-out MAKEcation I’ve been working on my boat project as well as the art project. Just digging out and cleaning up my previously described, 16-year-old pram project has been a job in itself. But I’ve started cutting a few needed parts and sloshing around a bit of epoxy to move the boat-building forward.
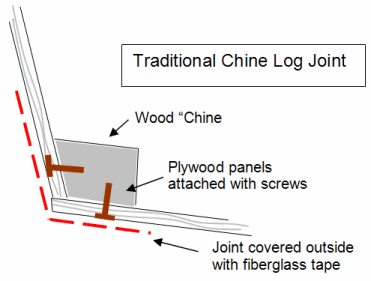
Chine Log Joint
I previously described the basic idea of stitch-and-glue boat building (and see the new Sam Devlin link below). So now I should confess that beyond my interest in backyard boat building a primary impetus of this particular pram project was as a “proof-of-concept” of one of those “great ideas” — that so far has not caught on.
By way of introduction to the idea behind the project: My thought about the standard approach to stitch-and-glue building was that as much as I like it, it suffers because of the details of the stitch-and-glue joint. This joint replaces the chine-log structure of traditional, hard-chine boat building (see Figure). The chine log creates an un-attractive corner in traditional boats made with planks or plywood sheets that attracts debris and leaks. The stitch-and-glue technique has all the advantages for hull shape and strength that I discussed earlier. But, the stitch-and-glue approach also involves creating an epoxy fillet at the seam. While an improvement over the chine log, this newer joint requires a lot of work and much sanding and finishing. It also leaves the end grain of the plywood sheet exposed on the outside, which means that both the inside and outside of the joint must be encapsulated in fiberglass tape and extensively faired and sanded to be attractive.
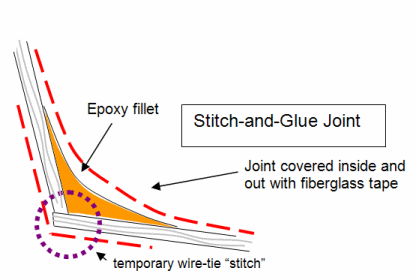
Stitch-and-glue Joint
I came up with an alternative approach that I wanted to explore. And, and it ended up being dependent on being able to precisely cut and machine the panels — another reason for needing a CNC tool beyond just getting the shape exactly right for developable surfaces (see design discussion in earler post). The concept is to internalize the epoxy joint inside the adjoining plywood panels by laminating up each of the panels, in place, from two sheets that have an inward facing bevel. This creates in cross-section a shape like a deep birds beak making for lots of surface area for gluing. The joint itself is is fully filled with epoxy by injection after all the panels are in place. This makes for a strong and water-tight plastic joint with an outward facing edge that is solid epoxy. The end grain is completely encapsulated by epoxy that is formed to the wood over a large surface area. This makes the external edge of the joint a lot more durable against abrasion and water penetration than the standard stitch and glue system (though you would probably put additional thin protective sheathing over the entire hull as you do with the other techniques). On the inside of the hull, there is a clean and neat joint requiring only quick smoothing of the epoxy in the inside corner. The internal joint can be additionally stiffened with longitudinal fibers during the build-up if desired.
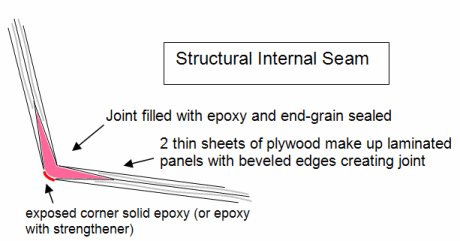
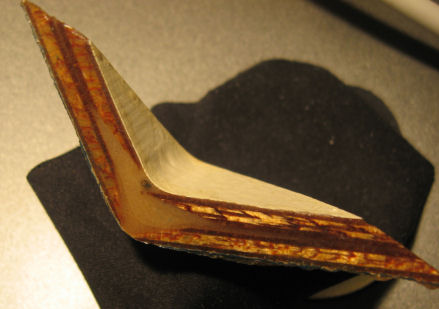
Structural Internal Seam (SIS)
It may seem that because of needing to do the additional lamination step that the technique involves a lot of additional work, but this effort is mitigated by allowing you to work with very thin and easy to manage plywood. Building with either the external or internal shell first, the sheets are much easier to handle and bend into position and in most cases can even be held for initial gluing with masking tape rather than using the wire-tie “stitches”. Also, because the lamination is done in position, it adds considerable strength and stiffness and allows the boat to be made of thinner plywood than otherwise. Engineering tests of the breaking strength of the joint show it to be equal to both the chine log joint and epoxy fillet joint. In all cases, when joint samples are stressed to breaking, the break occurs outside the joint.
Of course, the whole system depends on the panels being precisely cut (outside and inside panels will be slightly different) and the joint edges exactly machined. But this is pretty easily done with CNC. Additionally, Bill Young has suggested a technique for adding matching tabs and slots along the edges of the sheets and panels forming the joint (later easily sanded off) so that the hull almost snaps together by itself — I haven’t tried this yet …
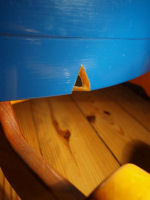
So now having this info about the building technique, you can now appreciate that the both the kids rocker, shown in previous posting, and the full-size pram are prototype tests of the building technique. In the case of the pram, I’ve cut out a small cross section of the joint so you can see how it looks. More pictures of the larger pram will follow as final building proceeds, but I won’t be cutting any chunks out of it.
I have also been interested in applying variations of this technique to building furniture where the interest is in making curved, light, and stiff pieces. I guess I’ll save that for the next MAKEcation.
A couple of ShopBotter-related boat links that may be of interest:
Sam Devlin (Devlin Boats) is one of the leading professional practitioners of stitch-and-glue building. He’s written several excellent books explaining the his methods and is also a ShopBot owner. (I have never been able to convince him to try the SIS technique.)
Graham Byrnes, who’s boating get-togethers I’ve attended for the last several years, is the ‘Crocodile Dundee’ of sailboat racing, boat-building, and ShopBotting. He is a cult figure in distance, small-sailboat, racing and uses a ShopBot to cut parts for his boats and kits. Click here for WoodenBoat article on Graham. Check out B&B Boats.
Leave a Reply