We would like to give you some background about our company and share some experiences we had improving our 48” ShopBot Buddy with a new vacuum hold down system.
Intelliview UAS, LLC was originally organized to help design an aerial surveillance video platform for unmanned aircraft systems. Running back and forth to meetings, I spent most of my time trying to figure out how to win government grants and struggled with national air space flight restrictions. I found I was getting nowhere fast.
In fact, what I really wanted to do was to spend more time with the family and be able to go fishing more often. Needless to say, I decided it was time to go another direction, and get a better sort of business started.
My wife and I both enjoy working with other people, and we have found stable careers. We have a rotating schedule that makes free-time management challenging, but allows us to be available for our family.
A few years ago we added a solar electric system to our home. It was a choice we made for our future. In Florida, most days are sun filled, and we return excess electricity to the grid. Accordingly, it occurred to us that it would be great if we could use the electricity we generated to “green-power” our business.
One day after work, I was surfing the Internet for a home-based business idea. We started to envision a company with a technology base that was environmentally friendly and that could make unique products for people. We needed a home-based solution for our business that would allow us to divide our free time and work at our own pace.
In September of 2008, I came across the ShopBot Forum on the Internet. There is a healthy mix of people on this forum. Newbies who are looking for support getting started with their projects and also more experienced users who are dedicated to the Forum in answering questions. The community is well developed by its users and is respected online. I have enjoyed woodworking for years, but it is hard to find knowledge-based resources at your fingertips when it comes to real-time solutions. Then it dawned on me!
A CNC router was a perfect fit for us – a home based business with real potential for making money that could work for us in the shop. We looked at what our options were, and found that ShopBot was the best fit for a number of reasons, most of all they were a friendly community. So we decided on a PRSalpha BT48 with a spindle.
We took delivery of our machine in December 2008.
In February 2008, we drove to the Florida Keys Camp ShopBot hoping to meet people and get more project ideas for future customers and finalize our business plans.
Shortly after returning we started a project and quickly realized we needed a better solution for a common issue in manufacturing – securing the material to the table. It is absolutely essential that you determine how you are going to do this before you intend on cutting anything.
Each customer and project is different, so the machine is supplied from ShopBot with a plywood table solution to allow basic cutting and hold down with screws, tape, clamps, etc. Part of the creative spirit you will experience working with these machines requires a willingness to find alternatives to meet your specific needs and also to look for help where it is volunteered by other users.
Everyone has been in the same situation at one time or another looking for help, and most people are willing to share their experiences. The camps are a great place to start in my opinion. Decide what you want to do, go with a plan, and ask questions. ShopBot owners like to talk about how they do things. So don’t be afraid to ask them.
The PowerStick on the Buddy is great for users with limited space, who need a moveable solution. You can read about it and see videos on the Talk ShopBot Forum. The PowerStick is an alternative to a normal (non-moving) cutting table like which is traditionally found on CNC machines.
The basic model of the Buddy includes a plywood table with a spill-board that travels over flat rollers and is moved back and forth by the “PowerStick” that replaces the X axis travel of a gantry.
We tried to use various traditional clamping methods with little success and managed to cut a few clamps accidently in the process. Air cuts above the work piece, while encouraged, add extra steps that cost production time. We needed to find a way that didn’t elevate shop risk and was less time consuming to set up for many different projects.
I started researching a solution for a hold down system that would meet our specific production needs. There were three potential solutions, but nothing truly fit the bill.
- Large, expensive regenerative blowers that were out of our budget and that required fixed piping to the underside of the table. Really intended for fixed tables, not a moveable system.
- DIY vacuum pumps with above table hoses and pucks and other types of suction motors requiring assembling of DIY parts with no product warranty. They were also on fixed tables with ample clearance for connections and didn’t suffer from vibration and movement that potentially could break vacuum. Not good.
- Finally, various sorts of clamping systems also not suited well for table movement and that stick up in the way of the cutting path, or that don’t hold reliably for all purposes.
Then I found what I was looking for online at a company called Schmalz. The product is called Innospann. They offer a full spectrum of vacuum gripping systems for large factory production routers.
I decided I would like to determine if we could adapt this system for the buddy and create a table to go under it that would work for us.
I approached ShopBot management about the idea, and they were just preparing to roll out their economic stimulus package for new owners. They agreed to provide a phenolic grid table for testing of the prototype system, with the understanding that I would share my findings with the ShopBot community here in this web column.
Next, I approached Schmalz management with the needs for our project. Their team was also supportive of the prototype testing of the Innospann product on a Buddy. Each Schmalz system requires a custom design, and so we set out to find a reliable vacuum solution that was repeatable for ShopBot Buddy customers.
I was assigned to Bryan, one of the engineers from Raleigh, N.C. He calculated the vacuum load required for the table we designed and assisted the project development. I introduced him to Jared, an engineer on the development team at ShopBot, who cut the 48”x48”x1” phenolic table, based on CAD drawings measurements. Bryan visited and exchanged information with Jared at the ShopBot facility.

Next we received the table at our shop in Florida and proceeded to install it on our 48” Buddy. It has a similar hole pattern to the stock table for installation on the PowerStick.
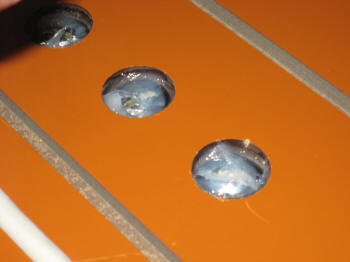
The Schmalz parts are imported from Germany and consist of a 1000mm stainless steel, magnetic, laser-cut grid plate. It is the core component of the system and is etched with a grid pattern on the top to line up the work piece. The tight tolerances are typical of German engineering and are impressive. The plate has tapered holes in a regular pattern that accept special beveled magnets with o-rings to form a seal to the grid system. There are a number of magnetic solutions available from Schmalz for various jig creations as well that attach quite nicely to the surface of this table.
Here is the completed system.
Now let me walk you through the Buddy – Innospann installation.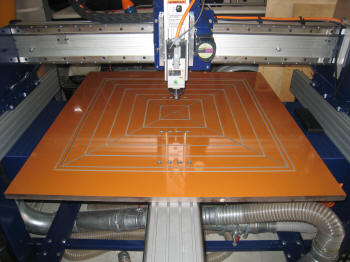
The table was installed on the Buddy after being bolted to the PowerStick. The rollers were leveled after installation to the bottom of the table. You can see the white hole that was tapped just to the right of the PowerStick on the table edge profile for the hose fitting above.
There is an inner grid on the lower table and an outer foam seal that vacuums down the surface plate, once the magnets, fixtures and material are in place. The plate is held in place when there is no vacuum by 12 pan head screws taped into the phenolic plate around the table perimeter. They were marked to match the holes in the plate prior to drilling and tapping. Phenolic is brittle, but really hard.
The 16 bolt holes in the table that attach the PowerStick were sealed with clear silicone from the top and allowed to dry before installing the plate on the top. This was necessary to prevent vacuum leakage.
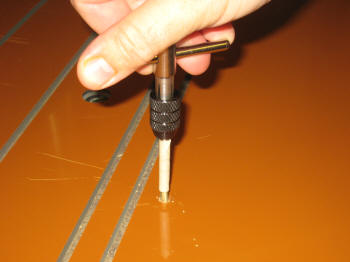
Here you can see the two channels in the table, and to the left of my fingers, the vacuum port that is cut deeper into the inside channel.
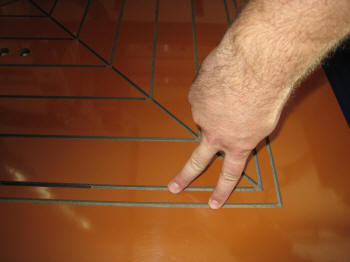
Next we installed the foam seal cord around the perimeter in the outside channel to make a vacuum under the plate.
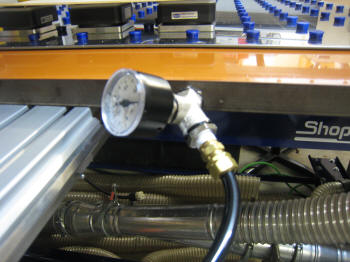
The profile edge of the 1” phenolic grid table was drilled and threaded for a Y fitting previously during the making of the table for the spiral vacuum hose and gauge. This thick table maintains rigidity and allowed space for the threaded fitting into the side with no chance of bending. A flat table equals good square cutting results and vacuum.
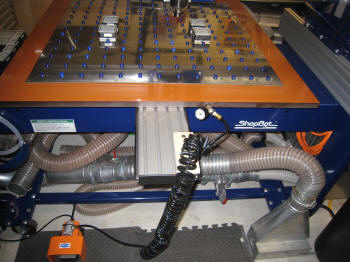
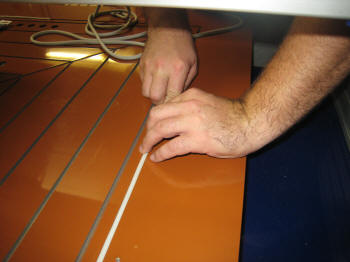
A spiral hose seen in the second photo was utilized for flexibility to move with the Buddy table. It does not get caught up with the under workings of the table. The hose is held in place by electrical cord keepers screwed into a wooden plate that is secured with the supplied nut plate hardware to the top of the PowerStick.
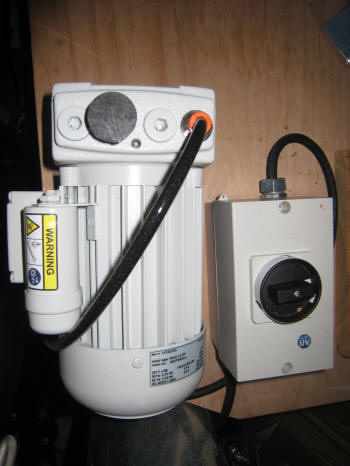
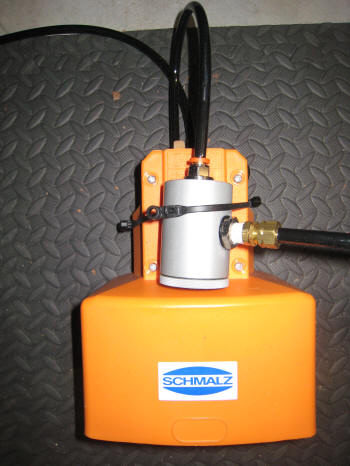
The other end of the spiral hose is attached to a pedal assembly that acts as a switch for controlling the vacuum source. Once the switch near the pump is turned on, available vacuum is supplied to the pedal, and only then transferred to the table when you step on the locking part of the pedal. There is an easily cleanable inline filter to stop debris from returning to the pump, here zip tied to the pedal.
The operator has his hands free to position the work piece while starting the vacuum. It is possible to use the stainless steel table to attach a user supplied removable magnetic fence. Sweet feature.
There are several different attaching assemblies that can be built up to meet your specific clamping needs. Schmalz is patient and willing to help you find a solution. So far, we have cut hardwoods, plywood and solid surface materials. The system is working well for us, and we are pleased with the ease of operation. You can position vacuum hold down on the table at any location that suits your needs. Remove the magnets, position the pucks, and then set down your work piece.
If you are working with porous material, an aluminum backboard can be attached with short screws into the back of your work piece to achieve vacuum hold down. This allows cutting through the perimeter of the piece without hitting the table. This is another nice feature. Alternatively, you could glue your work piece to something nonporous like hardboard if you were working with foam, for example.
There were only two issues from this system we could identify.
We limited our Z travel some initially, as this table and hold down is 1” higher than the stock table. The solution we found was to flip our spindle plate over, gaining 2”. The second related issue is dust skirt clearance when you flip your plate. We are working on a new 3D dust collector foot in the shop at Intelliview. Stay tuned for part two.
Big Thanks to Ted, Jared and the Team at ShopBot. We appreciate your support. Bryan and Ed at Schmalz, I appreciate your willingness to participate in this project, and thanks for your help.
Schmalz, Inc. is located in Raleigh, NC, not too far from ShopBot headquarters in Durham.
If you have any questions about the system, please see email addresses below.
See you on the Forum.
Greg
Intelliview UAS, LLC
Phone: 561-723-3112
e-mail: gwerner@intelliviewuas.com
Ed
Schmalz, Inc.
5250 Old Wake Forest Road, Suite 150
Raleigh, NC 27609
Cell: (919) 630-5752
Fax: (919) 713-0883
e-mail: ed.gramaglia@schmalz.us