
One of the interesting things about making signs is that more often than not, we are making a custom item, specifically to a single customer’s specifications, and that sign (once created) will never be made again. If you are building furniture or wooden toys for a retail environment, it is very likely that with many of your projects, once you have made one, all of the planning and programming for the first one carries over to the next one you make and so on. So, with the 2nd item, you are standing on the shoulders of the 1st, and that work is already done even if you are doing 20 or 200 items.
Don’t misunderstand, I realize that in any industry there are going to be many projects that are “custom” and one-offs, but I think in the sign industry (more than any other) we work to produce pieces of commercial art that are totally unique and will never be reproduced (unless the customer needs multiple signs). (Believe me, if there were a way to convince a furniture store that they should just buy a copy of the sign that I just completed for Pat’s Pizza, it would be terrific, but I’m not that good a salesman).
When sign-shops are considering buying a router, one of the things that they wrestle with is if whether it is faster to hand-carve a one-off sign, rather than take the time to set up the file in the design software, prep the material and place it on the router, and then do the finish work needed to get the carving ready for paint. The largest chunk of this time is certainly getting the design file ready, and when you are getting a file for 3D carving prepared, it can involve quite a bit of time.
The first thing to remember is that a ShopBot is fast, and it is certainly going to carve much faster than you can when it comes to V-carve lettering. But when it comes to 3D carving, the hand-carver begins to catch up with the ShopBot. Using the sign I am talking about in this article (Sandpiper Cottage), you can see that I needed to create a 3D carving of a sandpiper. For me to model this in ArtCAM Pro (my CNC design software of choice), I would probably need a good 1 to 2 hours to render even a simple relief in 3D, and I can certainly carve the bird faster by hand. So, does this mean I shouldn’t use the ShopBot for this sign? (and, the bigger question of, “should I never have bought the ShopBot at all?”).
It is important to remember, that it is not “all or nothing” when it comes to the hand vs. machine debate, and this sandpiper sign is a great example. I can use the router to carve everything including the shape of the bird, and then do the last bit of shaping by hand. Believe me, there are parts of quite a few sign projects that I did when first purchased the ShopBot, that I could have saved a lot of time on if I had used this “roughing-out” strategy, rather than doing all of the complex 3D carving with the ShopBot.
Here is a summary of the project and how we used our “roughing-out” strategy:
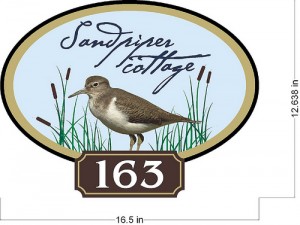
Sometimes, when we do a custom carved sign, we are given nothing at all to start with, and we create a design for a home or business totally from scratch. In the case of the Sandpiper Cottage sign, we were given a pretty good starting point from the customer. The first design that is shown above is what the owners had been using for a logo for the past couple of years, as the home is a vacation rental home.
My first order of business was to go in and tweak the logo to maximize all the good things about their current design. Loved the sandpiper (but we needed to realistically carve and paint the bird), and the reeds were great and were going to make the sign. I was a bit worried about the font they used, but I rearranged it and made it a bit bolder, and am very happy with the results…
Here is the router carving the sign in High-Density Urethane. Remember that my plan with this project is to 3D carve everything but the sandpiper, and then go in and finish it by hand.
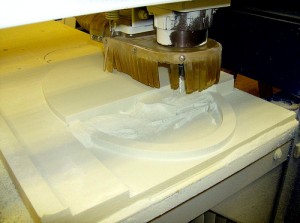
The picture above is the sign on the router getting carved. Carving a 3-dimensional sign like this is not a quick process. In this case, I am using an eighth inch ball-nose bit, and I believe this sign, which is just 1.5 square feet of material took about twelve hours. Now, we liked this sign so much, that we are actually doing one for ourselves to keep for a sample, so the ShopBot actually 3D carved for 24 hours on this project.
Now, I can hear someone in the audience raising their hand and pointing out “considering the fact that the router is running for 24 hours, could you have done both of those by hand?”. The simple answer is “yes”, we could have hand-carved both of those signs in 24 hours. BUT, no-one was carving these sign in that 24 hour period but the ShopBot. The rest of my staff was working on other projects, and I was doing other things like working on the next design, getting an invoice ready to send out, or yes, even sleeping. Don’t underestimate how terrific it is for the ShopBot to be working on a project, while you work on another or do nothing at all.
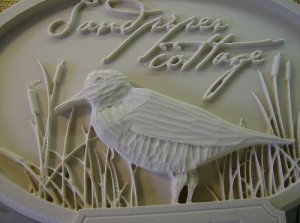
Here is the sign after the 3D “rough-out” carving has been completed. This house sign is only 12″ high, so that is a lot of really fine detail work the ShopBot did when it comes to those cattails and reeds. I’m not sure they would have looked quite as crisp if we had attempted them by hand.
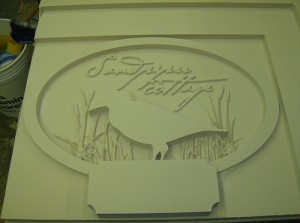
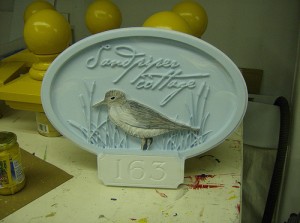
Here is the sign with all of the carving that we planned to do with the ShopBot. The total programming time for this project was under 3 hours. It probably would have been 5-6 hours if we hand tried to do everything in ArtCAM.
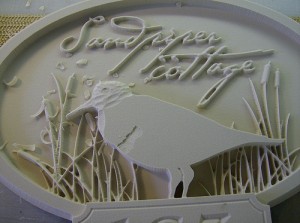
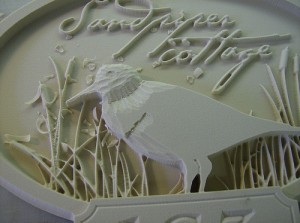
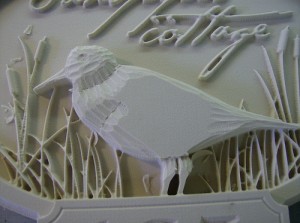
So up next, is a series of photographs that I took while carving the sandpiper for the sign. I think it took about 30 minutes to do. The general shape of the bird is created in the carving, and the details of the sandpiper will be created with paint.
(For all the fine-art woodcarvers out there, keep in mind, I am not attempting to create a piece of art that will be viewed up close. You won’t see the veining of each individual feather in this sandpiper. Here, the details and effect were going to be done with paint. Signs are meant to be viewed at a distance, and any excessive detail that I put into the sandpiper, would be lost from long-distance viewing.)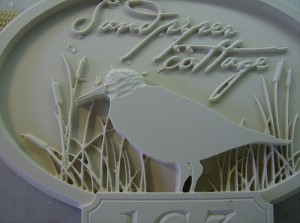

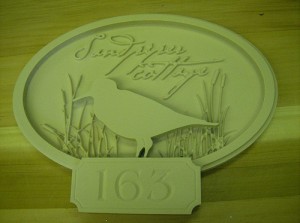
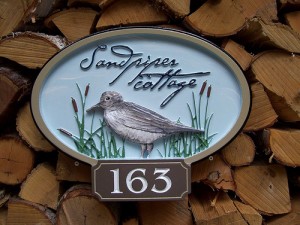
Here is the completed sandpiper after it has been detail painted,
and the picture below shows the project totally completed.
We have started using this “roughing-out” technique on many projects, and it is proving very effective. This is another use of the router that I really didn’t see coming when we starting working with it, but it is helping us to better manage time within projects. One of the terrific things about owning the ShopBot is the new capabilities and production strategies that it enables you to do, that you weren’t expecting. As with any tool, the more you work with it, the better you understand it, and the better you are able to incorporate it into your workflow.