 Selecting the right bit for cutting sheet goods can be tricky, so we’ll shed some light on different bit geometries you are likely to encounter and when to use them. For most sheet goods, a regular 2-flute straight bit is a good choice. It neither pushes nor pulls the chips up or down, and it neither helps nor hinders your hold down method. The downside of 2-flute straight cutters is that they don’t have the same strength as their spiral counterparts, especially in ¼” or smaller diameters. I have yet to find a ¼” 2-flute straight bit that will last long before breaking, even with a very light chip load. If you examine a small 2-flute straight ¼” bit you will quickly see how small the center cross section is compared to a spiral.
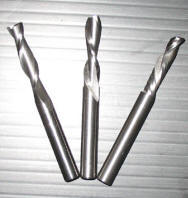
When it comes to spirals, there are generally 3 different classifications, as they relate to cutting sheet goods.
1. The Upcut Spiral – This does an excellent job of evacuating chips from the kerf, pulling away heat from the bit. The upcut action of the bit leaves a smooth bottom face on your sheet goods and reduces the chances of burning and melting of materials. The downside of using an upcut spiral is that it can fight your hold down method and lift parts when cutting thin materials. The other downside is that it will often chip out the top veneers on sheet goods, resulting in a less than desirable finish. Upcut spirals are typically the same grind as a standard solid carbide end mill used in the metalworking industry. You can save a considerable amount of money using end mills instead of upcut spiral router bits.
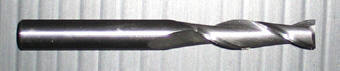
Notice how the flutes of an upcut lean toward the right, when bit is viewed vertically as it would be in the router. This is also called a right-hand spiral cutter. By holding the cutter by the shank and rotating clockwise, you can simulate the rotation of your router and understand how the flutes lift the chips out of the kerf with an upward action.
2. The Downcut Spiral – This does the exact opposite of an upcut spiral. It pushes chips back into the kerf and can sometimes blow out the bottom face veneers when it cuts all the way through. Since it forces chips back into the cut, it is prone to burning and melting and welding chips to materials. A downcut assists your hold down method and is ideally suited to shallow cutting and thin materials that would have a tendency to lift during cutting. It does an excellent job on top face veneers virtually eliminating tear out.
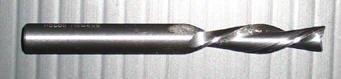
Notice how the flutes of a downcut lean toward the left, when bit is viewed vertically as it would be in the router. This is also called a left-hand spiral cutter. By holding the cutter by the shank and rotating clockwise, you can simulate the rotation of your router and understand how the flutes push the chips and material with a downward action.
3. The Compression Spiral – This is a combination of an upcut and downcut spiral. When run in a single pass it gives a relatively neutral cutting action, mildly assisting your hold down method. To get the full benefits of a compression spiral, it is meant to be run full depth in the material, cutting the sheet in one single pass. Compression spirals run in multiple stepdown toolpaths show the same detrimental qualities of the upcut spiral, having a tendency to tear out the top face veneers. The reason it will do this is in the geometry of the bit. Typically, compression spirals have an upcutting single flute at the tip of the cutter approximately one third of the cutting length of the bit. The remaining two thirds is ground to give a downcutting shear. When run full depth, the bit leaves a sharp clean top and bottom face. When a compression bit is run in multiple passes, the 1st third of the bit, being an upcut grind, pulls the face veneers out and users are left scratching their heads. Compression bits work best when ramped into a cut in the XZ or YZ plane. This is typically an option only found in some of the more advanced CAM packages, so it is not something that you can do with only PartWizard…but now I am going to show you how to get the same quality cut of a compression spiral using PartWizard. (See additional information at the end of this article concerning compression spirals.)
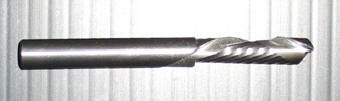
Notice how the compression spiral is a combination of an upcut & downcut grind tool. Approximately 1/3 of it’s cutting length is upcutting, the remainder is downcutting.
The Poor Man’s Compression Trick
This is a technique that I coined as a ‘poor man’s compression spiral’. It actually uses 2 bits: A downcut and an upcut, plus two toolpaths. It requires a bit change in between files, but if cut quality is your highest concern, this is well worth the added effort.
I’ve created a file in PW3 for cutting out some sheet goods in .75” thick material. I created two toolpaths, one with a downcut spiral bit to break through the top veneer of the material to give me a nice clean top face. I have limited the depth to .25” and I have set the stepdown to .25” so that it will do this in a single pass:
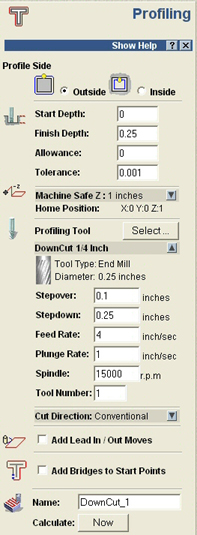
Examine the toolpath assistant and notice how the depth is restricted to .25” deep. I named this toolpath DownCut_1 so that I would remember that I am going to run this toolpath first using a downcut bit.
Next, I left the toolpath assistant open and changed the start depth from 0 to .25”. Remember, our downcut is already going to cut down to .25” deep, so there is no sense cutting air for the 1st pass. I then changed the finish depth to be the thickness of our material, in this case, .75”.
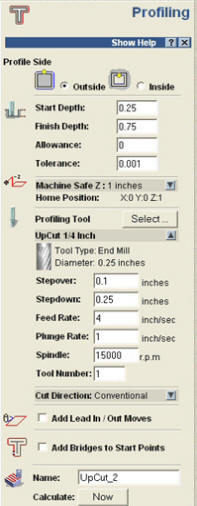
I named the toolpath UpCut_2, since it will be cut after the toolpath we created previously. It will start at .25” deep, and do two passes, one at .5” deep and the final pass at .75” deep. Since it is an upcut it will pull the chips upward and leave us with a nice clean face on the bottom of our material. Using this method, you get all of the benefits of a compression spiral using common bits available at any home center or lumber yard. The inconvenience of a tool change is quickly overshadowed by the quality of the parts coming off of the machine, and the fact that your average compression spiral bit is in the neighborhood of $65 or more. The poor man’s trick can be done with about $35 in bits if you shop around!
Compression Spirals – Things to consider:
The idea of using a compression spiral is appealing, but there are some additional things to consider when using these tools. Your ShopBot is equipped to deliver between 70 and 150 pounds of cutting force, depending on the model. Cutting full-depth in .75” material places additional load on the tool, and some fine tuning on your part is needed to make sure that you are cutting first class parts. While it is important to consider chip load when calculating cutting speeds and RPM, it is equally important to consider the column of material that is to be evacuated by the cutter, and the force that is going to be applied to the material. Physics 101 taught us that for every force, there is an opposite and equal force applied. This means that if you are using vacuum to hold down your parts, you need to consider how effective it will be against the force of the cutter. You will also need to consider bit deflection and how that can influence the accuracy of your parts.
Those running PRT Standard tools, will want to avoid pushing the tool beyond what the stepper motors are capable of delivering since they lack positional feedback. Loss of steps (where magnetic lock on motor is temporarily broken) will result in off-spec parts, when you ask the motors to do more work than they are designed to provide. Those using Alpha-spec tools should understand that even with positional feedback, you can run the tool too fast, and trigger ‘Alpha mode’ where the tool self corrects momentarily causing a small deviation from the programmed cutting path. If you are losing steps (standard ShopBots) or your tool is going into Alpha mode, you will need to reduce the cutting speeds, and adjust the ramping values (VR) for your tool. Adjusting your ramping values will greatly enhance the performance and flexibility of your CNC regardless of what tool or material is used.
There is also another thing to consider when running compression spirals. There are many professionals running compression spirals with their ShopBot day in and day out, cutting thousands of sheets a week. The added force required to run these tools places additional stress on the rack and pinion drive system. If you plan on processing sheets on a daily basis using compression spirals or any high-speed machining operation, a close examination of your pinions is a must. Pinions are consumables, wearing many times more quickly than your rack. Make inspecting and replacing worn pinions part of your ShopBot maintenance schedule to ensure that you continue cutting smoothly and on spec. New pinions are inexpensive enough for even the smallest shop to build into their maintenance schedule.