Many ShopBotters are happy creating their part files in a program like Part Wizard and never really looking at the part file that’s created, and there’s nothing wrong with that at all. Part Wizard and similar programs use something called a Post Processor or “Post” for short to create the commands to move your ShopBot around, and you can run those files without ever exploring the mystery of what’s really going on in them.
A growing number of ShopBotters, though, are interested in learning to use the ShopBot language to create their own files, or to be able to modify the files that are generated by other programs. If you’re one of them, or are just curious, here’s a start at using (and understanding) the ShopBot language.
The ShopBot language
The first thing to remember is that a ShopBot part file is just a text file, and can be read just like a shopping list or a letter. The ShopBot language is a variation of the BASIC computer language and is “conversational”, meaning the commands are descriptive of what they do. Let’s compare it to G-code, another common CNC control language
Let’s say we want to move from the 1,1,0 position to the 2,2,1 in absolute mode, then move back to our home position. In G-code it would look like this..
G90 … set to absolute mode
G00 X1 Y1 Z0 … move to 1,1,0 at rapid speed
G01 X2 Y2 Z1 … move to 2,2,1 at cut speed
G28 … go to HOME position
Here’s the same thing in ShopBot language…
SA ‘ set to absolute mode
J3, 1, 1, 0 ‘ jog to 1,1,0
M3, 2, 2, 1 ‘ move to 2,2,1
MH ‘ go to HOME position
It’s quite a bit easier to understand what ShopBot commands do, don’t you think?
So how do I read and write a ShopBot file?
If you’re using the ShopBot Windows software and checked the “Associate Files” checkbox when you installed the software, then you can click on any part file…any file with the .sbp file extension…and it will open in the ShopBot Editor. You can also open a part file with your favorite Text editor… Notepad is installed by Windows by default…by right-clicking the file, selecting the “Open With” option, and picking the program that you prefer. You can even open a part file in Microsoft Word, but be AWFULLY careful if you want to save a part file in Word to make sure you save using the simplest TEXT option, without any formatting.
So let’s write our own part file and see just how simple it can be. Start the ShopBot software and type [FN] to create a blank part file in the ShopBot Editor. Once it’s open type the following lines …
MZ, 0.5
J2, 1, 1
MZ, -0.5
MZ, 0.5
MX, 2
MZ, -0.5
MZ, 0.5
MX, 3
MZ, -0.5
MZ, 0.5
MX, 4
MZ, -0.5
MZ, 1
J2, 1, 1
The ShopBot software doesn’t care if you leave blank lines in your file (and many cases it is easier to follow the flow of a part file if you leave some “White space” between sections of a file), but for this first example just type it the way it is above. When you’re done save it with a descriptive name like “samplefile.sbp”. If you used the ShopBot editor then it should look like this when you’re done.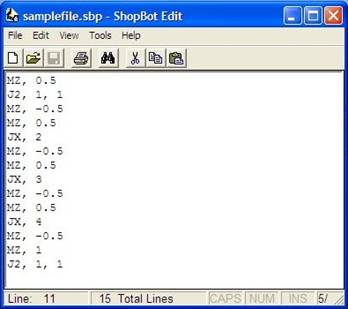
On Naming your part files
There are very few rules for naming ShopBot files…most of the restrictions are imposed by Windows. {If you plan on running your file in the DOS version of the ShopBot software then you’ll need to use the DOS naming restriction…the name can only have 8 characters in the name followed by a 3 character extension (which is .sbp in our case) and can only use the characters a-z, 0-9, and underscore.}
In Windows the file name can be up to 256 characters long and the only special character restrictions are that the file can’t contain the
; \ ⁄ : * ? ” < > ¦ ,
characters. The only restrictions that we have to worry about that are ShopBot-specific are that you can’t use any of the math operators or special characters that ShopBot uses (like the “&” that’s used in front of a variable name), or any of the Programming commands or key words like PAUSE or INPUT
This was not a very complicated file but it may not be obvious what it does just by looking at the commands. You can test your new saved file by changing to Preview mode [SP] and then typing [FP] and selecting your new file. If you rotate the Preview a little you’ll see that it moves along parallel to the X-axis and periodically moves up and down.
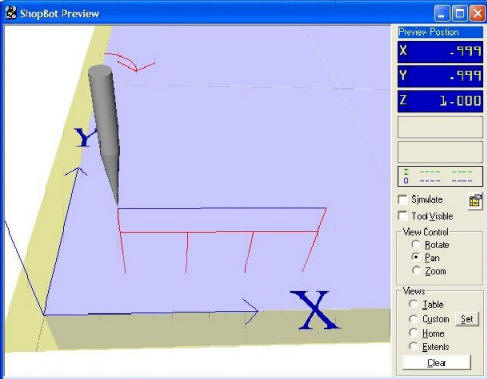
If your preview doesn’t look like this or you get an error message when you try to run it, open your file back up in the Editor and make sure that you typed it EXACTLY the way it’s listed above.
The preview tells you how the file moves but it still doesn’t tell you everything…comments will help to do that.
First steps in ShopBot programming…Commenting.
Before we get much further, we’re about to use the “P” word…”programming”. But don’t let the word scare you…a program is just a set of commands or instructions that tell a computer or machine what to do. Every ShopBot part file is a program of sorts, even a simple one like the one we just created. That simple “program” could be used to drill a series of ½” deep hole, but that may not be obvious by just looking at it. What we need is a way to tell someone that’s reading the file what it does, without putting instructions in the files that your ShopBot will try to execute but doesn’t understand. You’ll do that by adding comments.
A comment is just a message from the person that wrote the part file to the person that will be using it, and starts with the single quote or apostrophe character ‘ . You can put comments on a line by themselves anywhere within a file, or add them to the end of a command to explain what that particular line does. Using our example above, let’s add some comments (shown in green here to make them easier to pick out; they’ll be black in your file) and see if it makes things clearer:
‘ Our sample file could be used to drill a series of half inch deep holes
‘ Zero the Z-axis at the top of the material
‘
‘ Written by Bill May 4, 2006
MZ, 0.5 ‘ lift to a safe Z height
J2, 1, 1 ‘ Jog to X = 1 and Y = 1
MZ, -0.5 ‘ plunge the Z-axis to –0.5 to drill hole
MZ, 0.5 ‘ lift bit to safe height
JX, 2 ‘ Jog to the next hole
MZ, -0.5
MZ, 0.5
JX, 3 ‘ and the next
MZ, -0.5
MZ, 0.5
JX, 4 ‘ the last hole
MZ, -0.5
MZ, 0.5
J2, 1, 1 ‘ Jog back to X = 1 and Y = 1
Now comments really aren’t necessary in a simple file like this, but you can see how they could make a complicated file quite a bit clearer and easier to understand or remember. So do yourself (and anyone else that needs to use your files) a favor by adding comments to all your part files. It’s a great way to include information like what size bit the file was created for, what thickness material this file uses, where the Z-axis must be zeroed, or even how to contact you if there are any questions. You can add your comments manually with an Editor or use the Header Writer Virtual Tool [TH] to automate the process.
Now there’s one time that a comment is used in a special way by the ShopBot software, and that’s if it is immediately followed by a PAUSE command, as long as there isn’t a number after the PAUSE command. In this case the comment is shown on the screen in a message box. The program stops executing and waits for a response from the user. So a file with the following lines…
‘ Comment test…click OK to continue
PAUSE
.. will present the user with this message box when the Part File runs …
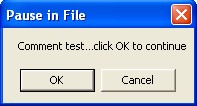
If the OK button is clicked or the ENTER key is hit the file will continue…if Cancel is clicked or the ESC key is hit the file will stop executing.
Making things easier… the ShopBot Part File Assembler.
Having to type the commands in with the keyboard can be kind of a pain, so we’ve come up with the ShopBot Part File Assembler to make the job easier. Before we tell you what it is, lets start with what the ShopBot Part File Assembler ISN’T. It’s NOT a replacement for the Editor or a way to create elaborate cutting files. It’s also not a replacement for Part Wizard and doesn’t know anything about toolpaths or importing drawings. What it DOES do is to give you a way to “Assemble” a Part file by combining some of the basic ShopBot commands. It’s especially handy for things like “master files” that can be used to call an existing part file in many locations around your material or alternate between files for multiple cutting heads if you have them…Z and A axis files for instance. It also does some color coding of commands to make it easier to pick them out.
There’s not really that much that needs to be explained about how to use the Assembler. In the left column are buttons for each of the commands that are available. You start out by selecting a name for your new “assembled” part file and a form opens with an assortment of “basic” commands that let your part file do things like make moves, call other part files, and add comments to make things as clear as possible. If you’re feeling adventuresome, click the “Advanced” item in the “Mode” menu and you’ll get some of the more advanced programming commands that are available in the ShopBot language. We’ve included the commands that are most common and we think most useful, but if there’s one that we haven’t included that you need just click the “???” button and you’ll get a blank line to type in whatever command you want.
You start creating building your file by clicking the button for the command that you want and that command will appear in the main panel on the right. You’ll also get a popup window that will let you fill in the values that are specific to that command…the file name if it’s an FP Command, the coordinates to move to if it’s a Move or Jog command, that sort of thing. These values are called “parameters” and you can leave out any of them that you don’t want to change and they’ll stay at their current value…only the ones that you enter a value for will change. You can also add an “inline” comment to many of the commands by clicking the “Add a comment” checkbox…it will put your comment at the end of that line. Just build your file by clicking on commands and filling in the correct values.
If you’re very smart (or very lucky) you’ll have put your file together correctly the first time, but just in case you aren’t that lucky you can move your mouse pointer over any command that you’ve created and, toward it’s right end, the cursor will turn into a hand and you’ll be able to left-click and drag that command to a new position in the file. You can also right-click and either Edit it to change some of the values that you set, Copy the command so that you can paste it into a blank “???” command, or Delete the command altogether. If you get it hopelessly messed up with absolutely no chance of recovery, don’t worry…just select the “Reset” option and you’ll be presented with a clean slate.
After you’ve played around with it for a while you’ll realize pretty quickly that this part file business is really not rocket science, and that a part file is just an assembly of ShopBot commands. When you’re all done and your file is just the way you want it, select SAVE in the FILE menu and your part file will be created. You’ll be asked if you want to add a header and footer …sections of information at the beginning and end of your file to help the person that’s running the file to understand what’s going on in it… and if you answer “yes” the ShopBot Header Writer will open to help you create your new file’s header. That’s all there is to it…your done!
Here’s our same example file, created with the Assembler
{missing material}
definitely a “work in progress” so make sure that you open the files that it creates in an Editor to see if it’s really doing what you expect.
2) There is not much more file checking at this point that there is in the ShopBot Editor, so if you’re not careful you can EASILY create files that don’t make sense and won’t run on your ShopBot. You can tell it to do things like “M2, bob, henry” and it will be happy to let you do it. Consider yourself warned!
3) If your file calls other part files you are WAY better off if you create a folder to hold all your files, instead of having them scattered all over your hard drive. If they’re all in one folder…including your new assembled file…then the Assembler can write relative paths (like “FP, Beak.sbp”) and you can move the whole bunch around to your heart’s content and the paths will still work. If however they’re in different folders then it has to write the full path for any files called with the FP command (something like “FP, C:\Documents and Settings\Sam\Desktop\Current Work\PartFiles\Duck\oldVersion\Beak.sbp.) If you move those files around after you’ve saved then it won’t have a clue where to find them.
Enough for now…I don’t want to overload you right at the start! Over the next couple of articles I’ll talk about some of the other programming commands and how you might use them in your parts files…things like making it easy to modify values by using variables and INPUT statements.
[Click here to download Bill’s Part File Assembler]