One of the things that ShopBotters seem to have the most trouble understanding and utilizing is the concept of “table base coordinates” and limit checking in the ShopBot software. They’ve been in the ShopBot software all along, but I’ll bet that there aren’t a handful of ShopBotters that use them or even know what they do.
To understand the concept of table base coordinates you first need to think of your ShopBot as having a real, physical 0,0 point, one that you never change. If you were looking down at your ShopBot from above, for most people that 0,0 point will be the lower left-hand corner…the corner that most people already think of as the 0,0 point. The reason that remembering this physical 0,0 point is so important is that if the ShopBot software always remembers where that “table base” 0,0 point is, then it will always know where things like stop bolts are on the table and how far an axis can move off of the table top before it will hit them, EVEN IF YOU RE_ZERO YOUR WORKING X AXIS AND Y AXIS.
I don’t get it…give me an example.
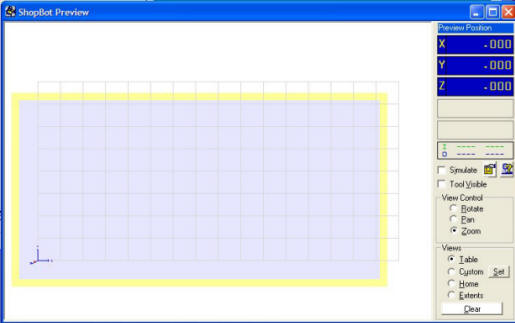
 To illustrate Table base coordinates, start the ShopBot software and make sure that you are in Preview mode. For this example you also need to make sure that your table limits settings are still set to the defaults by opening the fillin sheet with the VL command. The default values leave a 2″ perimeter all the way around your table top and have “limit checking” turned off. The screen shot shown here gives the default values for a 48″x96″ tool…if you have something different (like a benchtop) just adjust the values accordingly. With these default settings you’re telling the ShopBot software that it can safely move 2″ off of the table top in all directions without hitting the stop bolts, so your safe working area goes from -2″ to 98″ in the X-axis and -2″ to 50″ in the Y-axis. That’s what the yellow perimeter around the “virtual” table top is in the ShopBot previewer…it’s this “safety zone” that the tool can safely move around in without banging into anything.
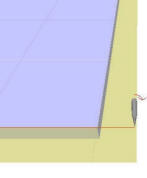
With your ShopBot zeroed at the usual 0,0 corner of the table top…the “home” position…let’s give the software an MX,97.9 command. It will move the whole length of the table plus a little less than 2 inches and then stop…still safely within the yellow safe area as shown in the image at left.
Now let’s move your ShopBot to the 5,5 position with an M2,5,5 (edited 10/21/04) command, so that the bit is 5″ over and up from the usual 0,0 corner, and then re-zero the X and Y axis’ at that point with a Z2 command. You’ll get a this message box telling you that the Preview will now be “out of sync” with the “real” tool, but just click OK…it will be back in sync the next time you start the Previewer. You’ll notice when you change your 0,0 point that the WHOLE grid in the previewer has been shifted in the X and Y axis so that it is out of sync with the table as shown below.
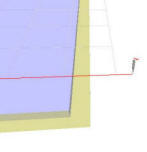
So what happens if you now give it the same MX,97.9 command? It will still make a move that’s 97.9″ long, but this time it will run out of the yellow “safe zone” (as shown at left) before the move is completed, because it started 5″ away from the “real” 0,0 point. If you were in Move mode instead of Preview the tool would have run into the stop bolts at the end of the table, or worse if those bolts hadn’t been installed! And the worse part is that the Software never warned you!
A practical use…File Limit checking
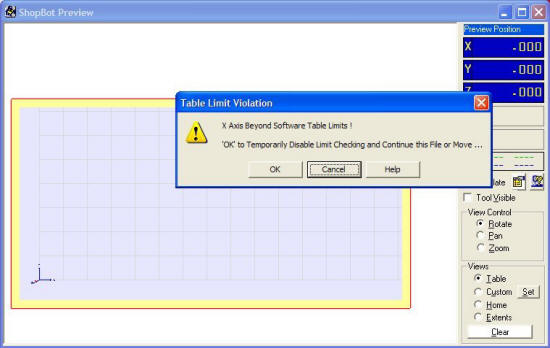
Now let’s try the same moves but this time with a new software setting. First move your ShopBot back to its CURRENT 0,0 position with an M2,0,0 move…which was actually the 5,5 position in the REAL world before you re-zeroed in the last step. Now let’s repeat our original MX,97.9 move, but before we do let’s turn on File Limit checking using the VL command. Nothing exciting will happen except that a red line will appear around the yellow “safety zone”…that red line lets you know that limit checking is turned on. With Limit Checking now turned on, type MX,97.9 like you did before. This time the software is smarter…you’ll get an error message telling you that this move will put you “out of limits” and ask you if you want to turn off limit checking. The software is smart enough to know that even though you’ve told it that 0,0 is in a new location, the table and stop bolts are still in the same old place.
So now you’re thinking “This is pretty cool…I can see how this could be pretty handy.” With limit checking turned on the ShopBot software will let you know if your file will make your ShopBot crash into the end stops BEFORE it runs. The tricky part is that the software needs to be able to keep track of where the limits are even after you’ve rezeroed…that’s were the “table base coordinates” come in. Once you’ve set your table base Zero point then each time you re-zero any of your Axis’, the difference is saved as sort of a “stored offset”. That way your ShopBot always knows the difference between it current zero position and the “real” zero position.
Setting up your Table base Coordinates and File Limit Checking
So you’re probably asking “How do I work with these table base coordinates”. Here are the steps for setting them up… 1) In Move mode move to your REAL 0,0,0 position (in most cases the home corner of your table top) and zero your X,Y, and Z axis AND your table base coordinates by typing UZ. Do a good job of setting this…the accuracy of your setup depends on it. 2) Next you’ll need to figure out how far you can safely move off of the table top before you hit a stop bolt or some other obstruction. Go into Keypad mode and SLOWLY and CAREFULLY move in the -X direction until you AlMOST hit the stop bolt and write down that number. Now do the same thing in the +X direction, the + and – Y directions, and the + Z direction. If you have proximity switches installed the tool will stop when it hits the prox switches. Just write down a value that’s a little bit beyond the prox switches…if the prox switch stop the tool at -1.00, write down -1.05 or something like that. 3) Now type VL to open the limit switch setting fillin sheet and type in the values from your list. Let’s say the values for YOUR tool are..
X-axis minumum -1.38
X-axis maximum = 97.92
Y-axis minumum = -2.07
Y-axis maximum = 49.88
Z-axis maximum = 5.72
If you were to use the values above, your new VL fillin sheet should look like the one shown here. Don’t worry about the A and B axes unless you use them…if so just do them the same way. Also don’t worry too much about being accurate with the “low” setting for the Z axis…just pick a value that will let you cut as deep as you think you’ll ever need to.
One quick note…if you have an indexer or some other rotary axis connected to your ShopBot, limit checking doesn’t really make sense for that axis since it can turn FOREVER without hitting anything, but is especially important to have turned on so that you don’t whack into the turning chuck!! In that case just put a REALLY small number for the low value for that axis…maybe -10,000…and a REALLY big number for the high value. That way you can still have limit checking do its job for the other axis.
Here are a few tips. To see how far your “working” coordinates are from your table base coordinates, type UV and the offsets are listed for each axis. And just to make things easier there’s a shortcut to zeroing your working coordinates and your table base coordinates…the UZ command does the same thing as typing Z3 and then ZT…it zeros everything in one shot!
Keeping up with things
So now you’ve setup your table base coordinates by carefully zeroing all your axes and put in YOUR table values so that limit checking will work correctly. You won’t need to go through these steps again UNLESS…
-
You lose position with your ShopBot because of a power failure or other calamity (mostly user error in my case!). If this happens just go back to your 0,0,0 point and type UZ to reset your zero position and your table base coordinates
OR
-
You replace your table top and don’t get it EXACTLY in the same place, or you make any other changes that change the REAL 0,0,0 position of your ShopBot like moving the Z-axis or using a different kind of router with a different sized body. If any of this happens, don’t worry…just go through the same steps above that you did the first time you set things up and you’ll be back in business.
I know all this sounds pretty complicated (and the description was pretty long-winded!), but I promise if you take the time to set things up correctly that you’ll find it VERY handy, especially with the new, fast-moving PRTAlphas.