
No matter what kind of work you do, occasionally you’ll need a “blunt instrument”–something you can use to pound on things. This is my version. I’ve made a bunch of them over the years out of odd corners of sheets of ½” plywood I was cutting, but all the parts fit nicely on a 16”x16” blank of whatever ½” material you might have laying around. I’ve included the VCarve Pro files (at the end of the post), along with these step-by-step instructions, so you can make one of your own.
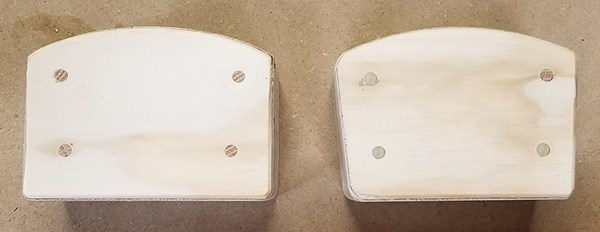
There are two versions of the head. One has faces that are parallel to each other (shown on the left) and is best for general pounding. If you plan on using it to hit a chisel or something like that, I find the one with slightly angled faces (shown on the right) to be a bit more comfortable to use.
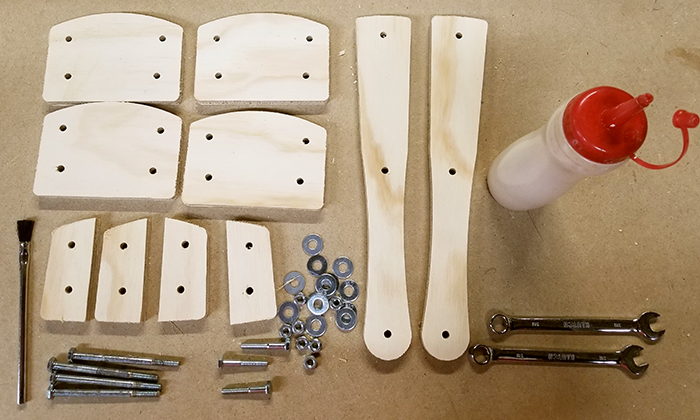
Along with the cutout plywood parts, you’ll need a few supplies. The parts are glued together using plain old carpenter’s glue (I like Titebond 3), but pretty much any wood glue will do. For temporary clamping while the glue sets, you’ll also need four ¼-20 hex bolts that are at least 3.5” long for the head, and three that are at least 1.5” long for the handle. Two flat washers and a nut will be needed for each of these bolts, along with 7/16” wrenches and a disposable brush to spread the glue. You’ll also need around 18” of ¼” dowel.
Put a washer on each of the four longer bolts and insert them into the four holes in one of the larger head parts.
Spread glue on the face of this piece, making sure to cover it completely. You’re better off with too much glue than too little, so be generous.
Add a second large plate and slide it down the bolt. Next, take two of the smaller spacers, look at how they will be assembled, and flip them over. Spread glue all over their faces.
Flip them back so they are glue side down, slide them down their corresponding pair of bolts, and then repeat with the other pair of spacers.
Coat the face of this layer with glue.
Add the third large piece, coat its face with glue, then add the last plate. Put a washer and nut on each bolt and then tighten the nuts to clamp it all together. Don’t go too crazy tightening the nuts because the washers will make indentations. You want to tighten it just enough that a little of the excess glue squeezes out and it’s securely held.
Scrape off as much squeezed out glue as you can, especially in the open recess. It’s easier to remove it before it cures than afterwards, especially inside this area!
Repeat these steps with the two handle parts and the three shorter bolts. If you are using the weighted handle option, see the instructions below.
Set aside these parts to let the glue cure completely, then remove the bolts. Clean out the holes with a drill and a ¼” bit.
Cut four 3.25” lengths of ¼” dowel for the holes in the head, and three lengths that are 1.25” long for the handle. Put a little glue in each hole and drive in the dowels so that a little sticks out of both sides. Let the glue cure.
When this glue has cured, cut off the ends of the dowels and then sand all the edges. A belt sander works well. But any kind of sander will work and even a rasp or file if that’s all you have.
Next, round over the edges to make the grip more comfortable. I like to round over just the handle section that I’ll be holding, starting at the straight tapered section (the red line in this picture) and continuing around the handle to the other side. Flip and repeat.
When you’re done, sand the handle until it’s nice and smooth. Your hand will thank you!
I sometimes round over the edges of the head, but mostly just to keep them from getting too banged up. Sharp edges won’t stay sharp for long, especially when you’re pounding on things!
The slight taper in the head and handle allow you to easily insert and remove the handle. Slip the handle through the hole in the head, slide it as far as you can, then turn it over and tap it several time on a concrete floor or other solid surface. Inertia will securely tighten the head on the handle.
An optional weighted handle:
Sometimes you want a little more heft when you’re pounding on stuff, so included in the VCarve Pro files I provided below are optional pockets that can be cut into the handles. If you’ll be doing this version, I’d suggest cutting the parts with the “good” side of the plywood down since the pockets will be on the sides that will be glued together.
The pockets are mirror images so that when the two handle halves are glued together, they will create a void in the middle with an access hole on one side. You’ll glue and clamp the two halves together, just like a non-weighted handle.
Generously spread glue on both halves and clamp together with bolts, nuts, and washers. If there’s any gunk in the access hole, clean it out now before the glue sets.
After the glue has set remove the bolts, sand the edges, and glue in the dowels. Trim the dowels and round over the edges, just like a non-weighted handle.
Stand the handle on one edge and start filling with BBs or lead shot. Stop every once in a while to tap it on the table to level the BBs and check the weight. If you fill the cavity completely with bb’s you’ll add between 4-5 ounces of weight, which is just right for me. If you want it even heavier you can use lead shot instead of bb’s…lead weighs three times as much as steel!
When you have it just the way you want it you can plug the access hole using a hot glue gun, but I find a piece of Scotch Tape works well to keep things together until the mallet is assembled . Once you (carefully!) install the handle in the head, the access hole will be covered and the weights won’t fall out.
If you haven’t filled the cavity completely, the weights shifting around will act to minimize any rebound when pounding, but the noise may end up annoying you. If it does, squirt glue, resin, or even paint into the hole and shake it around to coat the pellets. Let it solidify completely before using.
Here are the files to make both the flat-faced and angle-faced mallet.
Due to popular demand, the files contained in the link above now include the .dxf files as well.
Really great that you are willing to share the files. I think you have paid it forward! Thanks
Any chance there is a dxf of this for those of us not up to date with v-carve?
Thanks,