I’m getting back into reporting here after too long a time spent deep in software. I thought I’d start with a report on an Indexer project. Reporting on this project lets me describe some things that have been going on at ShopBot as well as highlight a feature of the (new) ShopBot 3.8.x Version software.
The project was done for an event that Bill Young, Randy Johnson and I recently participated in. The event was Autodesk University, the major Autodesk user meeting that happens every year in Las Vegas. We have been working with the Autodesk 123D team to get some of their new web (cloud) applications for 3D design outputting directly to ShopBots.
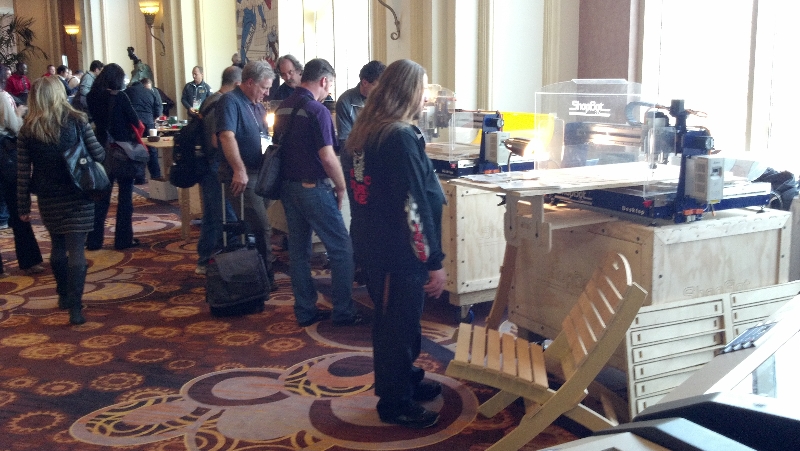
ShopBot Desktops at Autodesk University
At Autodesk U, “digital fabrication” was a major theme and ShopBot was well represented. The “Creative Studio” and “Everyone’s a Designer” activities included ShopBot users and 100kGarages designers Anne Filson & Gary Rohrbacher of AtFAB . We had 3 Desktop ShopBots demonstrating live CNC machining as part of the digital fabrication display (see …).
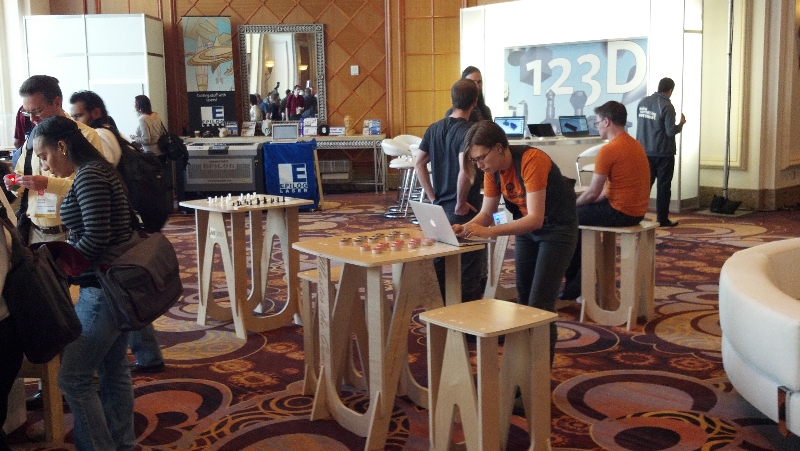
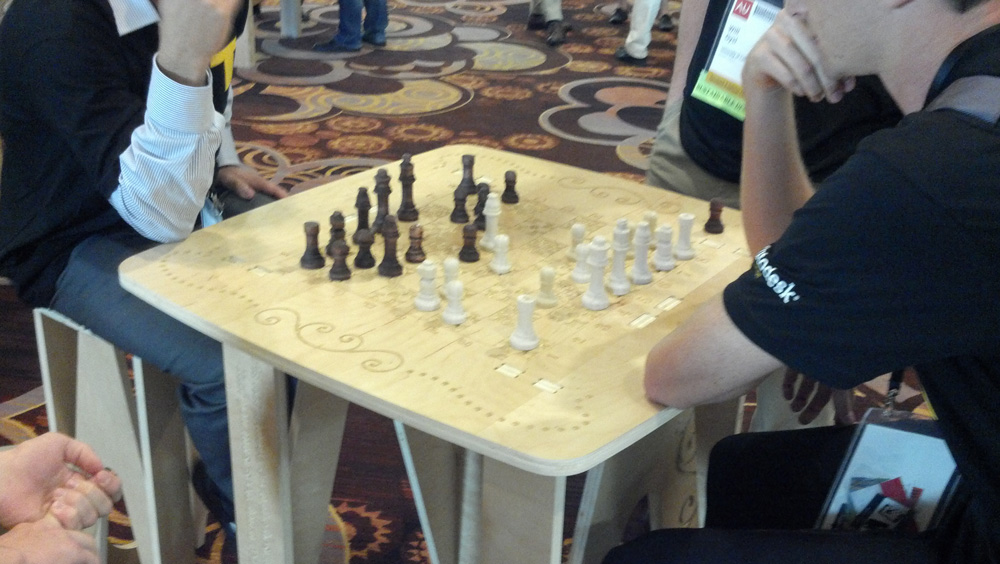
Jeffrey McGrew’s Game Tables
For the event, we had also been asked to bring a couple of CNC-cut chess sets and a checkers set. These game pieces were to enhance several digitally fabbed game tables that had been designed and cut by Jeffrey McGrew of Because We Can. Jeffrey and his partner Jillian are ShopBotters whose digital fab approach to business I’ve described before. Jeffrey had incorporated the Autodesk University logo (“AU”) into the design of the tables that were the centerpiece of one of the main mingling areas. He also gave a talk on digital fab practicalities at AU (summary …).
But, back to our assignment … Bill made the checkers set. He used some ApplePly plywood leftover from a furniture project he had cut that was designed by AtFab for the new MakerBot headquarters in Brooklyn (see MakerBot project …). It was a great looking set of checkers and got lots of “play” over the course of the event.
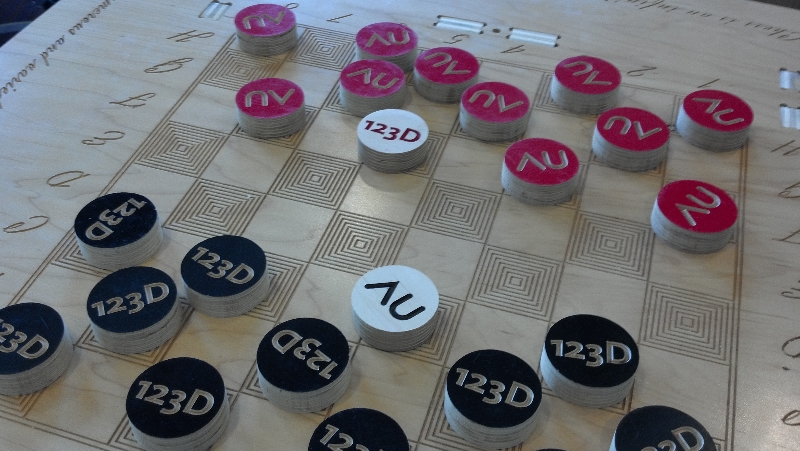
Bill’s Checkers
David Bryan (here at ShopBot) and Bill also created one of the chess sets, a modernistic version with profiles of the chess piece shapes cut into the edges of acrylic blocks. They were unique pieces and drew many comments.
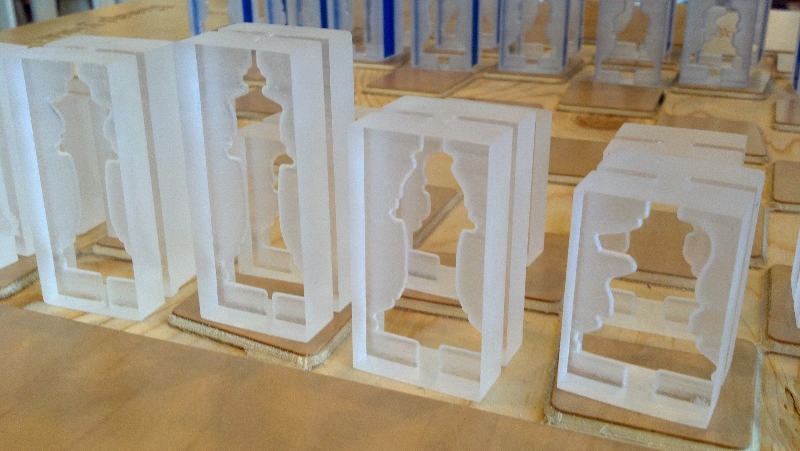
David’s Chessmen
DeskProto Turning
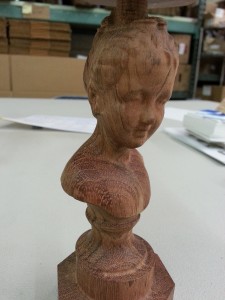
I did the other chess set and that’s what I’ll describe here. I started with very ambitious plans. I wanted to do large, detailed, indexer-carved pieces that would dazzle. I picked a set of interesting pieces out of the 123D, 3D-model gallery and experimented with bringing them into the DeskProto CAM software in order to set up the rotary machining for making them on a Desktop ShopBot with Indexer. [By way of introduction to DeskProto (www.deskproto.com), we worked with Lex Lennings of DeskProto at the NYC Maker Faire a couple of months ago; I had been impressed with the ease of use of the DeskProto software for full rotary machining and the quality of the finishing toolpaths. Here’s a look at one of the pieces that Lex was cutting at the Faire, exactly as it looked coming off the Desktop indexer].
I was hoping to tool-path each of the pieces in Deskproto for carving with the Indexer – making them nice and big with lots of medieval features. But … as these things go, I got distracted by a couple of other projects and put making the pieces off until the day before I had to leave. Then, I took a look at how long doing the really nifty carving of a full set of chess pieces would take … WOW, each piece was estimated at more than an hour! Given that each was a small sculpture in itself, that’s probably not so bad, but there are 32 pieces in a chess set! Arrgh! I only had about 12 hrs, assuming a little time for some sleep before I left. So it was time for a revised plan …
The new ShopBot Software, which is just released, has a feature for the Indexer that allows spinning it at relatively high speeds, independent of what the tool is doing. This feature means you can treat the indexer like a manual lathe that is just set to spinning – then use of the rest of the ShopBot to cut a profile over the spinning work-piece. My plan became to utilize this feature to “turn” a more conventional chess set – in a way that it could happen much more quickly than my original plan for fully-indexed, carved pieces.
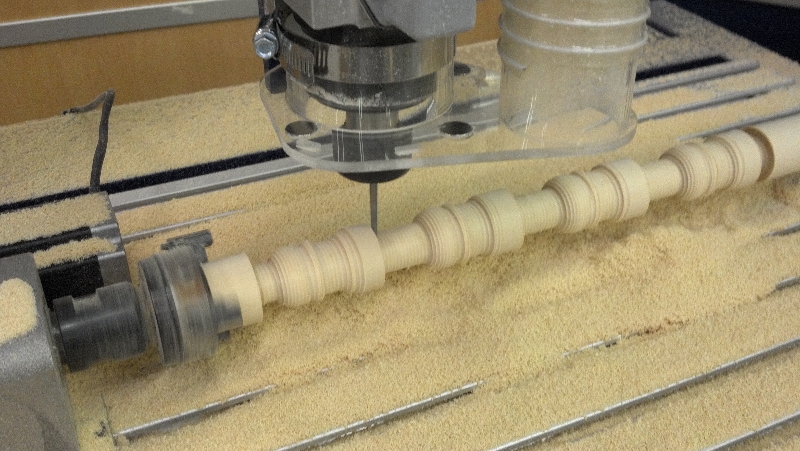
Using Indexer to Turn Chessmen
To describe the process simply, one starts the Indexer spinning – then runs the profiling toolpath across the longitudinal axis on top of it. Simple concept, but you might ask right off the bat, how does one get the profile toolpath? Well, the answer is “any way you can …”; but one easy way is with the “Flipper” feature under [T]ools in the ShopBot Software. Draw or trace your profile in X and Y in PartWorks and output a toolpath that is offset from one side of it using a ball-nose tool of the same diameter you will use for the turning. Now use “Flipper” to turn the profile into an X & Z or a Y & Z file (hint: before you run the Flipper; remove all the extraneous tool info at the start and end of the file so that you just have the profile motion – depending on what post-processor you are using, there can be a lot of distracting lines of code for the Flipper).
Once you have a profile of toolpath file, you can start the indexer running using the new [M]ove [I]ndexer instruction for setting the Indexer spinning parameters (note: use MI, 0 to turn the Indexer Off; or the shortcut CTL-I; CtL-I will also toggle back on at the last speed). Then, with the tool positioned for the profile, start the carving process with FP. In my case, I started with passes high over the turning. Then you make subsequent passes, lower and lower until you reach the desired depth of the profile.
You can do this programmatically, as I show in the following Partfile.[ WARNING … what follows, is somewhat advanced CNC programming, but if you’re even a little comfortable with the code inside a Partfile, you should be fine with this, and you’ll be able to use this sample file as a template.]
Before I describe the details, I need to say that I have little experience with traditional turning. So I really had no idea of where to start with feeds and speeds — how much material I should take off in a pass, how I should arrange the step-over in relationship to spinning speed … and so on. Here’s what I worked out, but I’m sure there are better ways to do it … it’s worth some experimenting for your own project.
I figured that since I was using a 1/8” bit (a tapered ball-nose), I probably wanted to do the cutting in multiple passes. I also figured there would be a trade-off between how quickly I moved down the piece (for efficiency) and how smooth (for quality) the cut would be. I decided on making the passes that got me down to near the final depth relatively rough, and then do a high-resolution, finish pass, once I was near the final depth.
Here’s the Partfile a came up with to automate moving the profile down through the part. I’ve made extensive comments in the file. And then, further down this article I walk you through it and explain an alternate method.
 ‘File for Profiling Chessmen (4 pieces at a time on a 14” length of 1.5” dowel)
 ‘    set up for Desktop Indexer
 ‘    Zero X & Y centered, at start of dowel; Z at Indexer Center
 ‘    (*but see alternate method for setting up plunge)
 ‘Starting up
   &depth = 0.7       ‘This defines a variable for plunging
   MI, B, -1, 120     ‘Start Indexer SPINNING; B-axis, counter-clockwise, 120-RPM
 ‘   uses [MI] Command in new software version
SO, 1,1 ‘Turn Router/Spindle ON
MS,.1, .1 ‘Use relatively slow move speed for profiling down part
Start:                ‘Beginning of my “loop” for repeated profiling
   JZ, 0.7            ‘Make sure I pull to full height before positioning
   J2, 0, 0           ‘Go to Start Position for pass
   MZ, &depth         ‘Move to depth; first pass is at top of part as a check
FP, chess01_flipped.sbp,,,,,1 ‘*Call flipped part profile; ** with 3d OFFSET
MZ, .7 ‘Pull back up at end of profile run
   &depth=&depth-.05  ‘Subtract from variable for NEXT PLUNGE Depth
   IF &depth < .12 THEN GOTO Finish  ‘If we’re at finish depth, goto finish pass
   GOTO Start         ‘Otherwise go back to start for next profile pass
 Finish:
   JZ, .7             ‘Position for Finish Pass
   J2, 0, 0
   MI, O, 1, 0        ‘Cancel Current Indexer Spinning and wait 5 sec
   PAUSE 5
   MI, B, 1, 240      ‘Set new Finish Spinning; Clockwise, 240-RPM
 ‘*The following 2 instructions set an extremely slow move speed, see notes
   VU, 4000, 4000, 4000, 4000, .05, , , .25, 33.33333,  1,  1,  1,  1,  1,  10
   MS, .25, .5        ‘Because of timing multiplier above, speed is .025, .05 IPS
 'Finish Pass
   MZ, 0.140          ‘Set Finish Pass Depth
FP, chess01_flipped.sbp,,,,,1
   MZ, .7             ‘Back to top
   SO, 1,0            ‘Spindle OFF
  ‘*RESTORE Normal Timing Multiplier
   VU, 4000, 4000, 4000, 4000, .05, , , .25, 33.33333,  1,  1,  1,  1,  1,  1
   MS, 1, 1
   JZ, 1
   J2, 12, -4         'Pull Back
The idea here is that we align the XY axes over the dowel, then create a loop that sequentially moves down into the material by decreasing the &depth variable after each profiling pass. I picked a set of speed parameters here that seemed to work for the rough cut in which I plunged down to near the final depth (see video). I just guessed at this after a little bit of practice spinning/cutting – 120 RPM, with a feed rate of .1ips.
In this set of passes, I just ran the same profile, over-and-over, stepping it down into the part by changing the variable and calling the profile with [FP] set for 3d-offset (that’s the purpose of the “1” after the 5 commas in the command sequence). Note in the picture, that at the end of this sequence of rough passes I was left with a distinct turning pattern on the part because the step-over to federate ratio was not very fine (see image).
This is where the finish pass comes in. I made this last pass only slightly deeper, following the same profile, but at a much slower XY lateral speed and at a higher spinning rate (video 2). This pass left me with a nice smooth part. It was ready for a bit of final finish with fine sandpaper, which can be done while the indexer is spinning at high speed.
NOTES on NEW INDEXER SPINNING FEATURE:
– You’ll be able to use this feature and the new software ONLY IF you have a version V201 or later ShopBot Control Card (last 5 years of PRS tools and upgrades; this Control Card is available for older ShopBots and affords a number of performance enhancements, if you don’t have it)
– The software speed range for spinning is from about 3 to about 300 RPM. But the min and max spinning speed for your Indexer will depend on a number of factors such as unit value and power of your specific Indexer motor … just experiment with increasing/decreasing speeds to determine where your tool tops out
Finished Chessmen
Leave a Reply