Daylight Method
One of the handiest things we can learn from big iron machines with Automatic tool changers is how they keep track of multiple bit lengths in up to a dozen tool holders. Even tho most of us do not have ATC’s, there are some real advantages to implementing a method to zero or rezero the bit other than using a Zzero plate. One of these advantages is the ability to store the setting so that the bit can be re-zeroed in case of power off or failure, loss of position or an error that causes you to have to restart a file.
If you have an accessory such as a drill or second Z added to your machine you will find even more uses for storing daylight values of different tools in each of your axes. If you have multiple Z’s and/or drills the advantages become exponential. Another advantage is being able to zero all bits to the spoilboard and have the post processor add the material thickness to the file as an offset. This will allow you to change and re-zero bits off the material to a location on the spoilboard. This can add accuracy and eliminate errors caused by zeroing to an area that is removed before a second bit is installed. It can also eliminate errors caused by materials that bow or warp during removal of material between roughing and finish passes. Drill users can eliminate the use of the drill offset file after a bit change by using a simple formula that compares the daylight value before and after a bit change. Having an upper limit allows lifting the Z to its maximum height to clear clamps and other obstacles on the table.
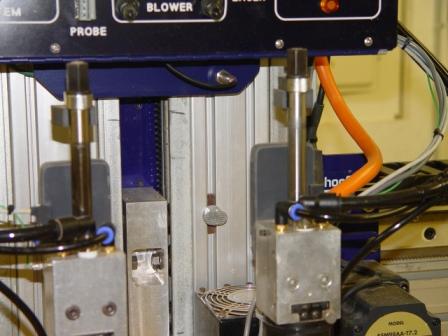
Even though most of the real work of the Daylight Method is done behind the scenes in the SB3 software, you will have to add a proximity switch to your Z (and A if you have one) axis. For the PRS I highly recommend the version sold by ShopBot. These prox switches have a long wire and have been specifically manufactured to be compatible with the newer control boards. PRT models use a different configuration and there are a number of good sources for them. You will need to fabricate a bracket that places the prox trigger point about 1/8” below the hard stop at the top of the Z travel. Here is a picture of a prox switch and trigger bolt mounted on my machine:
Mounting a prox switch on the vertical axis allows the same positional accuracy for the Z that we have for the X and Y axes. The X Y zero routine uses stored offsets to set the 0,0 location. The daylight method uses the same principal to record the distance from the prox to the table surface. This is accomplished by “bumping” the prox switch after a bit zero and recording that value to the my_variables.sbc file. This is the file where all similar values specific to your machine is stored. I used the syntax from the Zzero file to lift the Z axis to the prox and record the height. Here is an example that works on my machine, but care should be taken to adapt this to yours:
LIFT_Z:
ON INPUT (7,0) GOSUB TOP_Z
JZ,12
PAUSE .1
RETURN
TOP_Z:
ON INPUT (7,0)
PAUSE .1
&z_top = %(3)
Pause .1
MZ, (&z_top – .5)
RETURN
After the “&z_top” variable is stored then it should be “written” to the my_variables file. Here is an example of a subroutine that follows the syntax of the drill offset file and writes the stored variable to the file. Note that the variable must exist in the file prior to this sub being used.
WRITE_TOOLS:
&name = “c:\SbParts\TempVar.txt”
OPEN &name FOR OUTPUT AS #1
WRITE #1;”&z_top = “; &z_top
CLOSE #1
PAUSE .5
Shell “C:\SbParts\Custom\MyVars.exe c:\SbParts\TempVar.txt”
PAUSE .5
RETURN
If you were to use the above action after you zeroed your bit and wrote the &z_top variable to your my_variables file, if you lose Z position you can recall the &z_top height and apply it to the Z location the same as you apply your stored offsets for the X and Y. This would be as easy as writing a file to bump the Z against the prox and lowering .5” like above and then, using the VA command, assinging the value of “&z_top-.5) to that location.
If you use a lot of fixtures and clamps to hold irregular materials as we do, you can use the prox to ensure that the Z is lifted to its maximum height for rapid moves, or even a Jog Home. We have included this “Lift Z and A” into may of our custom routines. Some examples are: The beginning of our warmup file, before we zero the X & Y and before we send the gantry to our park location for sheet change during sheet cutting. I am sure there are as many variations as there are ShopBotters that implement the prox. In any case, I am sure that it will be a valueable tool for all that choose to use it.
Leave a Reply