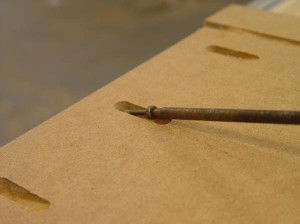
 Occasionally when assembling our cabinets we need to install pocket hole screws for a blind screwed connection. Cutting the screw pockets on the ShopBot is a natural progression from cutting the panels and then moving them to a pocket machine. Commercial pocket machines use an angled drill bit that plunges laterally into the material face. This gives a fairly decent looking pocket with an angled bottom that helps align the screw properly. We are looking to eliminate the time required for moving the material to the pocket cutter, plus that of the operator to cut the pockets by cutting the pockets on the ShopBot.
The typical screw pocket is 1.5” long, 10mm wide and a little over 10mm deep. Many of the cabinet cutting and nesting software programs simply plunge the bit to cutting depth and move in the required direction, which results in a square, rather than tapered bottom. You could add these to your cabinet drawing files as a 1.5” long vector or rectangle that you toolpath to the required depth. After cutting a job using this method I decided to find a way to cut the tapered bottom pockets. There are also ways that you can “trick” the 2.5D design software to cut the tapered bottoms. You could also edit the parts file to a 3 axis move. Since I am working towards a goal of not drawing any rectangular cabinet components prior to cutting, this pocket hole cutting module will be a step towards that goal.
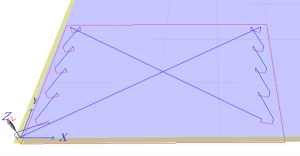
I have found that for my use, a 3/8” mortise compression bit works best for pocket holes. I wrote a part file that uses inputs for setting the bit diameter, panel length, width and thickness, along with the number of pockets and distance from the edge. It will cut tapered depth screw pockets and cut the panel to size (if you wish) without drawing. This allows us to cut our components with only a few seconds of machine down time. The following illustration shows a 24” by 15” panel in preview mode with 10 pockets and an outside profile cut:
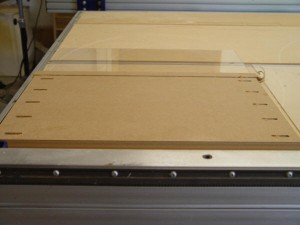
Here is a picture of the mdf panel just after cutting:
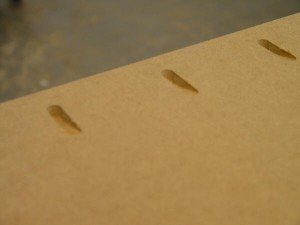
A close up of the angled pockets:
How to Use this File: (download the zipped file here)
Note: Bit must be zeroed to the top of material prior to running this file.
To cut pockets only in a panel of known size, set the panel at the 0,0 position and run the file. You will need to fill in the required inputs to complete the cutting operations. If this is the primary way you intend to make use of the file, you may want to modify the file and remove the bit diameter and trim to size options. This will decrease both cutting time and “clunky” menu lines.
To cut pockets and then trim to size, set an oversized piece of material a small distance to the negative in both X and Y. Fill in the inputs and you will have a pocketed and cut to size panel.
Another option is to use the fill in sheet and run the file in 2D offset mode. This will allow you to cut a group of pockets anywhere on a sheet or panel.
If you are drawing your cabinet parts using V Carve Pro or Parts Works you can add tapered pockets to your drawings by the following method. Unless you modify the file to fit each panel size, you will still have to enter the input lines for each size. The file will pause to allow this.
1) Draw your cabinet part as usual.
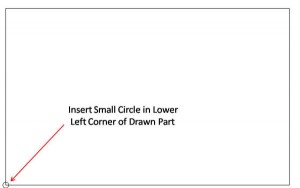
2) Place a small circle centered on the lower left corner of the part.
3) Select the circle and toolpath it using a drilling toolpath.
4) Save that toolpath using the “ShopBot Drill” postprocessor. Set the tool number to “2”
Note: you must make sure that the X & YindrillOffset variables are set to 0 (zero)
5) Open C:\SbParts\Custom. Save a copy of the “Custom8.sbc” file as Custom8.OEM (or any other name) for a backup. Open your editor to a new file and enter this line:
FP, (NAME OF THIS FILE).sbp, 1, 1, 1, 1, 2, -0.00, 0, 0, 1, 1
Save the file as Custom8.sbc in the default location.
6) This file will now run in 2D offset mode in every location that you placed a circle.
7) I would recommend commenting out the bit diameter and trim to size input lines prior to using this in the Custom8 file. This will allow you to toolpath your part cutout with VCPro/PWks in your normal fashion.
As with all untested parts files, you should air cut with it before running with a cutting tool. If you use the trim to size option, the machine will cut the panel at 2ips full depth 1 pass. You may have to adjust the cutting speeds and depth per pass to fit your machines cutting abilities. In any event, if you don’t feel comfortable modifying a parts file, this may not be for you. If you have a PRT drill installed on your machine, you will need to select another custom file number and modify the post processor to reflect that number change.
A few notes on the ShopBot Drill post processor. For those that don’t wish to hand code master files full of 2D offset subfiles, this may be one of the most versatile tools you can use. Vectric has graciously allowed us to modify (at our own risk) our ShopBot post processors. The Vectric ShopBot Drill post processor (used to operate the air drill on a PRT) can be used within a VCPro or PWks drawing file to travel the machine to a specific location (center of a circle) and call up and run a custom cut file. Make sure that you use the 2d offset parameters as shown above. To benefit from multiple custom callups, you will have to build a postP for each one. David Buchsbaum explains this in his column: http://www.shopbottools.com/notes_from_the_sandbox.htm#Customizing
If you have a machining file that you use fairly often, whether it is a special part, RTA fittings as David does, cabinet hinges, drawer slides, hanging slots, a speaker hole with mounting recess, or any other operation that you do repetitively, instead of drawing or copying and pasting in parts, consider just setting a circle on the drawing and use a modified postP and Custom cut file to do the job. You will, of course, have to make a part file that assumes a 0,0 start, cuts your part and retracts the tool before you can use it in 2D offset from a custom cut file.
Leave a Reply