 For quite a while now I have been using the outputs from my PRT Alpha control box to control equipment in my shop. By equipment, I mean my cyclone dust collector, vacuum motors etc. I find that by editing my post processor in PartWorks to automatically add the proper SO commands to my part files I can make things happen, or make sure I have not forgotten something quite useful. If you think this might have an application in your shop, read on.
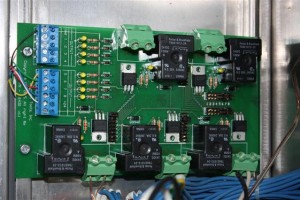
The outputs right off of the control board are not able to handle the voltage or current loads of the equipment I want to switch on and off. This would require me to add a device to the outputs that can handle the loads. My first thought was a solid state relay or to cobble together a driver transistor circuit to in turn activate a relay with the properly rated contacts for my load needs. While gathering the parts needed and deciding on how I wanted to build this, I found the ShopBot Relay Board. This relay board is already built, and is plug and play! After a phone call to ShopBot, the relay board was in my hand and I began to realize that ShopBot had put more thought into this Relay Board than I was going to build into mine. This board will allow you to jumper select what output controls which relay. This will allow for a very easy to configure system.
Enough excitement, let’s get down to business and install the board and get things connected. First you will slide the Relay Board into the rear slot that the control board sits into. Then you will install two screws into holes in the front of the Relay Board. Finally you will plug into the cable from the Relay Board into the Output switch connector on the Control Board. That’s it, all installed and ready. On the relay board there is a bank of jumpers next to each relay. These jumpers select what Output will control what relay. There is also a LED on the board to show you what relay is active.
Next I decided to wire up my vacuum motors to the control board. Since I am running four motors, I wanted to wire up two to one relay and the other two to the next relay. This way I am keeping the load within tolerance of the relays contacts. I first jumpered two relays to operate on the same Output signal from the Control Board. This is done by moving a jumper. Next I ran my wire and connected it to the very nice screw terminals on the Relay board. Then after finishing up the rest of the wiring external to the Control Box, I switched on power and tried it out. With the ShopBot Control Software running I can now hold the Alt key and push the 5 key and turn on output 5 and my vacuum motors run. By holding the Alt key down again and pushing the 5 key I turn off output 5 and my vacuum motors stop. Next I decided that I should have the ShopBot control the dust collector as well. After wiring that unit up to another output, 6 in my case, I verified it worked correctly. Now I have all of this wired up and working so let’s move onto the post processor editing to make all of this happen automatically when I run a file.
I remember reading David Buchsbaum’s article on editing the post processor some time ago so I found it and reread it. The article is found in David’s column, Notes from the Sandbox. Next I opened up the post processor and took a look around. After seeing how commands are written I decided to put mine in and see how it worked. Here is what I did and why:
By adding the below commands, I can turn on my vacuum motors and wait one second for them to come up to speed:
“SO,5,1”
“PAUSE,1”
Next I want to turn on the dust collector so I added the following:
“SO,6,1”
The next three lines will simulate me pushing a button by closing output 8 for one tenth of a second and opening it:
“SO,8,1”
“PAUSE, .1”
“SO,8,0”
Then by adding the below lines I can turn everything back off when the file is finished:
“‘Turning router OFF”
“SO,1,0”
“SO,6,0”
“SO,5,0”
By using the Relay Board I was able to get all of this done and still have relays free for some future use. In my setup I also have switches on the wall to start the dust collector and my vacuum motors without having the ShopBot do this for me. I hope some of this will inspire you to learn more about your ShopBot. Use any of this information at your own risk. It works for me in my shop doing things my way. It may not be the way you want to do things and this is not the only way to do this.