Why not use the ShopBot for all my panel cutting? Mainly because I’m just not there yet with my software, panel hold-down system or spindle.
That was me about a year ago. I’ve been purposely taking baby steps towards using the Shopbot for all my sheet cutting needs as I pretty much have to do it all myself and any time spent on R&D or machine maintenance/improvements is time I can’t spend producing cabinets (read: earning a living). As I wrote last October, I started with the vacuum table, which has been a huge success. Not that I’m not already thinking about improvements and what I might do differently next time, but it works well as-is, and my only regret is not taking the time to install a decent vacuum table sooner. But shortly after writing the installment detailing how I was purchasing pre-ripped and edgebanded melamine strips for my closet client, I made the plunge and tried machining a couple of small jobs entirely on the ‘Bot. Well, to get right to the point, I haven’t looked back. Even though I still lack full-featured software that can take my designs from “screen to machine” I already find it so much easier and more productive to do all my cutting and machining on the ShopBot than on the tablesaw/linebore/etc. that I now have a hard time imagining cutting a full sheet of plywood or melamine on the tablesaw.
So, of the three obstacles I mentioned, the hold-down system is taken care of, and I’m still using a Porter-Cable router – it’s loud and the bearings need regular replacement but it gets the job done. I’m getting much closer to being ready to order a spindle. That leaves the software. I’ve had several inquiries from folks who want to know if I’ve found a program that works for me, but unfortunately I still don’t have a real good answer for them. We all know there are numerous programs out there that will set you back as much or more than the cost of the Shopbot, and quite frankly, if I found one tomorrow that would work for me in every situation it would be worth the price of admission by saving me hours on every job. It’s not so much the cost of the software alone that is holding me back, but the time investment required to evaluate all the options out there and then to get up to speed on whichever one I choose. Just as the purchase price of the Shopbot doesn’t tell the whole story of how much it costs to get one up and running and get familiar enough with it to make it profitable, the time required to decide which software to buy and then learn how to use it would cost me as much or more than the cost to buy it. So for the time being I’m using my trusty DesignCad to manually draw and nest my parts and VCarve Pro to create the toolpaths for each sheet. As with anything, the more I do it the faster I get. I’ve saved a library of drawings so I can quickly bring up a drawing that has all the parts required to build a typical cabinet, arranged in such a way that I can easily stretch all the horizontal parts to correspond to the width of the cabinet, then cut and paste those parts into a drawing that represents blank sheets of material. I find that I can nest those parts onto the sheets as well as if not better than most nesting programs I’ve seen, although I admit it will take me longer than a decent nesting program would take. I created a macro for DesignCad that automatically exports each layer of each sheet into a separate .dxf file for importing into VCarve. The process of creating the toolpaths in VCarve is so repetitive (and so reliable) that I showed my 13-year-old daughter how to do it and now (when she has the time) she takes care of that part of the process for me.
 All the parts for a basic cabinet. It would take only a few seconds to resize as needed to adjust width, depth or height; or to add, remove or modify parts. |
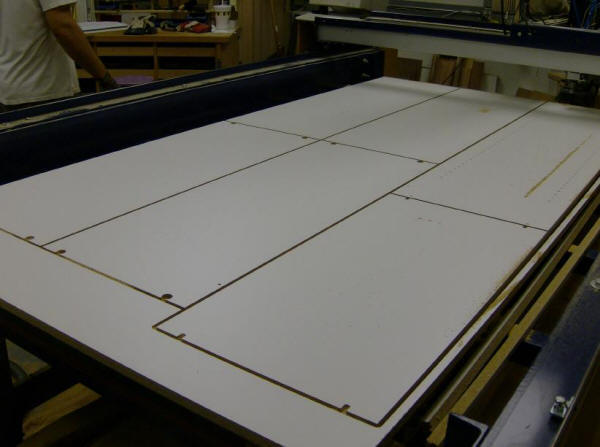
 A typical sheet of parts ready for toolpathing. As long as all the parts get cut, there is no need for parts of a single cabinet to all be on the same sheet. |
I’ve worked out a pretty good system for creating clean, consistent parts from most sheet materials. I’m mostly cutting ¾” two-sided melamine-coated particleboard, but I use the same techniques for veneered MDF and plywood. First of all, I use a ¼” compression spiral router bit which leaves clean surfaces on both the top and bottom faces of the board. I could easily cut all the way through in one pass, but if I do I’ll have a problem when I get to the last few parts of each sheet. Since they won’t have the hold-down force of the entire sheet to keep them still, they would shift and lose the vacuum seal. So I cut everything in two passes. The first pass leaves a “skin” of .02” – just a little more than the melamine coating. The entire sheet is cut with this first pass before the second pass cuts through the material and .012” into the spoilboard. In addition, I have to take into account that the machine, like all things mechanical, has just a little bit of “give” to it, which can mean that two identical parts might not end up identical depending on several factors. First is that a climb cut can yield different results than a conventional cut, since climb cutting has a tendency to pull the bit away from the part during cutting while a conventional cut tends to pull the bit towards the material. We’re not talking a lot of difference, but it’s enough to notice and it’s not hard to compensate for. Secondly is that in order to minimize waste and sawdust, I want to place the parts as close together as possible on the sheet. So, when cutting the first part the bit is fully engaged in the material for the entire cut, but when cutting the adjacent part the bit is mostly traveling in the kerf that was cut for the first part. This creates a different amount of sideways force on the bit which can also leave a noticeable difference in size between the two parts. So what I do is leave an allowance of .02” on the first pass (the first pass cuts the part .02” oversize on all sides), using a climb cut to make sure the bit is not being pulled towards the part. Then once all the parts have been roughed out slightly oversized with the first pass, the second pass cuts the parts free from the sheet, to the final correct size, using a conventional cutting direction. This technique yields uniform, proper-sized parts since the sideways force on the bit is consistent on all sides of all the parts.
A few more details complete the story. On all but the smallest parts I’ve found that I can space the parts .30” apart – that’s .25” for the bit diameter, .02” allowance for the finish pass on each part, plus an extra .01” to make sure that the first part’s first cut, which is the climb cut, does not encroach on the adjacent part’s .02” allowance. I also place parts no closer than .30” to the edge of the sheet, to be sure to remove the factory edge and not cut into the stops which I’ve bolted to the edge of the table to aid in sheet placement. For smaller parts such as rails which are typically only 4” wide and can be less than 20” long in some cases I leave a full inch between them and the next closest part. This leaves a skeleton of waste material surrounding each small part which helps keep those parts from moving during the final pass. If I had a more powerful vacuum system I probably would not need to do this. It’s worth mentioning that even with a pretty decent dust collection system the kerfs tend to stay full of sawdust even after the second pass is complete. This is due to the fact that the compression bit has only a short upcut segment on the end and is mostly comprised of downcut geometry. Although it leaves more dust on the table to be cleaned up between sheets, it works in my favor to preserve the vacuum seal even towards the end of the second pass. As for cutting speeds I’ve found I can run the router at 6ips for both passes for about the first 15 sheets or so, then once the bit has some wear on it I have to slow the first pass down to 4ips or the router sounds like it wants to bog down a bit. I’m hoping once I upgrade to a spindle I’ll be able to maintain the faster speed if not increase it some. I can usually get 25 sheets or more from a bit, which I then save for less demanding cutting like raw MDF or thinner materials. For veneered MDF I keep the speed at 4ips from the start as the router doesn’t like the faster speed in the denser MDF core. Also, any machining such as pockets, grooves, holes, etc. is done before the parts are cut out from the sheet to ensure that the parts cannot move during the machining process.
 A sheet of closet parts ready for edgebanding. All machining except for edgebanding is done on the Shopbot – grooves, holes, notches, cutouts – whatever. |